 Christmas Mega Sale – Enjoy Up to 50% OFF on Every Plan!
Getting Started
Getting Started
Introduction
Download W3Speedster
Downloading W3Speedster
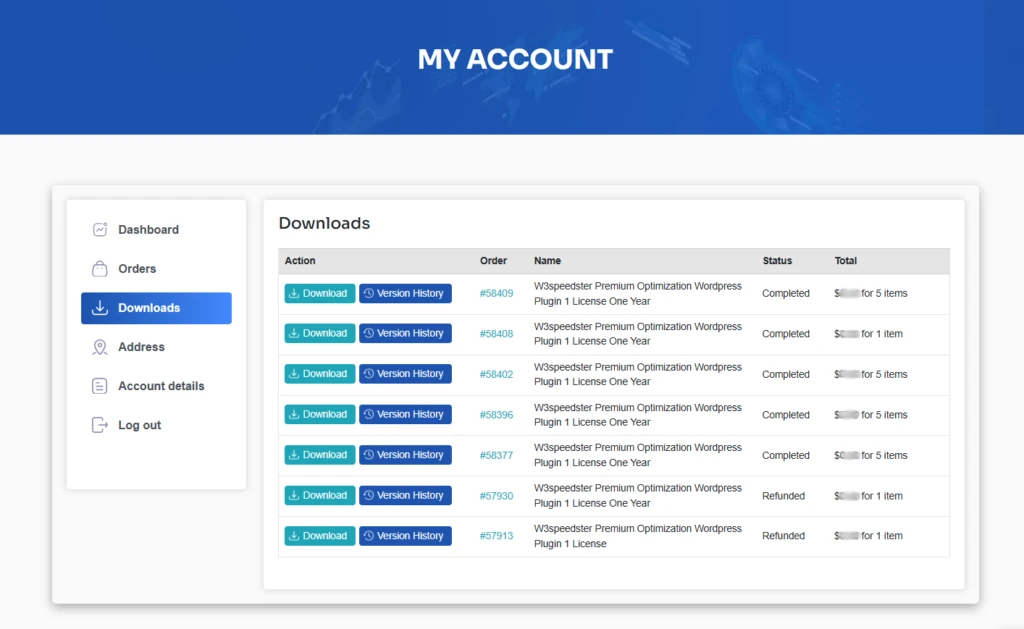
- After purchasing W3Speedster, you can download the ZIP file from your W3Speedster Account Dashboard, email, or from the order received page during checkout.
- To download it from my account, navigate to: My Account (login required).
- Locate the most recently purchased order and click Download.
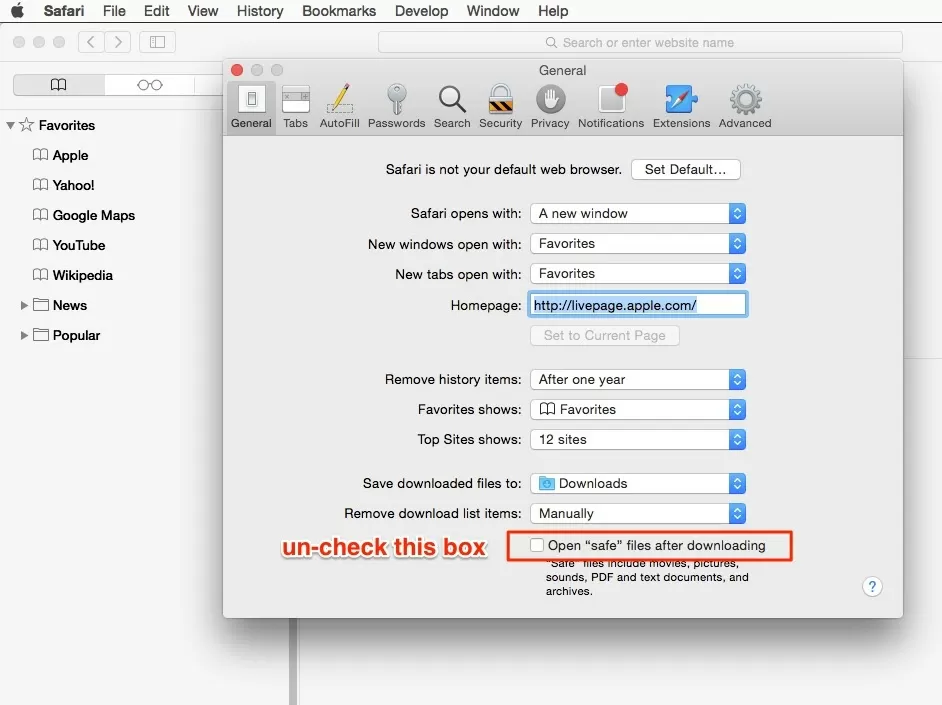
Safari Users – Important Notice
Safari may automatically unzip .zip files upon download, which prevents you from uploading the plugin.
How to Disable Automatic Unzipping in Safari
- Open Safari.
- Go to Safari > Settings (or Preferences, depending on your macOS version).
- Under the General tab:
- Uncheck the option: “Open ‘safe’ files after downloading.”
- This ensures that the plugin file remains in .zip format after downloading, which is required for installation.
- Now you can download the zip file normally and proceed with the installation.
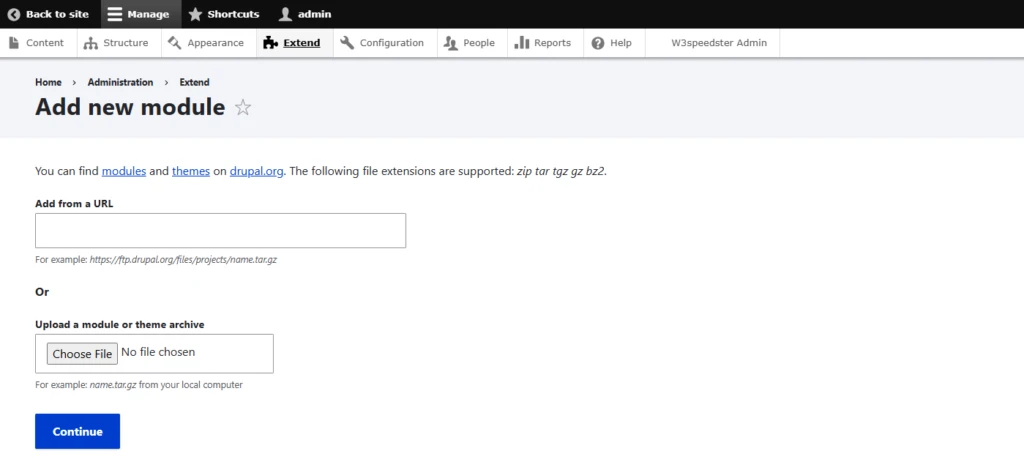
Installation W3Speedster
- Go to Extend:
- Log in to your Drupal site as an administrator.
- Navigate to Manage > Extend.
- Install New Module:
- Click on the Install new module button.
- upload it from your computer.
- Click on Install.
- Enable the Module:
- Once installed, you will be redirected back to the Extend page.
- Find the newly installed module in the list and check the box next to it.
- Click the Install button at the bottom of the page.

Updating W3Speedster
- Go to Update:
- Log in to your Drupal site as an administrator.
- Navigate to Manage > Reports > Available updates.
- Check for Updates:
- Click on the Check manually button to ensure you have the latest update status.
- Update the Module:
- If updates are available, click on the Update tab.
- Select the modules you want to update and click on the Download these updates button.
- Follow the prompts to complete the update process.
Additional Tips
- Backup: Always backup your database and files before installing or updating modules.
- Maintenance Mode: Consider putting your site in maintenance mode while performing updates to prevent any disruptions to your users.
- Drush: Drush is a powerful command-line tool for managing Drupal. Installing and using Drush can streamline many tasks.
Can’t upload/install W3Speedster
1. Check Compatibility
- Drupal Version: Ensure the module is compatible with your Drupal version.
- PHP Version: Check if the module requires a specific PHP version.
2. Read Error Messages
- Details: Carefully read the error message displayed. It often provides clues about what went wrong.
- Log Messages: Check the log messages by navigating to Reports > Recent log messages.
3. Clear Cache
- Drush: Clear the cache using Drush:
drush cr - Drupal UI: Navigate to Configuration > Development > Performance and click Clear all caches.
4. Check File Permissions
- Ensure that the file and directory permissions are set correctly.
find . -type d -exec chmod 755 {} \;
find . -type f -exec chmod 644 {} \; - The web server needs write permissions for the
sites/defaultdirectory.
5. Manually Download and Install the Module
- Download the Module:
- Download the module from Drupal.org and extract it to the
modules/contribdirectory.
- Download the module from Drupal.org and extract it to the
- Enable the Module:
- Enable it using Drush:
drush en module_name - Or via the Manage > Extend page in the Drupal UI.
- Enable it using Drush:
6. Check PHP Error Logs
- Inspect the PHP error logs for any issues. The location of the logs depends on your server setup:
- Apache: /var/log/apache2/error.log
- Nginx: /var/log/nginx/error.log
- Local Development: Check the error logs in your development environment (e.g., MAMP, WAMP).
- Apache:
7. Disable Conflicting Modules
- Conflicts with other modules might cause issues. Try disabling other modules that might be interfering.
8. Update Drupal Core and Modules
- Ensure that your Drupal core and all other modules are up-to-date. Use Composer for updates:
composer update
drush updb
drush cr
9. Check .htaccess and Settings.php
- Ensure that
.htaccessandsettings.phpare correctly configured and have not been altered incorrectly.
10. Consult the Module’s Issue Queue
- Visit the module's page on Drupal.org and check the issue queue for similar problems and possible solutions.
Getting Started with W3Speedster
Post-Integration: Initial Performance Testing
After integrating W3Speedster into your Drupal site, it's recommended to conduct a baseline performance test to assess the immediate optimization impact.
Step 1: Run a Default Settings Test
- Complete the W3Speedster integration into your Drupal installation.
- Measure your site’s performance metrics before enabling any optimization (e.g., using Lighthouse, GTmetrix, or the Drupal Performance module).
- Enable Recommended Default Settings from the W3Speedster configuration panel.
- Re-run the performance test after enabling the default settings.
- This helps you benchmark the default optimization benefits and understand W3Speedster’s initial performance gains for your Drupal environment.
Step 2: Optional Advanced Testing (For Technical Users)
For developers familiar with Drupal’s rendering pipeline, W3Speedster supports deeper optimization via manual adjustments.
You can enhance performance further by:
- Utilizing diagnostic tools such as:
- GTmetrix
- Pingdom Tools
- Google PageSpeed Insights
- Analyzing reports to identify bottlenecks in your Drupal site's:
- Block Level rendering times
- Asset loading sequences
- Render-blocking resources
- Server-client delivery overhead
- Applying W3Speedster’s advanced settings alongside Drupal-specific strategies:
- Delaying non-critical scripts
- Deferring or inlining CSS
- Fine-tuning cache types and full-page caching (FPC)
- This step is ideal for complex Drupal applications, multisite setups, or performance-intensive content-driven sites.
Step 3: Interpreting Performance Test Results
To get accurate and consistent results, follow these best practices:
- Stick to one testing tool for consistency (e.g., only GTmetrix).
- Run three consecutive tests on the same tool.
- Take the average of the three results for a more reliable benchmark.
Are there any recommended settings for W3Speedster?
Yes, W3Speedster provides a set of pre-configured recommended defaults—designed as a "fast track" to achieving a(Way to 90+ on Google PSI) and similar performance benchmarks.
However, the optimal setup can vary based on your Drupal site's architecture, including:
- Frontend stack (e.g., Classy, Stable, or custom themes)
- Custom modules and contrib dependencies
- Hosting environment (shared, managed, or containerized)
- Content structure, such as:(e.g., Image-heavy pages, Real-time integrations (e.g., Webform + AJAX), Heavily cached versus dynamic content)
Features That Work Automatically
Some of W3Speedster’s most impactful features are designed to be plug-and-play. Simply enable them, and they handle the rest automatically in the background:
- CSS Minification
- Reduces file size by removing unnecessary characters (whitespace, comments) from your stylesheets.
- Improves load time without altering the appearance of your site.
- JS Minification
- Strips down JavaScript files to their essential code only.
- Reduces execution time and enhances overall performance.
- WebP Support
- Automatically converts and serves images in WebP format, which is lighter and faster than JPG or PNG.
- No manual conversion or theme changes needed.
These settings are safe across most Drupal setups and require no advanced technical configuration.
Best Practice: Gradual Testing & Enablement
To ensure a stable and effective optimization process when integrating W3Speedster into your Drupal app, follow these steps:
- Begin with the recommended default settings to quickly achieve performance improvements aligned with Way to 90+ on Google PSI
- Incrementally enable advanced features, such as:
- Custom Code
- Exclusion
- Drupal-specific layout and observer integration
- Use performance tools (like PageSpeed Insights, GTmetrix, or Pingdom) after each change.
- If a feature causes rendering issues, disable it immediately and retest.
Automated Features (No Manual Configuration Required)
The following features in W3Speedster are fully automated once enabled, requiring no further setup:
- HTML Caching – Speeds up repeat visits by caching the HTML output.
- WebP Support – Automatically serves images in WebP format if the browser supports it.
- Image Quality Control – Optimizes images without visible quality loss.
- Lazy Loading – Defers off-screen images and iframes for faster initial load.
- CSS Minification – Removes unnecessary characters from CSS files.
- JS Minification – Shrinks JavaScript files for faster execution.
- Combining Inline & 3rd-Party Scripts – Reduces HTTP requests by merging JavaScript code.
- Combining Google Fonts – Merges multiple font requests into one to reduce loading time.
These features work silently in the background to improve performance without manual adjustments.
Settings Pane Structure
Use this section to locate specific settings in the W3Speedster dashboard:
HTML Cache Tab
- HTML Caching – Enable/disable full-page cache.
- Minify HTML – Remove whitespace and comments from HTML output.
- Cache Preload – Automatically preloads cache for faster first loads.
- Leverage Browser Cache – Instruct browsers to cache static assets.
- Gzip Compression – Compress site files for faster delivery.
- Query Parameter Handling – Control how query strings are cached
- URL Exclusion – Exclude specific URLs from being cached.
- Cache Path – Customize the directory path for storing cache files.
General Tab
- License Key – Enter your valid W3Speedster license.
- INP Issues – Tools and fixes to improve Interaction to Next Paint (INP) scores.
CDN Tab
- CDN URL – Add your Content Delivery Network (CDN) URL.
- CDN Exclusion – Specify which files or paths to exclude from CDN.
CSS Tab
- CSS Minification – Reduce size of CSS files.
- Combine Google Fonts – Merge font requests into fewer HTTP calls.
- Critical CSS – Generate and inline above-the-fold CSS.
- CLS Fixes – Tools to minimize Cumulative Layout Shift.
JavaScript Tab
- JavaScript Minification – Compress JavaScript files.
- Combine JavaScript – Merge scripts into a single file to reduce load time.
- Load JS via URL – Add custom JavaScript file URLs to be loaded.
Exclusion Tab
- Exclude JS/CSS/Images/Pages – Prevent specific resources from being optimized or cached.
- Preload Resources – Prioritize key files for faster loading.
- Lazy Load Exclusion – Define elements to skip lazy loading.
- Custom Code Injection – Add your own:
- CSS Code
- JavaScript Code
Cache Tab
- HTML Cache
- CSS/JS Cache
- Critical CSS Cache
Manage and clear caches individually for precise control.
Image Settings Tab
- Image Optimization – Automates image compression.
- Image Size Adjustment – Resize large images to optimal dimensions.
- Lazy Loading – Enabled by default.
- WebP Support – Converts images to WebP format.
- Image Quality Control – Adjusts image quality threshold.
Hooks Tab
- Predefined PHP Functions – Integrate custom logic using available hooks.
Web Vitals Log Tab
- Core Web Vitals Log – Tracks real-time metrics related to:
- LCP (Largest Contentful Paint)
- CLS (Cumulative Layout Shift)
- INP (Interaction to Next Paint)
What exactly does W3Speedster do?
W3Speedster is a comprehensive performance optimization solution for PrestaShop websites, designed to enhance site speed, server responsiveness, and user experience. It merges automated optimization tools with granular manual controls, making it highly adaptable to a wide variety of PrestaShop modules, themes, content types, and hosting infrastructures.
Key Features of W3Speedster
- CDN Integration
- Easily integrate any Content Delivery Network (CDN) to reduce latency and improve global load times.
- HTML Caching
- Generates static HTML versions of pages for faster delivery to users.
- Image Optimization
- Automatically compresses images and allows adjustment of image quality settings.
- Lazy Loading
- Delays the loading of below-the-fold images and iframes until the user scrolls near them.
- WebP Support
- Converts and serves modern WebP images for better compression and faster loading.
- CSS Minification
- Removes unnecessary whitespace, comments, and formatting from CSS files to reduce size.
- JavaScript Minification
- Minifies JavaScript files to improve script execution time and reduce load size.
- Defer Parsing of JavaScript
- Delay loading of non-critical JavaScript to prioritize visible content and improve LCP (Largest Contentful Paint).
- Serve Scaled Images
- Ensures images are appropriately resized and scaled to match their display dimensions.
- Avoid CSS @import
- Rewrites or inlines styles to avoid performance penalties caused by @import usage.
- Flexible Exclusion Options
- Selectively exclude specific CSS, JS, pages, images, or URLs from optimization rules.
- Google Fonts Optimization
- Combines and optimizes font delivery to reduce additional HTTP requests and FOUT (Flash of Unstyled Text).
- Delay JavaScript Execution
- Allows you to delay non-essential JavaScript (e.g., third-party scripts) until after user interaction.
Advanced Use Case Support
W3Speedster is engineered to function effectively in advanced PrestaShop use cases, including:
- Full compatibility with Twig templating, custom themes, and layout builder implementations.
- Works seamlessly with Drupal Commerce, multisite installations, and membership-based role systems.
- Offers granular configuration of: Page-level HTML caching and purging, Exclusions for admin pages, AJAX callbacks, or dynamically generated paths
Best practice
To ensure stable and effective performance improvements while using W3Speedster, it is strongly recommended to follow this step-by-step testing approach:
Step-by-Step Testing Procedure
- Enable options incrementally: Activate one setting at a time rather than enabling all features at once. This makes it easier to identify and isolate issues.
- Test in a non-logged-in session - After enabling each option:
- Open your site in a browser window where you are not logged in.
- Preferably use a private/incognito window to test.
- This ensures you see the site as a regular visitor would, bypassing any admin-specific behavior.
- Check multiple page types - Review different types of pages on your site, such as:
- Home page
- Blog or archive pages
- Product or service pages
- Contact or form-based pages
- If you encounter a display or functionality issue
- Disable the last setting you enabled.
- The issue will usually be resolved immediately after doing so.
Summary
Following this structured approach allows you to:
- Maximize performance gains with W3Speedster
- Minimize the risk of breaking the layout or functionality
- Confidently identify and roll back conflicting settings
HTML Cache
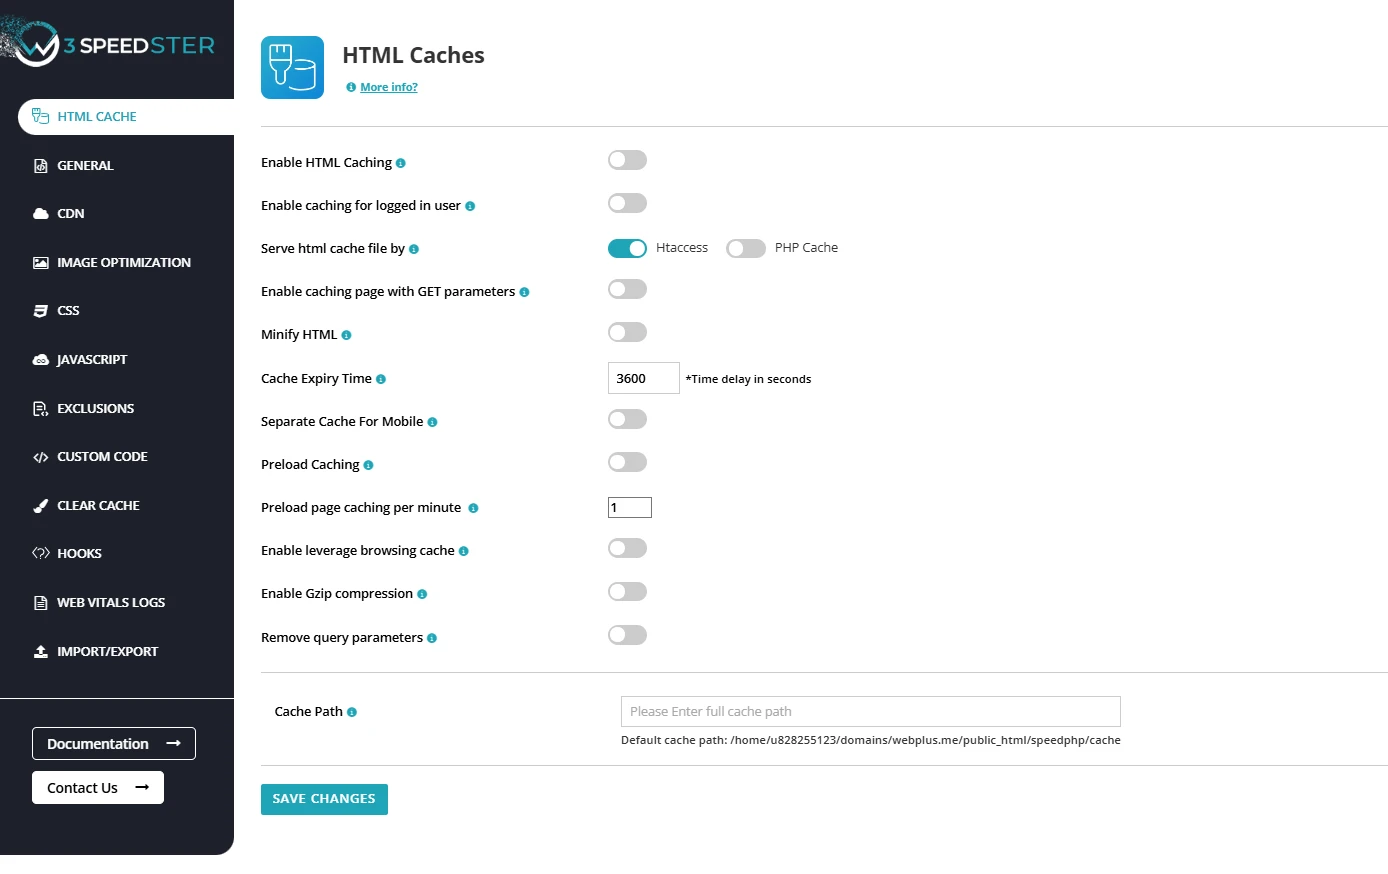
Enable HTML Caching
W3Speedster generates and stores static HTML versions of dynamic Website pages. These cached HTML files are served directly to visitors without executing PHP or MySQL queries, thereby reducing server load and speeding up page delivery.
- Upon the first request to a page, the plugin processes the page normally and generates a static HTML version.
- This HTML file is stored in the cache directory.
- Subsequent requests serve this static HTML file directly, bypassing the framework's core processing.
Enable Caching for Logged-in Users
W3Speedster enhances performance for authenticated users by enabling caching during logged-in sessions. This reduces the need to dynamically generate pages with each request:
- Upon login, the plugin continues to cache pages for authenticated sessions if caching for logged-in users is enabled.
- By default, many caching solutions disable this to avoid delivering personalized or sensitive data to unintended users. W3Speedster, however, offers the flexibility to allow it
- When a logged-in user performs an action such as publishing a post or updating their profile, the plugin automatically invalidates the associated cached HTML file. A new cache is then generated on the next request, ensuring users always receive the most recent content.
- For websites displaying role-based content (e.g., different layouts or access for subscribers and editors), W3Speedster supports per-role caching, serving role-specific HTML versions to preserve accuracy and personalization without sacrificing performance.
Serve HTML Cache File by
Feature:
W3Speedster provides two distinct mechanisms for serving static HTML cache files — via .htaccess or PHP Cache. These mechanisms enhance website speed by reducing server processing time and delivering pre-generated content directly to users.
Why We Need It
- Improve Performance: Serving pre-rendered HTML bypasses dynamic PHP execution, significantly reducing Time to First Byte (TTFB) and overall page load time.
- Reduce Server Load: By avoiding repeated processing of the same content, it conserves CPU and memory, especially during traffic spikes.
- Ensure Compatibility: Multiple delivery options allow site owners to select the method that best suits their server setup and hosting environment.
How It Works in W3Speedster
1. .htaccess-Based Cache Delivery
- W3Speedster modifies the .htaccess file (Apache/Nginx equivalent for rewrite rules) to include directives that intercept incoming requests.
- If an HTML cache file exists for the requested URL, it is served directly by the web server, bypassing PHP entirely.
- This method leverages the server’s native speed for static file delivery and is extremely efficient.
2. PHP-Based Cache Delivery
- W3Speedster uses internal PHP logic to intercept page requests.
- On each request:
- It checks if a cached HTML file exists for the requested page.
- If a cached file is found, it is served immediately at the beginning of the PHP execution cycle.
- If no cache is available, the request proceeds normally, and the output is cached for future requests.
PHP-based delivery is especially useful on servers where .htaccess modifications are restricted or where NGINX is used without rewrite compatibility.
How to Access
- Go to W3Speedster Dashboard.
- Navigate to the HTML Cache settings.
- Under Serve HTML Cache File by, choose “.htaccess” or "PHP Cache".
- Save changes.
Enable Caching Page with GET Parameters
Feature:
This option enables the caching of pages that include GET parameters in their URLs (e.g., example.com/page?param=value).
Functionality:
- When enabled, W3Speedster generates and serves cached versions of pages based on unique GET parameter values.
- Enhances performance for dynamic and content-rich websites, such as:
- E-commerce platforms
- Blogs with filters or query-based navigation
- Dynamic listing directories
W3Speedster Optimization:
- Handles parameter-based caching with precision to avoid excessive or inaccurate cache entries.
- Supports safe caching for parameter variations like:
- ?utm_source=google
- ?filter=color
Advantages:
- Maintains content accuracy while leveraging cache efficiency.
- Ensures quick delivery of parameterized pages.
- Prevents bypassing of cache for URLs that differ only by non-personalized query parameters.
Cache Expiry Time
Feature:
Cache Expiry Time, also known as Cache Lifetime, refers to the duration for which a cached HTML version of a page remains valid on the server before it is considered stale and needs to be refreshed or regenerated.
Functionality:
- W3Speedster allows you to configure the cache expiry duration manually.
- Set the duration in seconds (e.g., 3600 seconds = 1 hour).
- Cached HTML files are retained in the cache directory until the expiry time elapses.
W3Speedster Configuration:
- The default expiry time is set to 3600 seconds.
- This value can be adjusted based on:
- Frequency of website content updates.
- Desired balance between performance and data freshness.
Advantages:
- Ensures cached pages are served quickly, reducing load time.
- Automatically refreshes outdated cache, keeping content current.
- Provides a customizable approach to cache management tailored to dynamic or static sites.
Separate Cache for Mobile
Feature:
Enables separate caching and optimized content delivery for mobile and desktop users.
Functionality:
- W3Speedster analyzes the User-Agent string from the request header to detect the device type.
- Based on the detection:
- A dedicated static HTML cache file is generated for desktop users.
- A separate static HTML cache file is generated for mobile users.
Caching Process:
- Device type is identified server-side before PHP execution.
- The appropriate cached HTML file (mobile or desktop) is served according to the detected device type.
Advantages:
- Ensures optimized performance and layout delivery for different device types.
- Reduces load time by avoiding redundant content generation.
- Improves user experience by serving content specifically tailored for mobile or desktop use cases.
Clear Cache when Page or Post is Updated
Feature:
Ensures cached content stays synchronized with updates to your website.
Functionality:
- When a page, post, or custom post type is updated, published, or deleted, W3Speedster:
- Automatically removes the corresponding cached HTML file.
- Generates and stores a fresh cache version upon the next visit.
Extended Cache Clearing:
W3Speedster also clears associated cache files to maintain content consistency:
- Archive pages (e.g., /blog, /category/news)
- Paginated lists affected by content updates
- Homepage, if the updated content appears in recent posts
Advantages:
- Prevents outdated content, summaries, or thumbnails from being displayed.
- Ensures site-wide consistency and content freshness.
- Enhances user experience and site reliability without manual intervention.
Preload Caching
Feature:
Proactively generates static HTML cache files before user requests, improving performance from the first visit.
Functionality:
- W3Speedster automatically crawls and stores static versions of pages in advance.
- Cache generation is scheduled or triggered based on predefined criteria.
How It Differs from Traditional Caching:
- Traditional caching: Generated only on the first user visit, which involves PHP execution and database queries.
- Preload caching: Cache is pre-warmed, eliminating delays for first-time users.
Advantages:
- Instant page load for first-time visitors.
- Improved Time to First Byte (TTFB).
- Reduced server load during peak traffic.
- Better SEO, as search engines receive faster responses.
Preload Page Caching Per Minute
Feature:
Automatically refreshes cached versions of pages at set intervals to maintain content freshness and fast load times.
Functionality:
- W3Speedster supports configurable cache preloading intervals (e.g., every minute).
- Designed for high-traffic or frequently updated sites, such as news portals or live data platforms.
How It Works:
- Automatic Page Preloading: W3Speedster crawls and regenerates cached pages at fixed intervals, even if the page hasn’t been visited recently.
Benefits:
- Fresh content for first-time visitors: Ensures visitors always access the latest version of the site.
- Improved accuracy: Prevents outdated cache delivery, maintaining content relevance.
- Reduced server load: Keeps cache populated, minimizing PHP/database processing.
- SEO boost: Search engines crawl the most recent content, improving indexing and ranking.
Use Case:
- Ideal for sites with dynamic or real-time content, ensuring accuracy without sacrificing performance.
Enable leverage browsing cache
Feature:
Caches static resources in a visitor's browser to speed up page load times and reduce server load.
Functionality:
- Automatic Cache Control Headers: W3Speedster adds the necessary cache control headers to store static resources (like images, CSS, JS) in the browser cache for a specified duration.
- Optimized Server Configuration: Configures the server to support local caching without manual intervention.
Benefits:
- Faster Page Loads for Returning Visitors: Resources are served from the browser cache, improving load times on subsequent visits.
- Reduced Bandwidth Usage and Server Load: Less server data is transferred, minimizing bandwidth and reducing server load.
- Improved User Experience: Visitors enjoy quicker access to content, especially on repeat visits.
- Enhanced SEO Performance: Faster load times improve search engine rankings, boosting visibility.
Outcome:
- W3Speedster enhances both user experience and SEO performance by implementing leverage browser caching automatically, ensuring efficient content delivery and reduced load on the server.
Enable Gzip compression
Feature:
Reduces the size of files transferred between the server and the visitor’s browser to improve page load times and reduce bandwidth usage.
Functionality:
- Automatic Gzip Compression: When enabled, W3Speedster automatically compresses text-based resources (HTML, CSS, JavaScript, JSON) before they are sent to the browser.
- Requires Apache Server: This feature works only on servers running Apache.
- Compression via .htaccess: Files are compressed before being transmitted, and the browser automatically decompresses them for display.
Benefits:
- Faster Content Delivery: Reduces file sizes, leading to quicker load times for visitors.
- Lower Bandwidth Consumption: Decreases the amount of data transferred, helping to save bandwidth.
- Improved Page Load Speed and SEO Rankings: Faster page load speeds enhance user experience and can improve search engine rankings.
Outcome:
- W3Speedster simplifies enabling Gzip compression, resulting in faster page loads, reduced server load, and better resource efficiency.
Remove query parameters
Feature:
Improves caching and performance by removing unnecessary query parameters from file URLs.
Functionality:
- Interception of File Requests: W3Speedster intercepts browser requests for CSS and JavaScript files.
- URL Normalization: Strips out query parameters (e.g., ?ver=5.7.1) from the file URLs.
- Optimized File Delivery: The resource is served from the cache or CDN without query parameters, improving caching efficiency.
Benefits:
- Enhanced Browser and CDN Caching: Files are easier to cache by browsers and CDNs, leading to faster load times.
- Improved Performance: Reduces redundant requests and minimizes server load, improving site speed.
- Better SEO: Prevents search engines from indexing the same file with different query parameters, avoiding duplicated resources.
Outcome:
- By removing query parameters, W3Speedster optimizes the caching process, reduces network traffic, and boosts overall site performance.
Cache Path
Feature
Defines the location on your server where cached files (static HTML, JavaScript, CSS, etc.) are stored for improved performance.
Default Behavior:
- Cache Path Management: W3Speedster automatically manages the cache path.
- Default Location: Cached files are stored in the wp-content/cache folder.
Custom Cache Path
- Customizable Option: W3Speedster allows you to specify a custom cache path by providing the full directory path.
- Use Case: Useful for storing cached files in different directories or environments (e.g., separate subdomains or servers).
Benefits
- Improved Organization: Store cached files where it best suits your site setup.
- Enhanced Performance Optimization: Better management of cache storage locations can improve server and site performance.
Outcome:
- W3Speedster offers flexibility by supporting both default and custom cache paths, allowing tailored caching setups to meet specific site needs.
General Settings
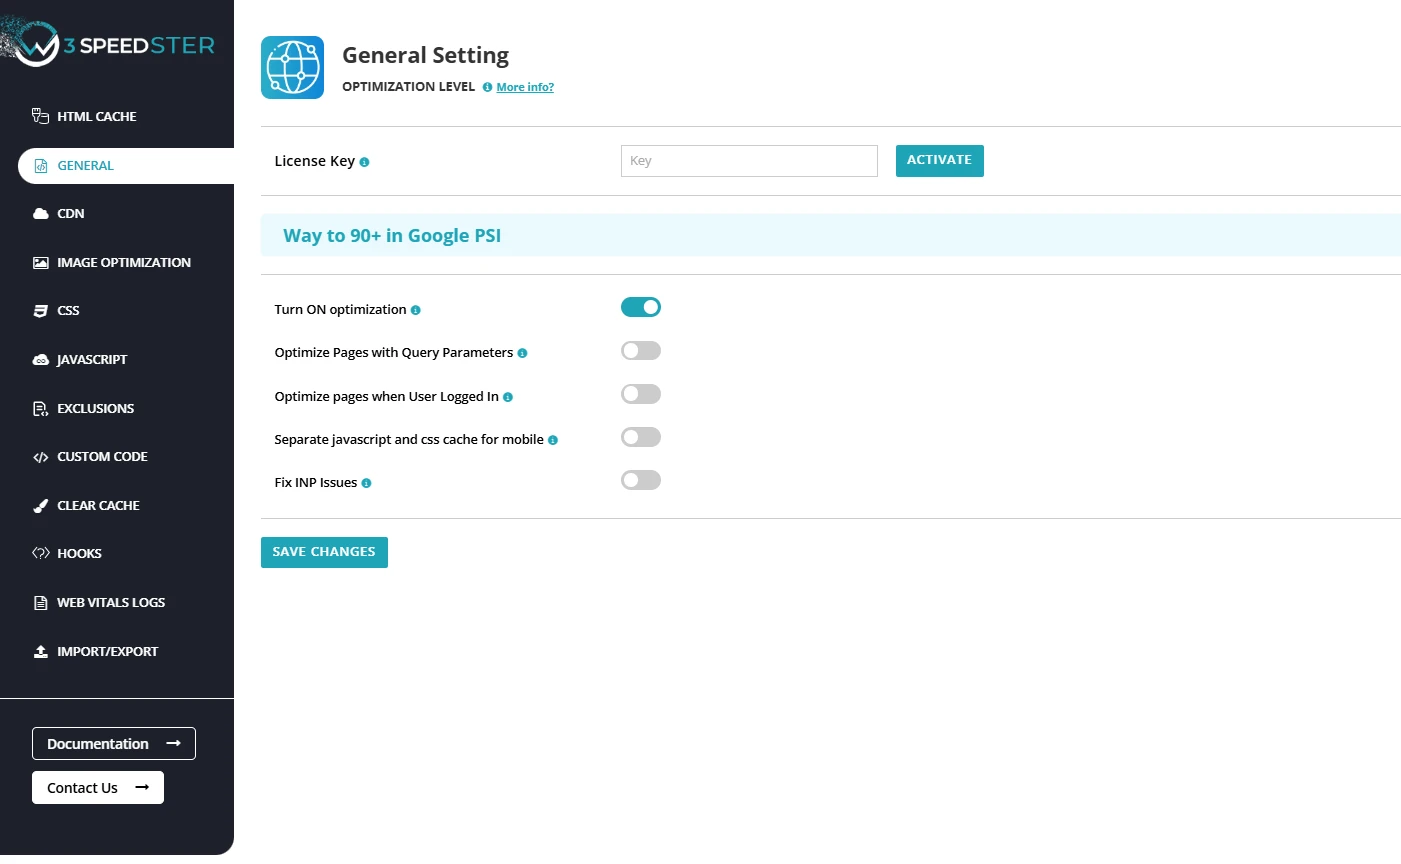
License Key
Feature:
The License Key in W3Speedster is a unique authentication code that validates your installation and unlocks access to premium features, automatic updates, and priority technical support.
How to Purchase & Activate the W3Speedster License Key
Step-by-Step Process:
- Purchase W3Speedster from the official website.
- After completing your purchase, your License Key will be delivered via:
- Email confirmation
- The Order Received page
- The My Account section on the W3Speedster website
- In your web application:
- Access the W3Speedster configuration panel.
- Locate the License Key field.
- Paste your license key and click Activate.
Post-Activation Benefits
Once activated, your W3Speedster installation gains access to:
- Premium Optimization Features, such as:
- Full-site Critical CSS generation
- Unlimited Image Optimization
- Automatic Updates: Stay up to date with the latest performance enhancements and security patches directly from the admin panel or CLI.
- Priority Support: Gain access to dedicated technical assistance for troubleshooting, configuration, and performance audits.
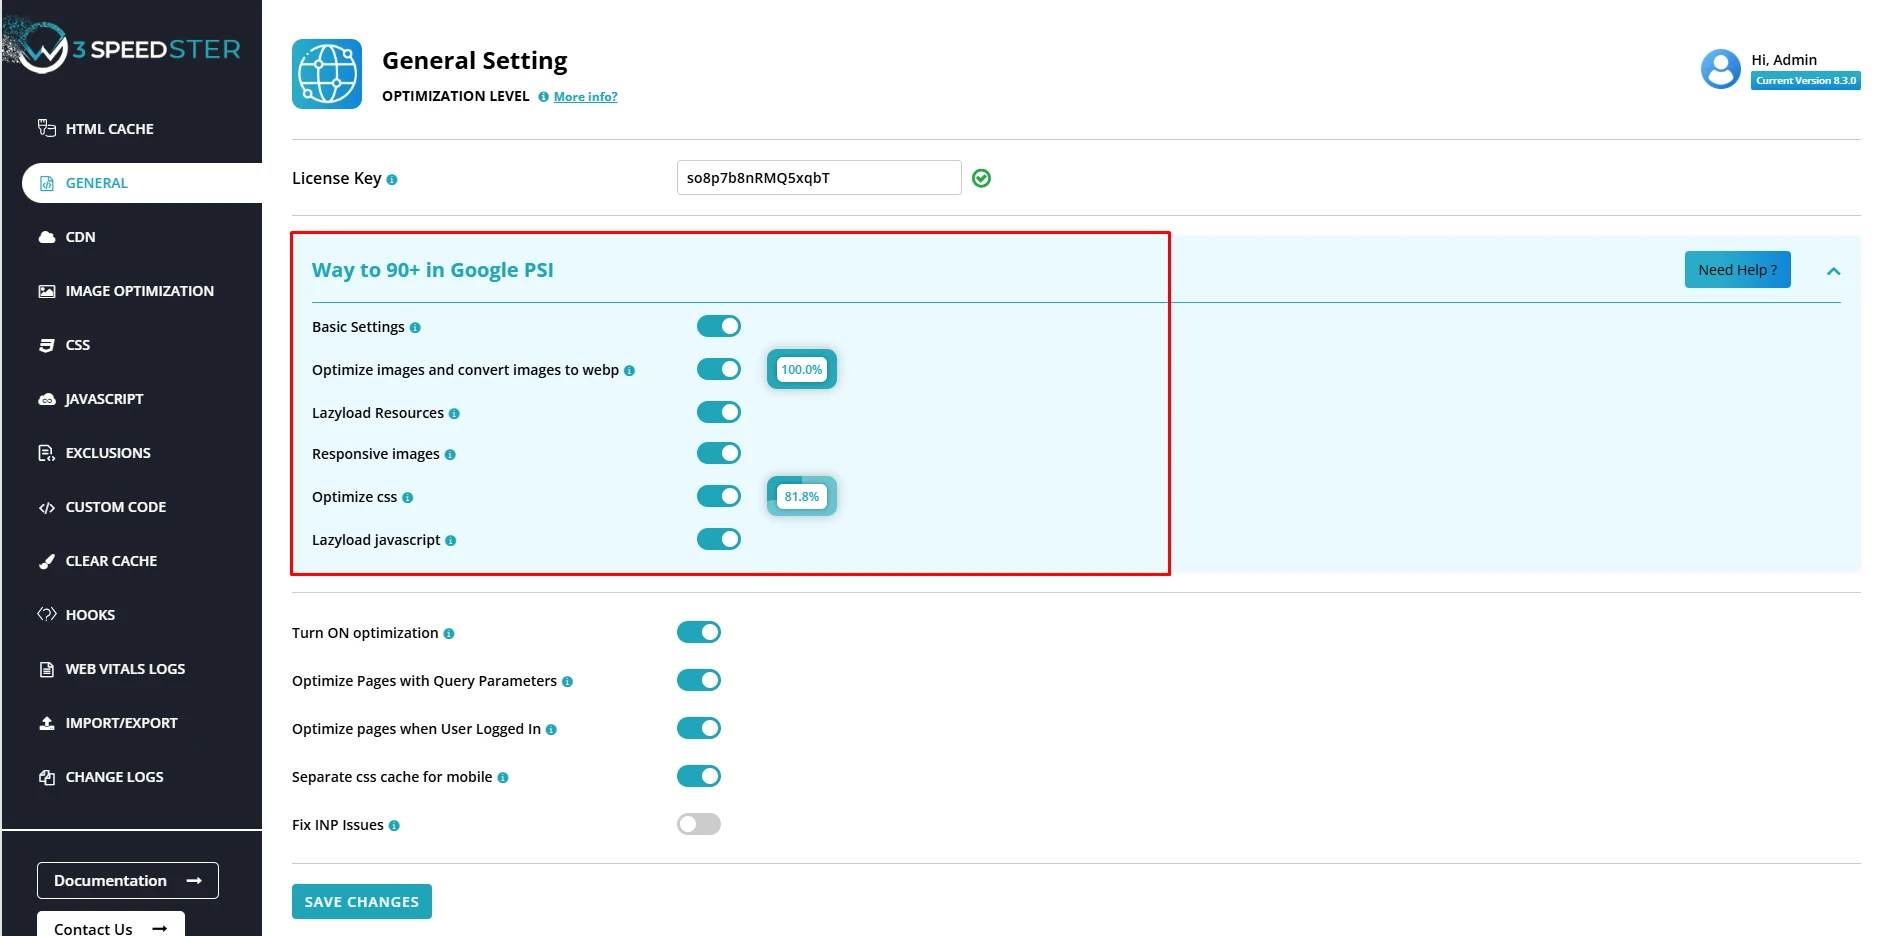
Way to 90+ in Google PSI
BASIC SETTINGS
The Basic Settings section acts as the master control panel for core performance enhancements in the W3Speedster.
Enabling it automatically activates critical features like:
- Full-page HTML Caching (Read In Detail)
- Optimization for pages with query parameters (Optimize Pages with Query Parameters)
- The master toggle for site-wide Optimization (Turn on Optimization)
These settings provide a foundation for faster, cache-friendly page delivery across any PHP-based application.
Designed for ease of use, this module delivers measurable performance gains without requiring advanced configuration.
Ideal for developers, agencies, and business owners looking for immediate speed improvements with minimal setup.
OPTIMIZE IMAGES AND CONVERT TO WEBP
The “Optimize Images and Convert to WebP” option is the master switch for all image-related performance enhancements in W3Speedster.
Once enabled, it automatically performs:
- Compression of JPEG and PNG images without visible quality loss. (Optimize JPG/PNG Images)
- Conversion of images to WebP format for smaller file sizes and faster delivery. (Start Image Optimization)
Ensures that image assets are optimized to meet modern web performance standards, reducing overall page weight.
Plays a critical role in improving Core Web Vitals, particularly:
- Largest Contentful Paint (LCP)
- Total Blocking Time (TBT)
Essential for achieving a Google PageSpeed Insights score above 90, especially on image-heavy pages.
Ideal for websites aiming to deliver fast, visually consistent experiences across all devices.
LAZYLOAD RESOURCES
The “Lazyload Resources” setting acts as the master switch for deferring non-critical media assets in W3Speedster.
Once enabled, it applies lazy loading to:.
- Images (<img> tags)
- Videos(<video>)
- Iframes(<iframe>)
- Audio files (<audio>)
Delays loading of these elements until they are about to enter the viewport, reducing the number of resources fetched during initial page load.
Improves Core Web Vitals metrics, specifically:
- Largest Contentful Paint (LCP)
- Interaction to Next Paint (INP)
Helps deliver a faster, more responsive user experience, especially on media-heavy pages.
Crucial for SEO performance and user engagement, particularly on mobile and in slow network conditions.
OPTIMIZE IMAGES AND CONVERT TO WEBP
The “Optimize Images and Convert to WebP” option is the master switch for all image-related performance enhancements in W3Speedster.
Once enabled, it automatically performs:
- Compression of JPEG and PNG images without visible quality loss. (Optimize JPG/PNG Images)
- Conversion of images to WebP format for smaller file sizes and faster delivery. (Start Image Optimization)
Ensures that image assets are optimized to meet modern web performance standards, reducing overall page weight.
Plays a critical role in improving Core Web Vitals, particularly:
- Largest Contentful Paint (LCP)
- Total Blocking Time (TBT)
Essential for achieving a Google PageSpeed Insights score above 90, especially on image-heavy pages.
Ideal for websites aiming to deliver fast, visually consistent experiences across all devices.
OPTIMIZE CSS
The “Optimize CSS” setting acts as the master switch for optimizing and enhancing the loading of CSS files in W3Speedster.
Improves website speed and performance by reducing the size of CSS files, ensuring faster page rendering.
Multi-step CSS optimization strategy includes:
- Minification: Reduces file size by removing unnecessary characters. (Enable CSS Optimization)
- Merging: Combines multiple CSS files into one to reduce HTTP requests.
- Deferred and Asynchronous Loading: Delays non-critical CSS files from blocking the page load.
- Critical CSS Injection: Ensures critical styles are loaded first for immediate rendering. (Load Critical CSS)
- Google Fonts: Combinning and localizing google fonts for faster loading. (Combine Google Fonts)
Boosts Core Web Vitals, particularly First Contentful Paint (FCP) and Largest Contentful Paint (LCP), by speeding up CSS delivery.
Essential for improving overall page load times and ensuring a smoother user experience across devices.
LAZYLOAD JAVASCRIPT
Lazyload JavaScript is a performance optimization technique in W3Speedster that:
- Defers the loading and execution of non-critical JavaScript files. (Lazyload Javascript)
- Ensures that JavaScript does not block page rendering or delay visual elements.
- Activates after the main content of the webpage has loaded or upon user interaction.
W3Speedster optimizes JavaScript by:
- Converting traditional <script> tags into deferred, asynchronous, or event-triggered executions.
- Prioritizing faster First Contentful Paint (FCP) and Time to Interactive (TTI) scores.
Turn On Optimization
Feature: Master Control for Performance Enhancements
The "Turn On Optimization" setting in W3Speedster serves as the central control for all available optimization features within the plugin. When enabled, it activates a comprehensive set of performance improvements, including CSS and JavaScript minification and combination, image optimization, Gzip compression, preload caching, lazy loading of images, device-specific caching (separate cache for mobile and desktop), and optimized handling of pages with query parameters.
Default Behavior:
- All Optimization Techniques Applied: When enabled, W3Speedster systematically applies all selected optimization features, improving site speed, reducing server load, enhancing the user experience, and boosting SEO performance.
- When the Toggle is Disabled: When disabled, only basic HTML caching remains active, while advanced optimizations like CSS/JS minification, image compression, Gzip compression, browser caching, preload mechanisms, and lazy loading are paused. This is ideal for development, troubleshooting, or performance testing.
How It Works:
- Enable: Navigate to W3Speedster settings in the dashboard. In the General Settings section, locate the "Turn On Optimization" toggle and enable it to apply all optimization features.
- Disable: If needed, toggle it off to disable the optimizations. Save changes to apply your preferences.
Benefits:
- Maximum Speed and Performance: Enabling optimizations ensures fast load times, reduced server strain, and an improved user experience.
- SEO Benefits: Faster load times contribute to better search engine rankings.
Outcome:
Keeping the "Turn On Optimization" option active ensures that your site operates with maximum efficiency, offering enhanced performance, improved SEO, and a seamless user experience. Disabling it should be reserved for testing or development scenarios where caching and optimizations may interfere.
Optimize pages with Query parameters
Feature:
The "Optimize Pages with Query Parameters" feature in W3Speedster enables the plugin to apply full optimizations (such as minification, compression, etc.) to URLs that include query strings (parameters), enhancing the performance of dynamic pages.
Why It’s Needed:
Many PHP applications, whether custom-built or based on frameworks like Laravel, Symfony, or CodeIgniter, deliver dynamic content based on URL parameters (e.g., ?filter=red, ?page=2). Typically, caching systems ignore or bypass such URLs to prevent serving outdated content. However, for high-performance servers that can handle content validity, optimizing these pages greatly boosts performance for scenarios such as filtered searches, product pages, pagination results, and user-driven listings.
How It Works:
- Enabled: When this setting is enabled, W3Speedster treats URLs with query parameters as unique pages and applies all optimizations to each version of the page with a unique query string.
- Disabled: Without this setting, pages with query parameters are not optimized. They are dynamically generated each time, which can increase server load and slow down response times, especially for filtered or sorted content.
Example:
- Without Optimization: Visiting ‘https://www.example.com/shop?filter=red’ results in a dynamically generated, unoptimized page.
- With Optimization: Visiting the same URL with the "Optimize Pages with Query Parameters" setting enabled loads the optimized, cached version for filter=red, ensuring faster loading times, reduced server resource usage, and improved SEO performance.
Important Notes:
- High-Performance Server Recommended: Each unique combination of query parameters creates a new optimized file. Ensure your server has enough resources to handle the increased number of optimized files without performance degradation.
- Critical for Ecommerce and Directories: This feature is particularly valuable for product filter pages, search results, category listings, and AJAX-based pagination, which are common in ecommerce and directory websites.
Optimize Pages For Logged-In Users
Feature:
The "Optimize Pages When User Logged In" setting in W3Speedster enables the plugin to apply optimization techniques to pages viewed by authenticated (logged-in) users. Optimizing these pages can significantly improve performance in many PHP applications where it is safe and beneficial to do so under controlled conditions.
How It Works:
- Enabled: When this setting is activated, W3Speedster applies all configured optimization techniques — including CSS/JS minification, Gzip compression, and image optimization — to pages viewed by logged-in users.
- Disabled: Without this setting, no optimization is applied for logged-in users. Each page request will result in full PHP execution, database queries, and dynamic content rendering, which can significantly impact performance.
Example:
- When Enabled: A logged-in user visiting their profile or dashboard sees a fast and optimized version of the page, with updates occurring only for dynamic data (like notifications).
- When Disabled: Every page request by logged-in users triggers live PHP execution and database queries, resulting in higher server load and slower performance, especially during high-traffic periods.
How W3Speedster Optimizes Logged-In User Pages:
- CSS/JS Minification and Compression: Like for guest users, CSS and JavaScript files are minified and compressed for faster delivery.
- Optimized Static Resources: Images, fonts, and stylesheets are served in their optimized forms to reduce page weight and improve performance.
- Improved Server Efficiency: By applying optimizations, W3Speedster reduces server processing time, even when users are logged in, ensuring a faster and more responsive user experience.
Separate CSS cache for mobile
Feature:
The "Separate CSS Cache for Mobile" feature in W3Speedster ensures that mobile users receive optimized CSS files specifically tailored for mobile devices, distinct from the desktop version. This is crucial when separate files for mobile and desktop are required. because mobile and desktop layouts typically require different styles for optimal performance and responsiveness.
Why This is Needed:
- Mobile-First Optimization: Mobile devices require lighter, smaller, and more responsive styles compared to desktops.
- Reduce Unnecessary Code: Serving desktop-specific styles to mobile users increases page size unnecessarily, impacting performance.
- Improve Loading Speed: By serving mobile-optimized files, W3Speedster delivers only the necessary assets, reducing download size and improving load time.
- Enhance Core Web Vitals: Faster mobile load times directly contribute to better performance in Google's Page Experience metrics, such as LCP (Largest Contentful Paint) and FID (First Input Delay).
How It Works:
- Enabled: W3Speedster detects the user's device type (mobile or desktop) during the initial request.
- Two separate cache versions are created:
- One set optimized for desktop (CSS).
- A different set optimized for mobile devices.
- The appropriate version is served based on the device type at runtime.
- Two separate cache versions are created:
- Disabled: A shared file is used for both mobile and desktop devices, meaning mobile users will receive desktop-optimized CSS, which may include unnecessary code and increase file sizes, leading to slower load times.
Example:
- When Enabled:
- Desktop Visitor: Served ‘style.css’.
- Mobile Visitor: Served ‘stylemob.css’.
- When Disabled:
- Both mobile and desktop users are served the same style.css, which may be unnecessarily large for mobile.
Important Considerations:
- Device Detection: W3Speedster uses User-Agent detection to differentiate between mobile and desktop devices.
- Additional Cache Storage: Maintaining separate mobile and desktop caches will increase the number of cached files, so ensure your server has sufficient storage space.
- Critical for Responsive Websites: This setting is especially beneficial for websites using different stylesheets, lazy loading behaviors based on screen size.
- SEO Benefit: Faster mobile performance can improve your rankings on Google Mobile-First Indexing.
Fix INP Issues
Feature:
INP (Interaction to Next Paint) is a Core Web Vitals metric introduced by Google to measure a webpage’s responsiveness. It tracks the time it takes for a page to visually respond after a user interaction (e.g., clicking a button or tapping a menu). A lower INP score indicates a faster, smoother user experience. INP issues in modern PHP applications often arise due to heavy JavaScript execution, slow server responses, or unoptimized frontend resources. W3Speedster provides a range of features to address and reduce INP problems.
Why Fixing INP is Important
- Better User Experience: Quick visual feedback ensures websites feel more responsive and user-friendly.
- Reduced Bounce Rate: A fast and responsive site is more likely to retain visitors.
- Compliance with Core Web Vitals Standards: Meeting INP benchmarks is crucial for maintaining competitive performance and user satisfaction.
How W3Speedster Fixes INP Issues
W3Speedster optimizes the INP metric through various performance improvements:
- Minify and Defer JavaScript: Reduces the size of JavaScript files and defers non-critical scripts to prevent render-blocking delays.
- Lazy Load Images and iFrames: Minimizes the main thread's workload by loading images and iframes only when they are about to appear in the viewport.
- Gzip Compression and Browser Caching: Compresses assets and leverages caching to reduce asset sizes and reload times, ensuring quicker interactions.
- Optimized CSS Delivery: Critical CSS is loaded immediately, providing essential styles for the page's first interactions.
- Preloading Key Resources: Fonts, images, and important JavaScript files are preloaded to avoid delays after user actions. Together, these techniques improve overall responsiveness, directly enhancing INP scores.
Example:
- Without Optimization: A visitor taps the "Load More Posts" button, and heavy JavaScript runs on the main thread, causing a delay before the next paint. This results in a spike in INP values.
- With W3Speedster Optimization: Deferred scripts, lazy-loaded content, and reduced file sizes allow the page to respond almost instantly after the click, resulting in a lower INP score.
Important Considerations:
- Heavy Inline JavaScript: Inline JavaScript should be optimized manually, as W3Speedster cannot fully optimize poorly written custom scripts.
- Third-party Scripts: Scripts from third-party services (e.g., live chat widgets, ad networks) may delay INP, even with optimization. Load them conditionally or use them sparingly
- Server Performance: While W3Speedster handles frontend optimizations, underlying server performance (PHP execution speed, database optimization) also affects INP. Server-side slowness must be addressed separately for optimal results.
CDN Settings
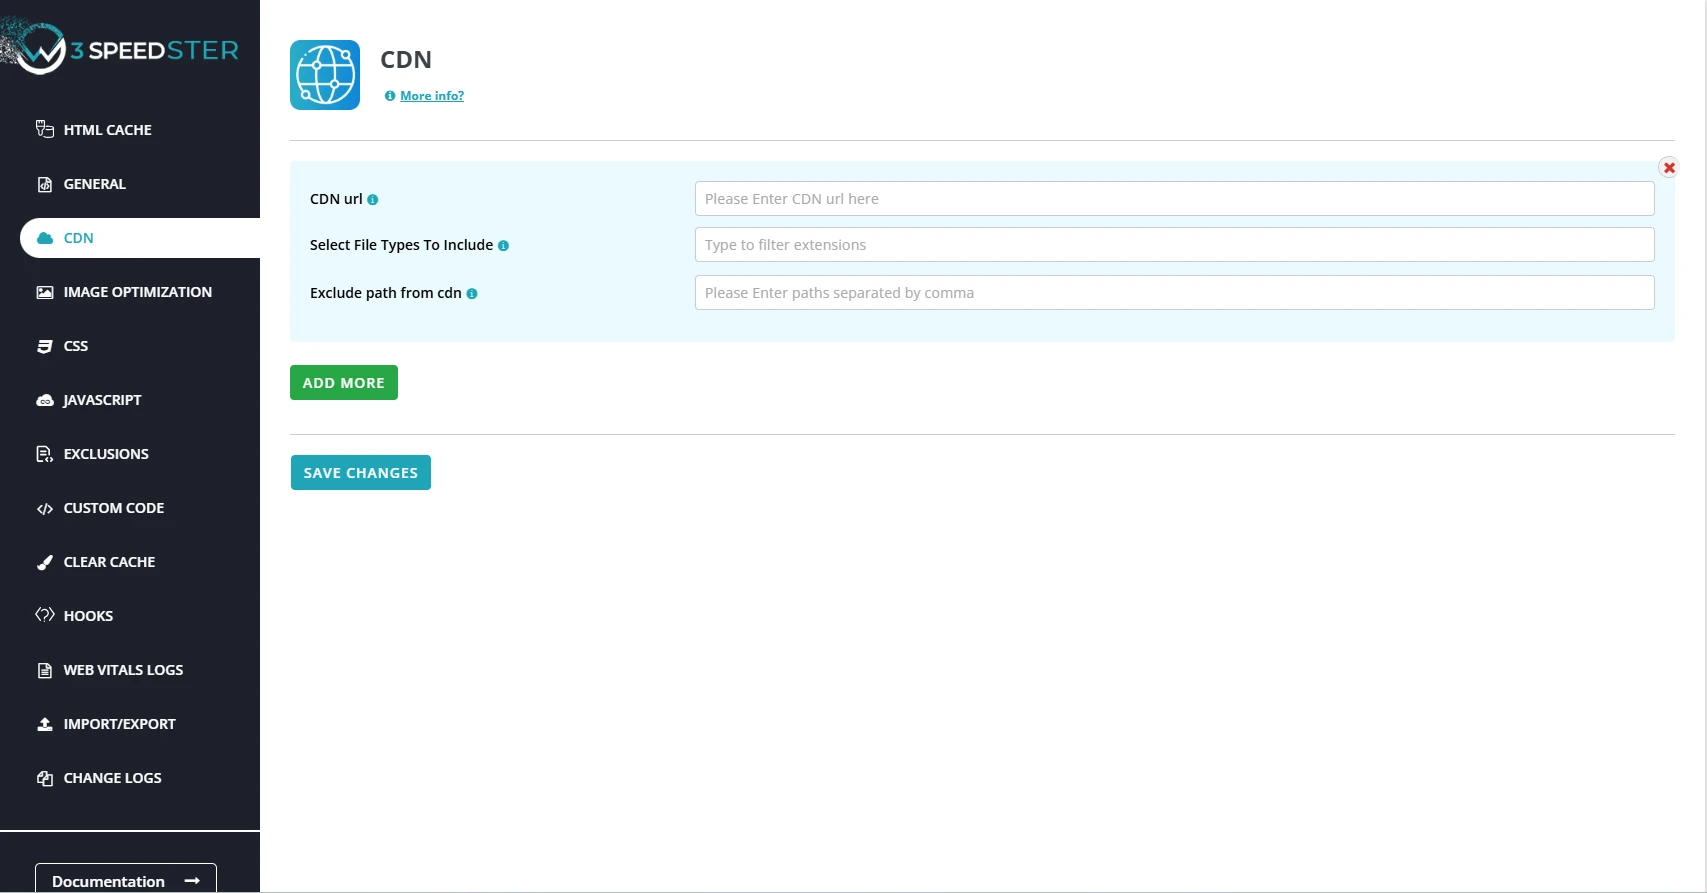
CDN URL
Feature:
A CDN URL refers to the web address provided by a Content Delivery Network used to serve static files (e.g., CSS, JS, images) from distributed global edge servers instead of your origin server. This approach significantly enhances page speed, reduces server load, and improves global accessibility. In W3Speedster, integrating a CDN URL is a key performance optimization step that ensures all static assets are offloaded to the CDN, allowing them to be served closer to the user.
Benefits of Using a CDN URL in W3Speedster
- Improved Performance: Faster asset delivery by serving files from the geographically closest server.
- Reduced Latency: Minimizes time-to-first-byte (TTFB) for static files.
- Lower Server Load: Frees up your origin server to handle dynamic content by outsourcing static file delivery.
- Enhanced SEO: Faster load speeds lead to higher user satisfaction and improved Core Web Vitals, positively impacting SEO rankings.
- Bandwidth Savings: Offloading large assets to a CDN reduces your hosting provider’s data transfer usage.
- Scalability: CDNs are built to scale, handling traffic spikes without impacting performance.
How W3Speedster Handles CDN URL Integration
- Configure the CDN URL
- Choose a CDN provider (e.g., Cloudflare, BunnyCDN, KeyCDN, CloudFront).
- Obtain your CDN endpoint (e.g., https://cdn.example.com).
- Navigate to W3Speedster > General Settings > CDN URL.
- Enter your CDN URL in the input field.
- To add more than one CDN URL, click on add rule and enter another URL
- Automatic URL Rewriting
- Once configured, W3Speedster rewrites all eligible static resource URLs across your website.
- Example:
- Original: https://www.example.com/wp-content/themes/style.css
- Rewritten: https://cdn.example.com/wp-content/themes/style.css
- This rewriting is done on-the-fly during page caching and asset processing.
- Static Files Redirection
- CSS, JavaScript, fonts, and image URLs are routed to the CDN domain.
- This happens transparently for both logged-in and guest users.
- CDN Cache Management
- When files are updated, W3Speedster ensures the CDN cache is cleared (if the CDN supports API-based purging).
- This avoids stale content being served.
- Verification
- Open the frontend of your site in a browser.
- Use Inspect Element to verify that all static resources load from the CDN URL.
- Use performance tools like:
- PageSpeed Insights
- GTmetrix
- WebPageTest
Multi-CDN
W3Speedster offers support for Multi-CDN setups, allowing you to accelerate asset delivery by distributing your content across multiple content delivery networks (CDNs). This is especially beneficial for global websites with users in different regions, ensuring faster loading times and enhanced redundancy.
How to Configure Multi-CDN in W3Speedster
- Go to W3Speedster Settings: Navigate to WP Admin > W3Speedster > General Tab.
- Enable CDN URL Field: Locate the CDN URL input.
- Enter First CDN URL Details
- Click on Add More
- Now you can add another CDN URL
W3Speedster is designed to dynamically fetch and apply CDN URLs based on your pre-defined configuration, ensuring seamless integration and conflict-free performance optimization across multiple CDNs.
Select File Types To Include
Feature:
This configuration option allows you to specify which static file types (by category) should be routed through the CDN (Content Delivery Network). Selecting only the relevant file types ensures optimal performance while maintaining full control over what gets served via the CDN.
Supported File Types
You can selectively include any of the following file types to be routed through the CDN:
- Images
- Includes .jpg, .jpeg, .png, .gif, .webp, .svg, .ico, etc.
- Ideal for reducing load on the origin server due to high image payloads.
- JavaScript (JS)
- Includes .js files used for client-side scripting.
- Can speed up dynamic interactions if served efficiently via CDN.
- CSS (Stylesheets)
- Includes .css files controlling the visual styling of your web pages.
- CDN delivery enhances first paint times and layout rendering.
- Fonts
- Includes .woff, .woff2, .ttf, .eot, .otf, etc.
- Essential for serving custom or third-party fonts faster via global edge networks.
- Audio
- Includes .mp3, .ogg, .wav, etc.
- Useful for content-heavy platforms like media sites or podcasts.
- Video
- Includes .mp4, .webm, .avi, etc.
- CDN delivery is crucial for improving video streaming performance and reducing buffering.
How It Works in W3Speedster
- W3Speedster scans the resource URLs of your site.
- Based on your selection, only those file types are modified to use the CDN URL.
- Others remain served directly from your origin server.
Best Practices
- Do not enable all file types blindly—only include what your site actively uses.
- Exclude dynamic or user-generated scripts that depend on origin-based logic.
- Avoid applying CDN to admin, login, or API paths (configure this under Path Exclusion).
Example Use Case
If your site has:
- Heavy image content
- Custom fonts
- Several JS and CSS files
Then enable:
- Image
- JS
- CSS
- Font
Leave Audio and Video unchecked unless your site specifically hosts such media files.<`/p>
Exclude path from cdn
Feature:
While integrating a Content Delivery Network (CDN) significantly enhances performance by offloading static resources, not all paths in a Drupal, especially be served via CDN. Certain directories and dynamic endpoints must always be served from the origin server to maintain functional integrity and prevent unexpected issues.
W3Speedster addresses this requirement with a flexible Path Exclusion feature.
Why We Need It
- Directories like /vendor/, /generated/, /var/, or /app/code/ contain sensitive framework and module files.
- Serving these via CDN can cause:
- Dependency/version mismatch
- Layout rendering issues
- Failing script behavior or backend routing
- Avoid Conflicts with Extensions and AJAX Endpoints
- Magento modules often rely on localized AJAX requests or file access under /pub/static/, /rest/, or custom routes.
- Excluding these ensures extensions run without unexpected CDN interference.
- Prevent Caching of Sensitive or Dynamic Paths - Exclude routes involving:
- CSRF tokens
- Auth sessions
- Checkout, cart, or account-related AJAX handlers
- Prevents incorrect caching of dynamic data or user-specific content.
How It Works in W3Speedster
- Path Exclusion Field
- Located under: W3Speedster > CDN Settings > Exclude Paths
- You can enter relative paths that should bypass the CDN rewriting logic.
- Example Pattern Configuration: /vendor/, /generated/, /var/, /app/code/, /pub/static/frontend/Vendor/ThemeName/en_US/js/dynamic/, /rest/
- All files under these directories will not be served via CDN
- Instead, they will be loaded directly from the origin (e.g., https://www.example.com/vendor/autoload.php)
- Matching Logic: W3Speedster uses string pattern matching (not regex) to determine if a URL should be excluded. Ensure each path begins with a forward slash (/) and ends with one if targeting directories.
Benefits
- Maintains Extension Compatibility – Ensures that dynamic components, real-time features, and middleware remain functional.
- Preserves Framework Integrity – Prevents broken views, incorrect script behavior, or failed API responses.
- Simplifies Debugging – Isolating CDN logic from critical paths allows quicker issue resolution.
- Enhances Security – Prevents CDN caching of sensitive logic, token-driven scripts, or session-based responses.
Note: Avoid excluding too many paths unnecessarily, as it limits CDN benefits. Only exclude paths critical for functionality or security.
Verification Tip
After applying exclusions:
- Inspect the page source (Ctrl+U) to confirm that excluded paths are loading from the origin URL.
- Use tools like PageSpeed Insights or DevTools Network Tab to ensure CDN is applied selectively.
Image Optimization
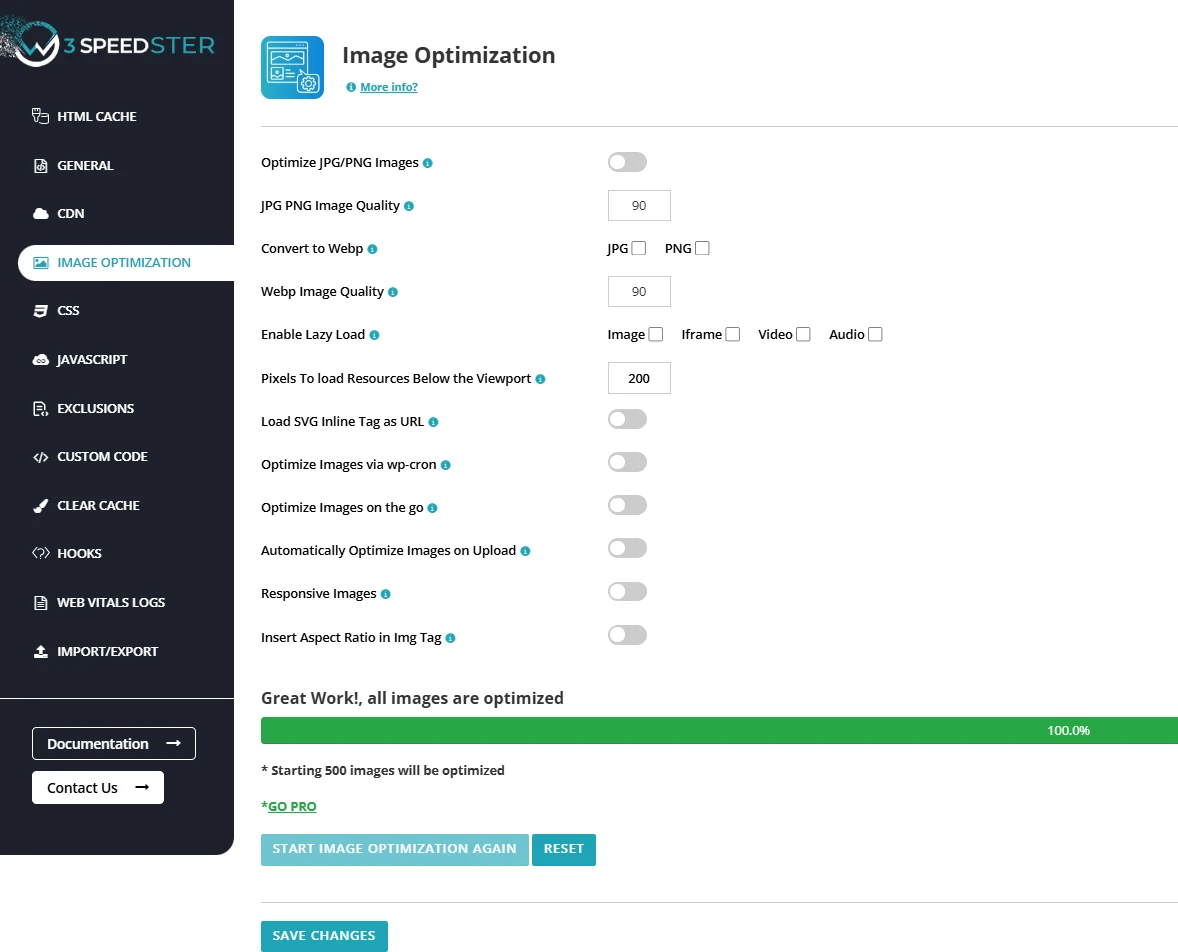
Optimize JPG/PNG Images
Feature:
Image optimization is an essential element of web performance, as images often contribute significantly to a page's total load size. W3Speedster includes an automatic image optimization feature specifically designed for JPG and PNG formats, the most commonly used image types on the web. This feature reduces image file sizes without compromising visual quality, leading to faster page loads, lower bandwidth usage, and an improved user experience.
Why We Need It
- Large Images Slow Down Pages: High-resolution JPG/PNG files can greatly increase page load times, especially for users on mobile networks or slower connections.
- Affects Core Web Vitals: Metrics like Largest Contentful Paint (LCP) and Total Blocking Time (TBT) are significantly impacted by unoptimized images, potentially hurting your site's performance.
- Mobile Optimization: Optimized images load faster on mobile devices, helping reduce bounce rates and improving user engagement.
- Bandwidth Efficiency: Smaller image file sizes reduce data transfer, benefiting both hosting resources and users with limited data plans.
How It Works in W3Speedster
- Automatic Compression: When you upload a JPG or PNG image to the media library (or during bulk processing), W3Speedster automatically compresses it using smart algorithms that preserve visual quality.
- Bulk Optimization Tool: The plugin provides a bulk optimizer for previously uploaded media, ensuring that all your media, including historical images, are optimized.
- Integration with cron (Optional): Image optimization can be scheduled using cron, allowing large media libraries to be processed in the background without impacting performance.
Benefits of Image Optimization
- Faster Load Times: By compressing image-heavy content, the average page size is reduced, resulting in faster page load times.
- Improved SEO: Search engines consider page speed as a ranking factor, particularly for mobile searches. Optimized images contribute to better rankings.
- Better User Experience: Faster-loading, visually identical images improve user retention and overall satisfaction.
- Lower Server Load: Reduced image sizes mean less server bandwidth is required and faster delivery times.
- CDN-Friendly: Optimized images are better suited for CDN delivery, as their smaller sizes make them more efficient to serve across different locations.
How to Enable Image Optimization in W3Speedster
- Go to your W3Speedster Dashboard.
- Navigate to W3Speedster > Image Optimization.
- Enable Optimize JPG/PNG Images.
- Click Save Changes.
Example
- Original Image: 1.2 MB (uncompressed PNG)
- After Optimization: 350 KB (visually identical, optimized PNG)
- Load Time Reduction: Approximately 2.5 seconds faster on mobile devices.
Remove Original Images
Feature:
This feature gives you the control to permanently delete original images after converting them to WebP format, which is a more efficient, lightweight format for the web. It is designed to help users save server storage while delivering optimized images for faster page load times.
Why We Need It
- Image size is a major contributor to slow website performance, especially on media-heavy websites (e.g., blogs, portfolios, WooCommerce stores).
- While WebP is highly optimized and typically 25–35% smaller than JPEG/PNG equivalents, storing both original and WebP versions consumes unnecessary storage.
- For websites on shared hosting or those with limited disk space, reducing redundant storage is essential.
- This feature ensures maximum space efficiency by eliminating unused original files.
How It Works in W3Speedster
W3Speedster provides two distinct behaviors based on the state of the checkbox for “Remove Original Image”:
When Enabled:
- The original image (e.g., .jpg, .png) is permanently deleted after its WebP version is created.
- Only the WebP file remains in the image directory.
- This action is irreversible — the original image cannot be recovered once removed.
When Disabled (Checkbox Unchecked):
- The original image is retained and moved to a secure backup folder (w3-backup-images).
- The WebP version is served from the main uploads folder.
- You can revert back to the original images at any time by restoring from the backup in just one click.
Benefits of Removing Original Images
- Reduced Storage Usage: Frees up server space by deleting original media files.
- Improved Load Speed: WebP images load faster due to reduced size, improving performance metrics.
- Flexible Reversion (when disabled): Original images are preserved in case you want to disable WebP delivery in the future.
- Automated Workflow: No manual handling of file deletion or storage—W3Speedster manages it.
How to Enable "Remove Original Images"
- Navigate to W3Speedster → Image Optimization tab.
- Find the option labeled “Remove Original Image”.
- Enable permanent removal of original images after WebP conversion.
- Warning: Enabling this will delete the original files permanently and cannot be undone.
- Alternatively, leave it unchecked to keep a backup of original images and serve only WebP from the main directory.
JPG/PNG Image Quality
Feature:
The “JPG/PNG Image Quality” setting in W3Speedster allows you to fine-tune the balance between image visual clarity and file size. By default, the plugin maintains a high-quality threshold of 90%, ensuring that your site’s images remain sharp and visually appealing while still achieving meaningful reductions in file size.
Why We Need It
- Performance vs. Quality Trade-Off: Web optimization requires smaller image sizes for faster loading. However, overly compressed images may appear pixelated or blurry. This setting allows you to strike the right balance.
- Custom Control: Different websites have varying needs. For example, e-commerce, portfolios, and photography sites may prioritize clarity, while blogs may prioritize faster performance.
- SEO and Core Web Vitals: Google favors fast-loading pages. Optimizing image quality directly impacts Core Web Vitals, including metrics like LCP (Largest Contentful Paint), ultimately improving your site’s PageSpeed score.
How It Works in W3Speedster
- The image quality setting is applied during optimization, whether during image uploads or bulk optimization processes.
- A quality percentage (e.g., 90%) determines how much compression is applied:
- 100%: No compression (maximum clarity).
- 90%: Visually lossless and optimized (default setting).
- 70%-80%: Noticeable compression but still acceptable for most use cases.
- <70%: Aggressive compression, suitable for thumbnails or low-priority visuals.
- This setting applies to both JPG and PNG.
How to Enable "Keep Original Images"
- Go to Dashboard > W3Speedster > Image Optimization.
- Locate the “JPG/PNG Image Quality” setting.
- Enter the desired quality value (e.g., 90).
- Click Save Changes.
Benefits
- Improved Site Speed: Smaller image sizes reduce load times.
- Maintained Visual Appeal: Ensures high enough quality for user satisfaction.
- SEO Boost: Better Core Web Vitals scores lead to improved search engine rankings.
- Bandwidth Efficiency: Lighter image files reduce server load and data usage.
Convert to WebP
Feature:
The “Convert to WebP” feature in W3Speedster allows automatic conversion of JPG and PNG images into the WebP format — a modern, high-efficiency image format developed by Google. WebP delivers significant compression advantages while maintaining visual quality, resulting in faster page loads and lower bandwidth consumption without compromising user experience.
Why We Need It
- Improved Performance: WebP images are up to 30% smaller than their JPG/PNG counterparts, which leads to faster loading, especially on mobile or slow networks.
- Better SEO & Core Web Vitals: Optimized images directly enhance metrics such as Largest Contentful Paint (LCP), contributing to higher PageSpeed Insights scores and better SEO rankings.
- Bandwidth Efficiency: Smaller image sizes reduce server-side bandwidth usage and associated hosting costs.
- Browser Compatibility: WebP is fully supported by all major modern browsers, making it safe for use in live environments.
How It Works in W3Speedster
- Navigate to Dashboard > W3Speedster > Image Optimization.
- Enable the “Convert to WebP” option.
- Start the Image Optimization process.
Once enabled, W3Speedster will:
- Scan the media library for .jpg and .png files.
- Generate .webp for each.
- Automatically serve .webp images to compatible browsers.
- Use fallback formats (original JPG/PNG) for browsers that don’t support WebP.
Note: This process does not overwrite your original files unless you explicitly choose to do so.
Benefits
- Image File Size Reduction: Reduces image sizes by up to 30%, resulting in leaner, more efficient web pages.
- Faster Page Load Speeds: Smaller assets contribute to quicker load times and improved user engagement.
- Lower Bandwidth Usage: Efficient image delivery means reduced data transfer for both the server and the user.
- High Visual Quality: Maintains near-original image clarity despite compression.
- Enhanced SEO & Core Web Vitals: Supports better LCP scores and PageSpeed ratings, improving visibility and performance in search engines.
- Graceful Fallback Support: Ensures backward compatibility by serving original image formats to unsupported browsers.
Notes
- Confirm that your server supports WebP delivery (via .htaccess or server configuration).
- For optimal results, use in combination with:
- Lazy loading
- Browser caching
- Image resizing
WebP Image Quality
Feature:
The WebP Image Quality setting in W3Speedster determines the compression level applied when converting JPG and PNG images into the WebP format. As a next-generation image format developed by Google, WebP provides significant file size reduction while maintaining strong visual quality. W3Speedster defaults this value to 90%, offering a near-lossless balance between clarity and performance.
Why This Setting Matters
- Performance vs. Visual Clarity
- Lower quality values yield smaller file sizes and faster load times.
- Higher values retain more detail but generate larger files.
- Bandwidth Optimization
- Smaller WebP images result in reduced server bandwidth usage.
- Beneficial for mobile users and high-traffic websites.
- Customizable Control
- Site owners can fine-tune quality levels depending on content type.
- Ideal for websites prioritizing either speed or image detail (e.g., blogs vs. photography portfolios).
How It Works
- When WebP conversion is enabled via W3Speedster > Image Optimization, the plugin:
- Scans JPG and PNG images.
- Converts them to .webp using the specified quality value (default: 90%).
- Serves WebP images to compatible browsers while maintaining the original files for fallback use.
- You can customize the quality level:
- Go to Dashboard > W3Speedster > Image Optimization.
- Locate the WebP Image Quality field.
- Enter a value between 0 (lowest quality) and 100 (no compression).
- Click Save Changes.
- If necessary, re-optimize existing images to apply the updated setting.
Benefits
- Faster Page Loads – Efficient image delivery improves load speed and user experience.
- Controlled Visual Output – Maintain brand consistency with high-quality visuals when needed.
- Better Core Web Vitals – Enhances LCP (Largest Contentful Paint) by serving leaner images.
- Optimized Data Usage – Reduced image sizes lower data consumption for both users and servers.
Enable Lazy Load
Feature:
The Enable Lazy Load feature in W3Speedster defers the loading of images and other non-critical media elements until they are about to enter the user’s viewport. Instead of loading all visual assets (Images, Audio, Video, and Iframe) at once, this approach prioritizes above-the-fold content, leading to significantly faster initial page rendering and optimized server resource usage.
Why This Setting Matters
- Improve Initial Page Load Time: Media below the fold is not fetched during initial page load, allowing users to begin interacting with the page faster.
- Reduce Bandwidth Usage: Assets that are never viewed by the user are not loaded, conserving both server and user data.
- Enhance Mobile Performance: Particularly beneficial for mobile users on slower networks or devices with limited memory and processing power.
- Better SEO and Core Web Vitals: Improves key performance metrics such as First Contentful Paint (FCP) and Largest Contentful Paint (LCP), which directly influence Google PageSpeed scores and search engine rankings.
How It Works
- When the Lazy Load feature is enabled:
- The plugin modifies “<img> and other media tags by adding the ‘loading="lazy"’ attribute.
- Non-visible images are initially rendered as placeholders or empty containers.
- As the user scrolls, W3Speedster detects which media elements are approaching the viewport and loads them on demand.
- The lazy load logic is compatible with:
- WebP images
- Responsive image formats (<picture> and srcset)
Benefits
- Faster Initial Rendering – Prioritizes visible content to minimize perceived load time.
- Optimized Resource Utilization – Reduces unnecessary HTTP requests and server load.
- Improved Mobile UX – Loads only what’s needed, improving performance on mobile networks.
- Higher SEO Scores – Contributes positively to Core Web Vitals and improves Google rankings.
- Seamless Integration – Works well alongside other optimization techniques like WebP conversion and image resizing.
Pixels to Load Resources Below the Viewport
Feature:
The "Pixel to Load Resources Below the Viewport" setting in W3Speedster determines how far below the visible viewport deferred resources begin loading. The default threshold is 200 pixels, which ensures images, videos, iframes, background images, and audio start loading just before they enter view, resulting in a smooth and uninterrupted user experience.
Why This Setting is Important
- Improves Perceived Performance: Preloading media just before it appears on screen avoids flickering or delays during scroll.
- Reduces Initial Page Load: Off-screen content is deferred, improving metrics like First Contentful Paint (FCP) and Largest Contentful Paint (LCP).
- Enhances User Experience: Users scrolling down the page experience fluid transitions and seamless media loading.
How It Works
- W3Speedster continuously monitors scroll position against the location of each media element.
- When an element is detected within the defined pixel range (e.g., 200px) below the viewport, it is queued for loading.
- Applies to:
- <img> elements
- <video> and <audio> tags
- <iframe> embeds (e.g., YouTube, Google Maps)
Customization Instructions
- Go to Dashboard > W3Speedster > Image Optimization (or General Settings)
- Locate the setting named "Pixel to Load Resources Below the Viewport."
- Enter a numeric value (e.g., 100, 200, 300) to define the threshold
- Click Save Changes
Example Configuration
- Value: 200: Loads content when it is 200px below the visible screen—ideal balance between performance and UX.
- Value: 50: Defers loading until the asset is much closer to view—better performance, but may cause visible load delay.
- Value: 300: Loads content earlier—ensures smoother scroll, but increases initial bandwidth use.
Load SVG Inline Tag as URL
Feature:
The "Load SVG Inline Tag as URL" option in W3Speedster determines how SVG images are rendered. Instead of embedding the full SVG code inline in the HTML (which increases DOM complexity), this setting enables loading SVGs as external files via standard <img> tags.
Why This Setting is Important
- Improved Page Performance: Prevents HTML bloat by avoiding complex inline SVG markup, leading to faster DOM parsing.
- Simplified Document Structure: Reduces the number of nodes in the DOM, making the HTML cleaner and easier to manage.
- Optimized for Rendering and Caching: Externally loaded SVGs are easier for browsers to cache and render, especially when reused across multiple pages.
- Better Support for Lazy Loading & CDN: SVGs loaded as URLs are compatible with lazy loading plugins and content delivery networks, improving load times globally.
How It Works
- Without the Setting Enabled
- SVGs are directly embedded into the HTML using <svg>...</svg> tags.
- This increases DOM size and page load time, particularly for complex SVGs.
- Applies to:
- SVGs are referenced externally via <img src="image.svg">.
- This results in lighter HTML, better caching, and improved rendering performance.
How to Enable
- Navigate to Dashboard > W3Speedster > Image Optimization or General Settings
- Locate the setting labeled "Load SVG Inline Tag as URL"
- Enable the toggle
- Click Save Changes
Optimize Images via cron
Feature:
The “Optimize Images via Cron” setting in W3Speedster leverages PHP framework-level or system-level cron jobs to automatically optimize images in the background. This ensures continuous performance enhancement without overloading server resources or requiring manual intervention.
Why Enable This Feature?
- Automated Optimization: Streamlines the process of optimizing images by scheduling background tasks without the need for manual actions.
- Server Resource Efficiency: Optimizes one image per minute to reduce CPU and memory consumption—particularly beneficial on shared or low-resource servers.
- Non-Disruptive Workflow: Operates asynchronously, allowing core application functions and user experiences to continue smoothly.
How It Works
- Once enabled, W3Speedster integrates with the the PHP framework's internal task queue (e.g., Laravel's Task Scheduling, Magento cron, Drupal Queue Worker).
- Every scheduled interval (typically one minute), it checks for any unoptimized image in the media library or storage directories.
- It processes a single image per cycle: Compresses the image, Converts it to the configured format (e.g., WebP).
- This ensures that image optimization occurs gradually and automatically, without requiring administrator input.
- For bulk uploads or initial media library optimization, you can manually initiate optimization from the W3Speedster > Image Optimization panel using the “Start Optimization” option.
Ideal Use Cases
- Applications with Large Media Repositories: Gradually optimizes assets without blocking user interactions or slowing down response times.
- Sites on Shared or Resource-Constrained Hosting: Ensures no performance spikes or resource exhaustion.
- Administrators & Developers Seeking Automation: Provides a reliable, low-maintenance method to ensure media performance is consistently optimized.
How to Enable
- Navigate to your W3Speedster configuration panel under Image Optimization Settings.
- Locate the toggle: “Optimize Images via Cron”.
- Enable the setting and save changes.
Optimize Images on the Go
Feature:
The "Optimize Images on the Go" feature in W3Speedster allows for real-time, automatic image optimization during live page views or when pages are crawled. This ensures that unoptimized images are progressively enhanced without manual intervention, enhancing overall site performance.
Why Enable This Feature?
- Real-Time Image Detection and Optimization: As users access pages, W3Speedster scans them for unoptimized images (JPG, PNG) and automatically queues them for background optimization.
- No Manual Input Needed: Removes the need to identify or trigger optimization manually. Every image encountered during page loads is handled automatically.
- Ideal for Dynamic or Media-Heavy Sites: Perfect for websites that frequently add content, such as eCommerce platforms, blogs, or news sites, ensuring all images remain optimized over time.
How It Works
- When a page is visited, the plugin scans for image files present in the content.
- It determines if each image has already been optimized or converted to WebP.
- Unoptimized images are queued silently and processed in the background.
- This does not delay the user experience, ensuring frontend performance remains unaffected.
- The optimization continues in the background, allowing the site to become faster progressively with each page visit.
Recommended Workflow:
- Enable the feature.
- Manually crawl or use an SEO bot (like Screaming Frog or a sitemap pinger) to visit key pages.
- Disable the feature once the optimization of discovered images is complete.
Ideal Use Cases
- New Website Launch: Ensures all image assets are optimized from the start.
- Sites with Large or Growing Media Libraries: Automates the process of detecting and optimizing older or newly added content.
- Content-Driven Platforms (e.g., Blogs, News, e-commerce): Adapts to continuous image uploads and optimizes them in real-time.
How to Enable
- Navigate to Dashboard > W3Speedster > Image Optimization
- Find the setting labeled "Optimize Images on the Go."
- Toggle the setting to Enabled
- Click Save Changes
Important Note
- This feature is best used temporarily.
- While useful during the initial optimization phase or for bulk detection, continuous use on high-traffic sites may increase server load.
Automatically Optimize Images on Upload
Feature:
The "Automatically Optimize Images on Upload" feature in W3Speedster ensures that every image uploaded to your website—whether on WordPress or any PHP-based platform—is immediately optimized and, if enabled, converted to the WebP format. This proactive approach maintains performance and visual consistency across all content from the moment it's added.
Why We Need It
- Performance-First Workflow: Automatically compresses and converts images during the upload process, eliminating the need for delayed or background optimization.
- Consistency Across Media Files: Ensures all new media follow the same optimization settings, preventing quality mismatches and format inconsistencies.
- Improved Page Load Speeds: By reducing the size of uploaded images instantly, this feature contributes directly to better Core Web Vitals and faster rendering.
Potential Problems Without This Feature
- Unoptimized Media Usage: Large or uncompressed files could be served directly, negatively affecting loading speed and user experience.
- Mixed Format Output: If WebP conversion is not applied uniformly, users may experience inconsistent formats depending on the image or browser.
- Manual Processing Overhead: Admins must remember to manually trigger optimization processes for each new upload, adding to the operational burden.
What W3Speedster Does
Once this feature is enabled:
- Every newly uploaded image is automatically optimized according to your predefined image quality settings.
- If WebP conversion is also activated, the plugin simultaneously generates .webp versions.
- The appropriate image format is then served based on the end-user’s browser compatibility, ensuring optimal speed and visual quality.
Important Consideration
If you're on a shared hosting plan or a low-resource server, enabling this feature might slightly delay the media upload process due to real-time optimization.
Recommended Alternative:
For high-volume uploads or constrained servers, you may prefer disabling this feature and using the “Start Optimization” bulk tool periodically to process all new media files.
How to Enable
- Navigate to Dashboard > W3Speedster > Image Optimization
- Locate and enable the toggle for "Automatically Optimize Images on Upload"
- Make sure both “Convert to WebP” and “Optimize JPG/PNG” are also enabled for full functionality
- Click Save Changes
Responsive Images
Feature:
The Responsive Images feature in W3Speedster allows your website to serve device-appropriate background images based on the visitor’s screen size—desktop, tablet, or mobile. This adaptive image delivery ensures faster page loads, efficient bandwidth usage, and visually consistent experiences across all devices.
Why This Feature Matters
- Device-Specific Optimization: Large images intended for desktops are unnecessary on mobile devices. This feature ensures each device only receives the image size it truly needs.
- Enhanced User Experience: Images are always displayed with correct dimensions and quality, avoiding distortion, cropping issues, or low resolution.
- Improved Performance: By delivering lightweight versions on smaller screens, the plugin reduces data consumption and speeds up page rendering, especially over mobile networks.
Issues Without Responsive Background Images
- Slower Load Times on Mobile: Downloading full-size desktop background images on a mobile device results in wasted bandwidth and sluggish performance.
- Inconsistent Visual Quality: Without size-specific images, background visuals may stretch, pixelate, or display improperly across various screen sizes.
- Higher Bounce Rates: Slow-loading or misaligned visuals can frustrate users and lead to faster page abandonment.
How W3Speedster Solves This
When the Responsive Images setting is enabled:
- The plugin automatically generates background image variants optimized for different breakpoints (e.g., 595px for mobile, 768px for tablets, 1024px+ for desktops).
- These variants are dynamically loaded using CSS or JavaScript, depending on the screen width of the user’s device.
- Each version is compressed according to your configured image quality settings, ensuring speed without sacrificing visual fidelity.
This responsive strategy guarantees that your background images load quickly and look perfect on every device.
Important Consideration
If you're on a shared hosting plan or a low-resource server, enabling this feature might slightly delay the media upload process due to real-time optimization.
How to Enable This Feature
- Navigate to Dashboard > W3Speedster > Image Optimization
- Locate the “Responsive Images” option
- Make sure both “Separate Cache for Mobile” and “Separate CSS Cache for Mobile” are also enabled for full functionality
- Toggle it ON
- Click Save Changes
Upload Directory Path for Images
Feature:
W3Speedster provides a dedicated tool to optimize all images within a specified server directory. This feature is especially useful for non-CMS-based PHP frameworks or custom-built platforms where media management is handled manually or through backend file systems.
Why We Need It
- Performance Improvement: Unoptimized images can drastically slow down page load times, especially on mobile and low-bandwidth connections.
- Manual Upload Handling: In many PHP frameworks, images are uploaded or managed outside of media libraries, requiring a manual optimization method.
- Reduce Bandwidth Usage: Optimized images consume less bandwidth on every request, saving server and user-side data.
- Ensure Web Readiness: Ensures images are in the ideal size and format for web delivery without compromising visual quality.
How It Works in W3Speedster
- Directory Input: The user is prompted to enter the absolute path to the folder containing images (e.g., /var/www/project/public/uploads/2024/).
- Recursive Scan: W3Speedster scans the specified directory and subdirectories to locate all supported image types (JPEG, PNG).
- Format Conversion: If WebP optimization is enabled, the tool converts compatible images to the WebP format.
- Lossless Optimization: Each image is processed using lossless compression techniques to reduce size without affecting visible quality.
- File Overwrite or Backup (Based on Settings):
- If Remove Original Image is enabled, original images are replaced.
- If backup is preferred, optimized versions are stored and original files are retained under public root directory as backup.
- Completion Report: A summary of total images optimized, space saved, and any skipped files is shown after processing.
Benefits
- Batch Optimization: Optimize thousands of images with scheduled cron job, saving manual effort.
- No Quality Loss: Compression is performed with precision to retain original clarity and resolution.
- Reduces Hosting Costs: Smaller files mean lower disk usage and bandwidth consumption.
- Enhances SEO & UX: Faster image load times improve Core Web Vitals and user experience.
How to Access
- Navigate to the Image Optimization Tab of the W3Speedster interface.
- Locate the Upload Directory Path for Images input.
- Enter the full path to the image directory you want to optimize (e.g., /home/user/project/public/assets/images/).
- Click Start Optimization.
Calculate Image
Feature:
W3Speedster includes a smart module that analyzes a specified folder path, automatically detecting images that can benefit from optimization. This ensures that only eligible and relevant images are processed—saving time, preserving quality, and enhancing application performance across all PHP-based platforms.
Why We Need It
- Avoid Unnecessary Processing: Prevents re-optimization of already optimized or unsupported files.
- Workflow Transparency: Gives users an overview of how many image files exist and are eligible for optimization.
- Efficient Resource Usage: Saves server resources by targeting only valid image files.
How It Works in W3Speedster
- Directory Input: The user provides the absolute server path to the image directory (e.g., /var/www/project/public/uploads/).
- Directory Evaluation: The system verifies that the directory exists and is accessible and recursively scans the folder and its subdirectories.
- Image Validation: It filters files based on file extension support (.jpg, .jpeg, .png) and excludes already optimized WebP files.
- Image Count Display: Once scanning is complete, it - Displays the total number of images need to be optimized. and reset the current image optimization.
Benefits
- Streamlines Workflow: Allows users to make informed decisions before optimization begins.
- Improves Accuracy: Ensures only necessary images are processed.
- Saves Time: Prevents reprocessing and redundant server load.
- Supports Large Repositories: Well-suited for directories with thousands of image assets.
How to Access
- Navigate to the Image Optimization Tab of the W3Speedster interface.
- Locate the Upload Directory Path for Images input.
- Enter the full path to the image directory you want to optimize (e.g., /home/user/project/public/assets/images/).
- Click Calculate Images.
Start Image Optimization
Feature:
The “Start Image Optimization” feature in W3Speedster triggers the on-demand compression and enhancement of all existing images within your website's media library. This process helps reduce image file sizes without sacrificing quality, resulting in faster page loads, lower bandwidth consumption, and improved SEO performance.
How It Works
Once the feature is activated:
- W3Speedster scans your media library for image files in supported formats such as JPG and PNG.
- Each image is optimized using advanced compression techniques.
- If enabled, images are also converted to the WebP format, improving efficiency for modern browsers.
- Depending on your configuration, optimized images can either replace the originals or coexist alongside them.
- Image quality is maintained at the preset threshold (default is 90%, adjustable in settings).
This process runs in the background, ensuring minimal interruption to your regular site operations.
Free vs Pro Capabilities
- Free Version: Allows the optimization of up to 500 images, making it suitable for new or small-scale websites.
- Pro Version: Lifts all limits, supporting unlimited image optimization. This is essential for larger websites, blogs, and e-commerce platforms.
Upgrading to Pro ensures your entire image library is optimized efficiently and automatically, especially as your content grows.
How to Use the Feature
- Navigate to W3Speedster > Image Optimization
- Click on the “Start Optimization” button
- The plugin will begin processing your images asynchronously
You can monitor the optimization status within the same interface. Pause or resume as needed.
Benefits of Image Optimization
- Faster Page Loads: Smaller file sizes improve load times on both desktop and mobile.
- Better SEO and Core Web Vitals: Optimized images directly enhance scores in tools like Google PageSpeed Insights.
- Reduced Bandwidth Usage: Especially beneficial for high-traffic websites or those on limited hosting plans.
- Improved User Experience: Faster media rendering leads to higher engagement and lower bounce rates.
Restore Original
Feature:
The “Restore Original” button allows users to safely revert back to their original image files that were previously backed up before being replaced by optimized WebP images. This ensures that users maintain full control over their media library without permanent loss of original content.
Why We Need It
- Not all browsers or environments support WebP images perfectly; sometimes, visual or layout issues may arise.
- Website owners may later decide to:
- Re-edit or resize the original image.
- Stop using WebP for compatibility reasons.
- Switch optimization tools or workflows.
- Therefore, the ability to safely and easily restore original images provides necessary flexibility and peace of mind.
How It Works in W3Speedster
This feature works only when the “Remove Original Image” option is unchecked (i.e., original images were backed up instead of deleted).
When You Click "Restore Original":
- It locates the original image from the secure backup folder (/wp-content/uploads/w3speedster-backup/).
- Replaces the current WebP-optimized image with the original JPEG/PNG version.
- Ensures the restored file is placed correctly in the standard /uploads/ directory.
- This process is safe, non-destructive, and can be reversed again if needed.
Benefits of Keeping Original Images
- Revert-Friendly: Instantly switch back to original image files with a single click.
- Non-Permanent Optimization: Gives users the freedom to experiment with WebP optimization without long-term impact.
- Compatibility Recovery: Useful if you face theme/plugin/display issues caused by WebP rendering.
- Full Media Control: Avoids the risk of permanent file loss and allows strategic performance management.
How to Enable "Keep Original Images"
- Navigate to W3Speedster → Image Optimization tab.
- Ensure that “Remove Original Image” is unchecked (backup exists).
- Click the “Restore Original” button.
- Wait for the success message indicating restoration is complete.
- Verify that your media library and front-end now use the original image formats (e.g., .jpg, .png).
CSS Optimization
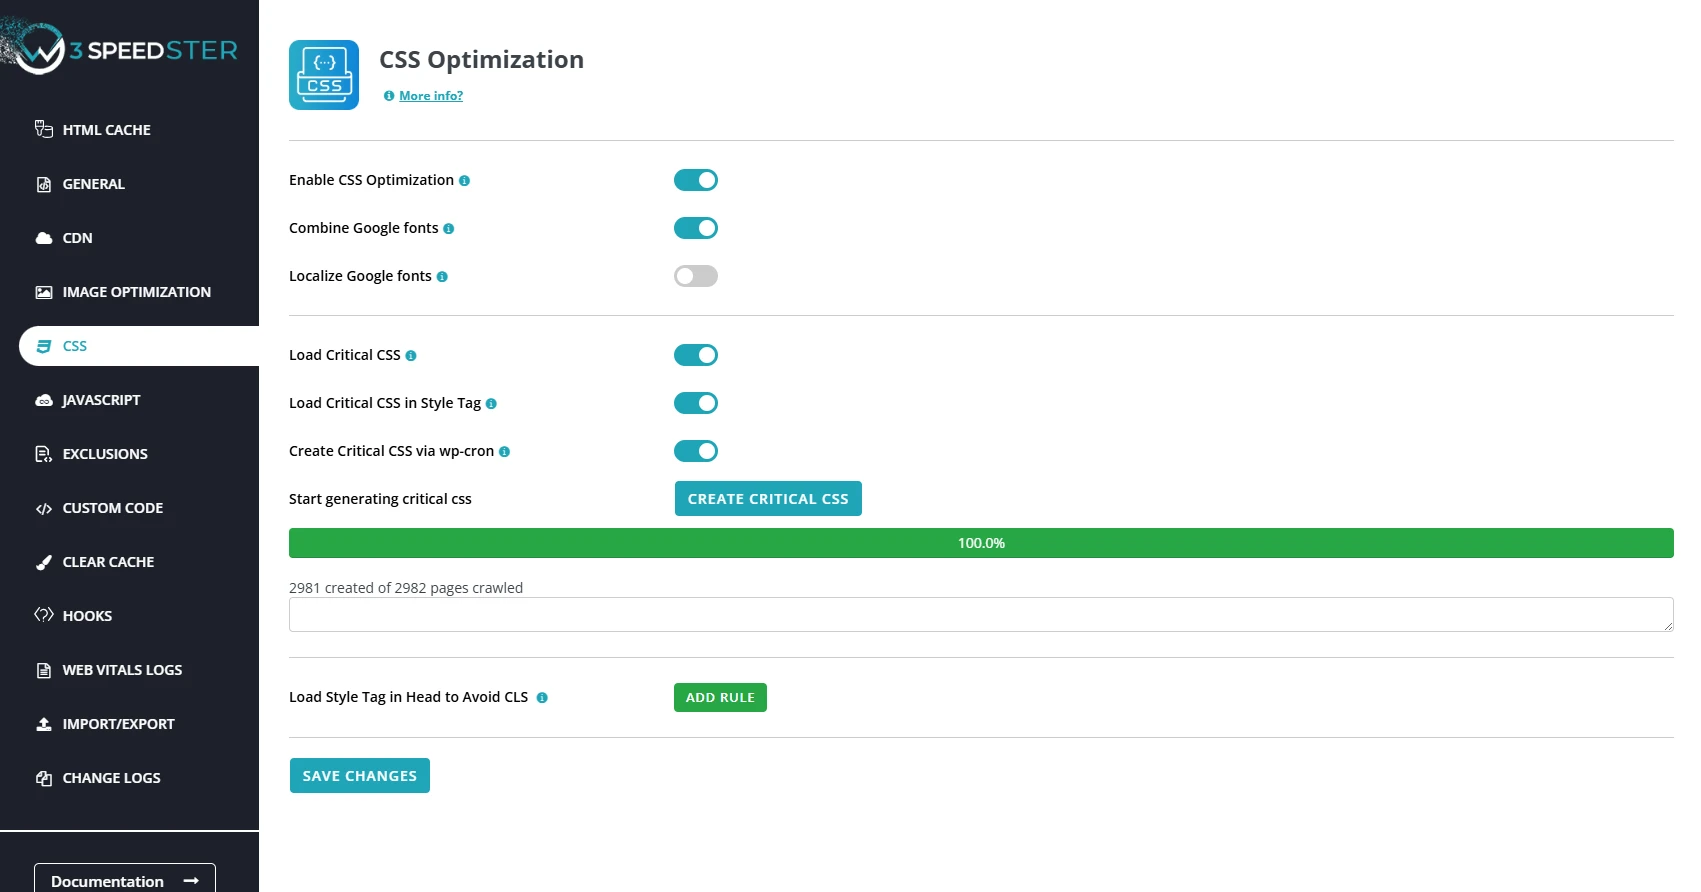
Enable CSS Optimization
Feature:
CSS Optimization is the process of reducing the size of CSS files and minimizing their render-blocking impact during page load. Enabling CSS optimization ensures that only essential styles load in an efficient order, resulting in faster page rendering and improved Core Web Vitals performance.
Why We Need CSS Optimization
- Improve Page Load Speed: Optimized CSS reduces file size and parsing time, allowing browsers to render pages faster.
- Reduce Render-Blocking: Critical CSS loads essential styles immediately, minimizing delays in displaying visible content.
- Enhance User Experience: Fast and smooth page rendering reduces layout shifts and improves perceived performance.
- Support Advanced Features: Enables dependent optimizations such as custom CSS injection and CSS caching for better management.
Problems Without CSS Optimization
- Large CSS Files: Unminified CSS increases bandwidth use and slows down page loading.
- Render-Blocking Delays: Loading full CSS files before page display can delay visual content and degrade metrics like First Contentful Paint (FCP).
- Flash of Unstyled Content (FOUC): Without critical CSS, users may see briefly unstyled pages, leading to inconsistent experiences.
- Manual Complexity: Developers need to manually handle CSS minification and delivery, increasing maintenance effort and risk of errors.
How W3Speedster Solves These Problems
- Minification: Removes whitespace, comments, and unnecessary characters from CSS files to reduce size without affecting styles.
- Critical CSS Generation: Automatically extracts and inlines CSS required for above-the-fold content to ensure immediate styling on page load.
- Deferred Loading: Non-essential CSS is loaded asynchronously or deferred to prevent blocking the rendering of visible content.
- Custom CSS Support: Allows adding optimized custom CSS that benefits from minification and caching for consistent performance.
- Cache Management: Efficiently caches optimized CSS files, serving them quickly on subsequent requests to improve load times.
Combine Google fonts
Feature:
The Combine Google Fonts feature in W3Speedster consolidates multiple Google Fonts requests into a single HTTP request. By merging these calls, it significantly reduces the number of network requests needed to load fonts on your website. This optimization enhances page load speed, decreases resource overhead, and improves the overall performance of your site, resulting in a smoother and faster user experience across all devices and platforms.
Why We Need It
- Reduce HTTP requests to minimize network latency and server load.
- Accelerate font delivery for faster text rendering and improved visual stability.
- Prevent font flickering or delays, ensuring consistent typography appearance.
- Improve SEO and Core Web Vitals metrics such as First Contentful Paint (FCP) and Largest Contentful Paint (LCP).
Problems Without Combining Google Fonts
- Multiple HTTP calls for each font family or weight increase page load time.
- Delays in font rendering can cause invisible or fallback fonts to appear temporarily.
- Bandwidth inefficiency due to repeated downloads of similar font resources.
- Visual inconsistencies from Flash of Unstyled Text (FOUT) or Flash of Invisible Text (FOIT).
How W3Speedster Solves These Problems
- Combines all Google Fonts URLs into a single optimized request, reducing HTTP calls.
- Requests only the necessary font variants to minimize payload size.
- Hooks seamlessly into font enqueue mechanisms in your site without altering codebases.
- Enhances performance metrics by ensuring faster font availability and rendering.
Benefits
- Faster page loading with reduced network requests.
- Consistent and smooth font display across all devices.
- Lower bandwidth consumption and server resource usage.
- Improved user experience and engagement.
- Better SEO rankings due to enhanced Core Web Vitals scores.
How to Configure
- Navigate to your W3Speedster settings .
- Locate the Combine Google Fonts option under the CSS optimization section.
- Enable the toggle to activate the feature.
- Save changes to apply the configuration.
- Clear any existing caches if applicable to ensure the new settings take effect immediately.
Localize Google Fonts
Feature:
Localize Google Fonts is a powerful feature in W3Speedster that downloads and serves Google Fonts directly from your own server instead of fetching them from Google’s Content Delivery Network (CDN). This approach reduces external dependencies, enhances privacy and security, and improves overall website performance by allowing better control over font delivery.
Why We Need It
- Improves loading speed by reducing DNS lookups and external network delays.
- Enhances privacy and regulatory compliance by avoiding user data transmission to third-party servers.
- Increases reliability by eliminating dependence on Google’s servers, preventing font loading issues caused by downtime or network blocks.
- Provides better cache control through font versioning on your server.
- Boosts SEO and Core Web Vitals by ensuring faster, more reliable font loading and improved user experience.
Problems Without Localizing Google Fonts
- External font requests cause additional DNS and connection overhead, delaying page loads.
- Font loading may fail due to blocking of Google services in certain corporate networks or regions.
- Limited cache control since fonts are cached according to Google’s policies, not site-specific needs.
- Mixed content issues arise if fonts are served over HTTP on HTTPS sites, triggering security warnings.
How W3Speedster Solves These Problems
- Automatically downloads required Google Fonts and serves them locally from your server environment.
- Rewrites Google Fonts URLs in CSS files to local paths, ensuring seamless integration without manual adjustments.
- Integrates smoothly to your website by hooking into font enqueue or CSS generation processes.
- Eliminates the need to contact third-party servers for font delivery, improving privacy compliance.
- Enables faster font delivery using your server’s caching and CDN infrastructure, reducing load times and increasing reliability.
- Removes external dependencies, making your site more self-contained and resistant to third-party outages or blocks.
Benefits
- Faster font rendering and improved page load speed.
- Enhanced user privacy and compliance with GDPR and similar regulations.
- Increased site reliability and reduced risk of font loading failures.
- Full control over caching policies and font versioning.
- Avoidance of mixed content warnings on HTTPS sites.
- Compatibility with all major PHP frameworks, ensuring consistent behavior across platforms.
How to Configure
- Access your W3Speedster settings.
- Navigate to the CSS optimiztion.
- Enable the Localize Google Fonts option by toggling it ON.
- Save changes to apply the configuration.
- Clear any existing caches if applicable to ensure the new settings take effect immediately.
Load Critical CSS
Feature:
“Load Critical CSS” is a crucial performance optimization technique that identifies and loads only the essential CSS needed to render above-the-fold content during the initial page load. This allows browsers to quickly display visible content without waiting for the entire CSS file to download, significantly enhancing perceived load speed and visual responsiveness. W3Speedster automates this process by extracting critical CSS for each page and delivering it inline or asynchronously, ensuring optimal performance for all PHP-based platforms.
Why We Need It
- Speeds up First Contentful Paint (FCP) by enabling rapid rendering of visible content.
- Improves Core Web Vitals metrics such as Largest Contentful Paint (LCP) and First Input Delay (FID) by minimizing layout shifts and interaction delays.
- Eliminates render-blocking CSS, allowing HTML parsing and page rendering without unnecessary delays.
- Enhances user perception by displaying content faster, which increases engagement and reduces bounce rates.
Problems Without Critical CSS
- Entire CSS files load before any content appears, causing render-blocking and delayed page display.
- Large CSS frameworks (e.g., Bootstrap, Tailwind) often include many unused styles during initial load, increasing payload unnecessarily.
- Users on slow networks experience longer wait times before the page becomes interactive, particularly on mobile devices.
- Performance scores in tools like Google PageSpeed Insights suffer due to render-blocking and unused CSS.
How W3Speedster Solves These Problems
- Automatic Critical Path Detection: Analyzes each page’s DOM to identify CSS needed for above-the-fold content.
- Inline Critical CSS Injection: Inserts extracted critical CSS directly into the HTML <head> section as inline styles for immediate rendering.
- Asynchronous Full CSS Loading: asynchronously loads non-critical CSS using rel="preload", preventing render blocking.
- Caching for Efficiency: Stores generated critical CSS to avoid repeated processing and integrates with caching mechanisms.
- Responsive Handling: Generates critical CSS tailored to different device breakpoints (desktop, tablet, mobile) to ensure consistent rendering across all screen sizes.
Benefits
- Reduces Time to First Render by focusing on essential styles only.
- Prevents Flash of Unstyled Content (FOUC) for a smoother visual experience.
- Enhances Google PageSpeed Insights and Core Web Vitals scores.
- Requires no manual setup or intervention except initial configuration; automation manages the entire process dynamically.
Load Critical CSS in Style Tag
Feature:
“Load Critical CSS in Style Tag” is a technique where the essential CSS required to render above-the-fold content is embedded directly within a <style> tag inside the HTML <head>. This approach eliminates the need for the browser to wait for external CSS files before rendering critical page elements, thereby reducing render-blocking and improving perceived page load times. W3Speedster automates this process across all PHP-based platforms, ensuring that key visual content appears instantly during page load.
Why We Need It
- Avoids render blocking by making critical styles available immediately without waiting for external CSS downloads.
- Improves First Contentful Paint (FCP) and other initial paint metrics by reducing the time before users see meaningful content.
- Enhances mobile performance by reducing network round trips required to load CSS files.
- Helps comply with Google PageSpeed Insights recommendations, specifically eliminating render-blocking resource warnings.
Problems Without This Approach
- Visual rendering is delayed as browsers must download entire CSS files before displaying any content.
- Multiple HTTP requests for stylesheets increase network overhead and latency.
- Core Web Vitals scores, particularly FCP and Largest Contentful Paint (LCP), are negatively impacted.
- Absence of critical CSS can cause layout shifts (Cumulative Layout Shift - CLS), leading to poor user experience.
How W3Speedster Solves These Problems
- Generating Critical CSS: Automatically scans each page’s layout and extracts only the CSS necessary to render above-the-fold content.
- Inlining via <style> Tag: Inserts the critical CSS inline within a <style> tag in the page’s <head>, ensuring immediate availability at page load without external requests.
- Responsive Compatibility: Adapts critical CSS output for mobile and desktop views, ensuring device-appropriate styles are inlined. But if you have different layout for different devices need to ensure that Seperate CSS Cache for mobile and Seperate Cache for mobile is enabled.
- Non-Critical CSS Handling: Defers loading of the remaining CSS asynchronously to avoid blocking page rendering.
Benefits
- Enables faster initial rendering by eliminating dependency on external CSS style requests.
- Removes render-blocking CSS warnings in performance testing tools like Google PageSpeed Insights.
- Enhances user experience by ensuring visible content is styled immediately.
- Fully automated and cached process requiring no manual intervention after initial setup.
Create Critical CSS via cron
Feature:
Create Critical CSS via Cron is a feature in W3Speedster that automates the generation of Critical CSS for website pages through scheduled background tasks (cron jobs). Rather than producing Critical CSS on-demand during page requests—which can affect performance—this method precomputes essential styles in the background. This approach improves overall site responsiveness and provides a smoother user experience across all PHP-based platforms.
Why We Need It
- Minimizes page load impact by avoiding Critical CSS generation during the first visitor’s request.
- Automates optimization by ensuring Critical CSS stays current without manual updates, especially after content or theme changes.
- Enhances Core Web Vitals by guaranteeing that key CSS loads immediately, reducing render-blocking and layout shifts.
- Supports scalability for large websites by systematically generating Critical CSS for multiple pages without overloading the server during user visits.
Problems Without Cron-Based Generation
- Performance bottlenecks arise when Critical CSS is generated on user requests, causing slower page rendering.
- Risk of stale or outdated Critical CSS if regeneration is manual or demand-based, leading to inconsistencies.
- Uneven user experience as some visitors may face delays if Critical CSS is not precomputed.
- Limited control and higher maintenance overhead when managing Critical CSS generation manually for numerous pages.
How W3Speedster Solves These Problems
- Utilizes scheduled background processing via cron to generate Critical CSS during off-peak times or regular intervals.
- Employs batch processing to generate Critical CSS for multiple pages efficiently, preventing server overload.
- Automatically detects style or content changes and triggers re-generation to keep Critical CSS accurate.
- Improves site performance by delivering pre-generated Critical CSS, reducing Cumulative Layout Shift (CLS) and accelerating page rendering.
Benefits
- Ensures consistently fast page loads by preloading essential CSS ahead of user visits.
- Reduces server load during peak traffic by shifting Critical CSS generation to scheduled tasks.
- Maintains up-to-date critical styles automatically, improving site reliability and user experience.
- Provides a scalable solution suitable for websites with large numbers of pages or frequent content updates.
Start generating critical CSS
Feature:
Start Generating Critical CSS is the command or action in W3Speedster that initiates the process of extracting and creating the critical CSS styles necessary for your website’s above-the-fold content. This process identifies and isolates the minimal set of CSS rules required to render the visible portion of a webpage immediately, deferring the loading of all other non-essential CSS. The outcome is a faster first render and improved perceived performance for users.
How It Works
- When you start generating Critical CSS, the plugin scans the HTML structure of your site’s pages to understand what CSS is essential for rendering the visible content on initial load.
- It then extracts this CSS subset from the full CSS files used on the site, creating smaller, focused CSS files (Critical CSS) tailored for each page or template.
- These Critical CSS snippets are either embedded inline in the of your HTML or loaded via a style tag to ensure they are applied immediately when the page loads.
- The remaining CSS is loaded asynchronously or deferred, preventing render-blocking and speeding up the visual presentation.
- The generation process can target all pages or specific URLs, depending on your configuration, and runs either manually or automatically via cron jobs for scalability.
Why It’s Important
- Improves User Experience: Users see content faster because the browser doesn’t wait for large CSS files to download before painting the page.
- Reduces Cumulative Layout Shift (CLS): Reserving styles upfront prevents layout shifts caused by late CSS application.
- Enhances Core Web Vitals: Critical CSS significantly impacts metrics like Largest Contentful Paint (LCP), a key Google ranking factor.
- Optimizes Server Load: By generating Critical CSS ahead of time, server resources are conserved during actual user visits.
Practical Considerations
- The generation can take time and server resources, especially on large websites with many pages.
- It should be triggered after major design or CSS changes to ensure accuracy.
- Regenerating Critical CSS periodically or via cron jobs helps keep styles current and effective.
- This process is essential for all modern PHP frameworks where performance and SEO matter.
Free VS pro
- Free
- You can only create Critical CSS for Home Page.
- Pro
- You can create unlimited CSS for whole Site.
In summary, Start Generating Critical CSS is the essential step that transforms your bulky CSS files into lean, page-specific styles that dramatically improve load speed and user experience by delivering only what is needed for the initial view. W3Speedster automates and manages this process efficiently across all PHP environments.
Load Style Tag in Head to Avoid CLS
Feature:
Cumulative Layout Shift (CLS) refers to the unexpected shifting of web elements during the loading phase of a webpage. These shifts typically occur due to delayed loading of styles, images, fonts, or other dynamic content. W3Speedster addresses this issue by injecting required CSS directly into the <head> tag, ensuring that all essential styles for above-the-fold content are applied immediately. This prevents layout instability and improves the overall user experience.
Why We Need It
- Prevent Layout Shifts: Ensures that key visual elements remain stable during loading by applying critical styles before rendering begins.
- Improve User Experience: Eliminates visual jank and jumping content, providing a smooth and trustworthy browsing experience.
- Enhance Google Core Web Vitals: CLS is a critical metric in Google’s ranking algorithm. Lower CLS scores directly impact SEO performance and search visibility.
- Optimize Mobile Performance: On slower devices or networks, mobile users are more prone to layout shifts. This solution stabilizes rendering for all screen sizes.
Problems Without It
- Unstable Layouts: Late-loading styles cause elements to reposition unexpectedly, disrupting user interaction.
- Poor CLS Scores: High CLS values negatively impact Core Web Vitals and result in lower search engine rankings.
- Degraded Perceived Speed: Users may interpret shifting layouts as poor design or performance, increasing bounce rates.
How W3Speedster Solves CLS
- Injects CSS in <head>: Automatically generates and embeds only the necessary CSS for above-the-fold content directly into the HTML <head>.
- Eliminates Render Blocking: By avoiding external CSS dependencies for initial rendering, W3Speedster reduces delays and accelerates visual load time.
- Ensures Layout Stability: Preloaded styles ensure that the browser renders the layout correctly from the start, preventing layout jumps and shifts.
Key Benefits
- Stable Rendering: Prevents CLS by ensuring essential styles are loaded upfront.
- Faster Load Time: Reduces render-blocking behavior and boosts initial paint performance.
- Better SEO: CLS improvements contribute to higher Core Web Vitals scores and better rankings.
- Seamless Mobile Experience: Ensures content remains stable across all device types.
How to Configure
- Open W3Speedster Settings: Log into your website’s admin panel and navigate to the W3Speedster plugin settings.
- Go to CSS Optimization: In the settings menu, locate and select the CSS Optimization section.
- Find the ‘Load Style Tag in Head to Avoid CLS’ Option: Scroll down to locate the Load Style Tag in Head to Avoid CLS feature within the CSS options.
- Add a Rule: Click on “Add Rule” and enter the file name or style tag ID responsible for Cumulative Layout Shift (CLS).
- Save Changes: Click Save to apply the configuration changes.
- Clear any existing caches if applicable to ensure the new settings take effect immediately.
Javascript Optimization
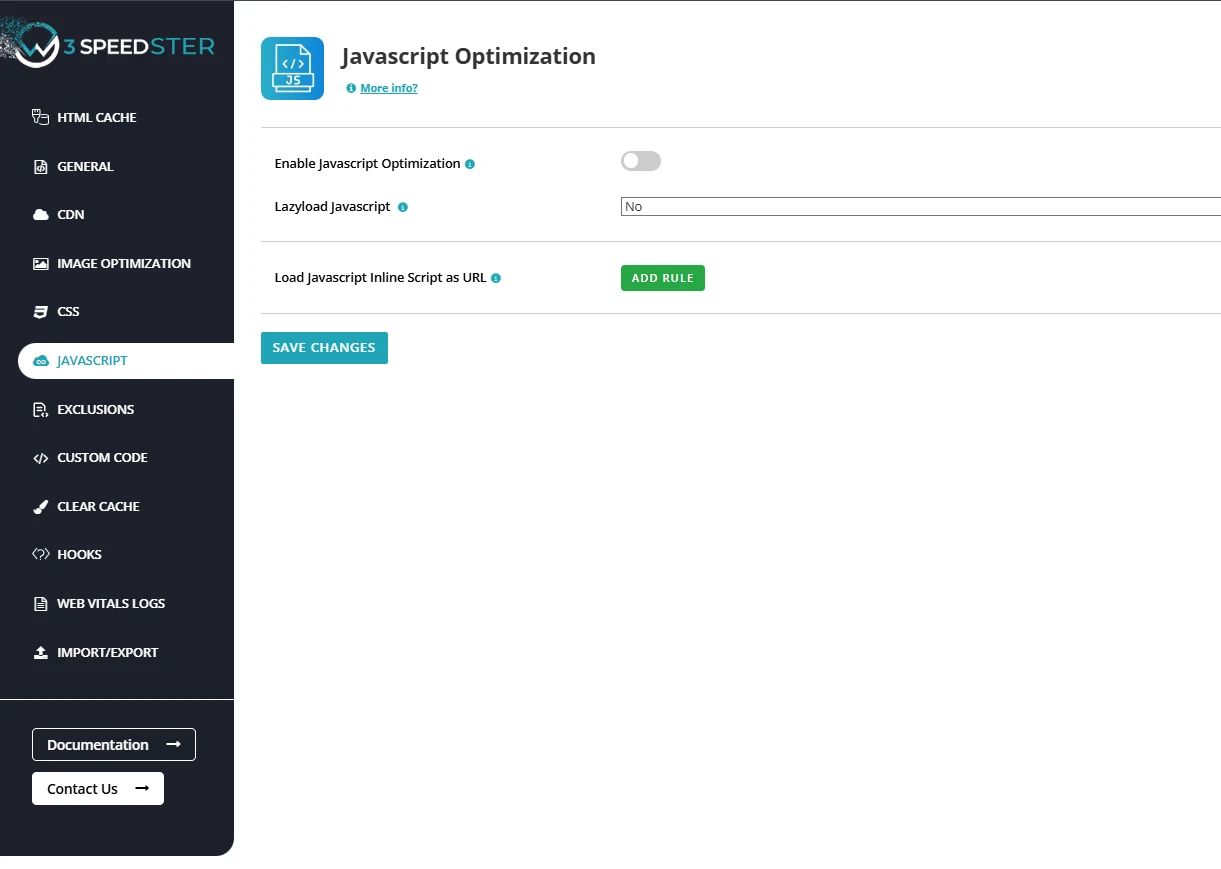
Enable Javascript Optimization
Feature:
JavaScript enhances interactivity and functionality on web pages, but unoptimized JavaScript can slow down loading, increase server load, and negatively affect SEO. W3Speedster addresses this by offering JavaScript optimization, a set of techniques including minification, deferral, asynchronous loading, and combination of scripts. This ensures faster load times, reduced render-blocking, and better user experience across all PHP-based websites.
Why We Need JavaScript Optimization
- Faster Page Load: Minimizing and deferring JavaScript reduces the time browsers take to render the page.
- Improved Performance: Fewer and smaller scripts mean fewer HTTP requests, lighter pages, and lower latency.
- Enhanced SEO: Core Web Vitals like First Contentful Paint (FCP) and Time to Interactive (TTI) improve when non-critical scripts are deferred.
- Better User Experience: Quick loading and smooth interactivity reduce bounce rates and increase user retention.
Problems Without Optimization
- Slow Page Rendering: Unoptimized JavaScript blocks HTML rendering, especially when loaded in the <head>.
- Increased Server Load: Multiple HTTP requests from separate script files put pressure on the server.
- Poor Core Web Vitals: Delayed interactivity and long input delay impact FCP, TTI, and Interaction to Next Paint (INP) metrics.
- Unresponsive UI: Users may experience janky scrolling, delayed clicks, or freezing interfaces.
How W3Speedster Optimizes JavaScript
- Minification
- Removes white spaces, comments, and unnecessary characters from JavaScript files.
- Decreases file size and accelerates download and execution.
- Deferring Non-Critical JavaScript
- Postpones the execution of scripts not essential for the initial view.
- Examples include analytics, chat widgets, or third-party integrations.
- Techniques:
- defer: Executes scripts after HTML is parsed.
- async: Loads scripts independently without blocking page rendering.
- JavaScript Resource Management
- Identifies and skips loading of redundant JS files.
- Improves efficiency and reduces page bloat.
Key Benefits
- Fast Load Times: Smaller, fewer, and deferred scripts make rendering quicker.
- Improved SEO: Enhanced Core Web Vitals help increase visibility and search rankings.
- Responsive Interaction: Users can interact with the page faster, leading to lower bounce rates.
- Optimized Mobile Experience: Lightweight and deferred scripts benefit users on slower devices and networks.
- Lower Bandwidth Usage: Reduces data usage, especially useful for mobile users and limited plans.
Summary
W3Speedster improves JavaScript performance across all PHP frameworks by:
- Minifying and combining JavaScript files to streamline delivery.
- Deferring or async-loading non-essential scripts to avoid render-blocking.
- Prioritizing essential interactivity scripts for immediate use.
- Managing JavaScript loading efficiently, avoiding redundant or unused files.
This ensures faster, more responsive websites with better SEO and user engagement.
Lazyload Javascript
Feature:
Lazyload JavaScript is a performance-enhancing technique used by W3Speedster that delays the loading of non-critical JavaScript files until after the page’s primary content is displayed or the user interacts with the page (e.g., scroll, click, mouse movement).
This method reduces render-blocking behavior and improves load times, especially on mobile devices and slower networks. W3Speedster includes a global switch to enable or disable this optimization across the entire website.
Why We Need Lazyload JavaScript
- Faster Initial Page Load - Non-essential scripts are loaded later, making the page interactive more quickly.
- Improved Core Web Vitals - Metrics like FCP, LCP, and INP benefit from reduced main-thread blocking caused by early script execution.
- Lower Bandwidth Consumption - JavaScript that is never needed in a session may not be loaded at all.
- Enhanced Mobile Experience - Devices with limited resources benefit from deferred script loading, resulting in smoother browsing.
Problems Without Lazyloading
- Render-Blocking Scripts - Scripts in the <head> block the page from displaying until fully downloaded and parsed.
- Slower Time to Interactive (TTI) - Early loading of large scripts delays the moment a user can start interacting with the page.
- Higher Bounce Rate - Poor performance frustrates users and leads to early exits.
- Unnecessary Resource Loading - Scripts for features not immediately needed are loaded unnecessarily, consuming resources.
How W3Speedster Solves It
When Lazyload JavaScript is enabled, W3Speedster applies the following strategies:
- Defer and Async Attributes
- Rewrites <script> tags to include “[type="lazyJs"]” attributes.
- Ensures scripts load after the main content is parsed or when needed, without blocking rendering.
- Event-Based Triggering
- Scripts are executed only after user interactions such as scroll, mouse movement, or click.
- This shifts non-essential scripts outside the critical rendering path.
- Integration with JavaScript Optimization: Lazyloaded scripts can also be minified and combined, ensuring reduced size and efficient loading.
- Deferred Execution: Loads non-essential JavaScript only after initial page load or user action.
- Render-Blocking Prevention: Keeps critical content from being delayed by heavy script files.
- Core Web Vitals Boost: Enhances FCP, LCP, and INP—leading to better SEO and faster UX.
- Mobile-First Performance: Reduces strain on slower devices, improving mobile browsing speed.
Summary
Lazyload JavaScript by W3Speedster delivers the following site-wide improvements:
- Postpones script loading until needed.
- Applies defer, async, and event-triggered loading.
- Prevents blocking of the initial page render.
- Boosts performance and SEO through improved Core Web Vitals.
- Integrates seamlessly into any PHP environment with no user intervention.
Load Javascript Inline Script as URL
Feature:
This feature in W3Speedster externalizes large or critical inline JavaScript code blocks by converting them into standalone files. These files are then referenced using standard <script src="..."> tags. The goal is to reduce HTML size, improve browser caching, enable async or deferred loading, and comply with security practices like Content Security Policy (CSP).
Why We Need It
- Minimize HTML Payload - Embedding large scripts directly in HTML increases the document size and slows down parsing and rendering.
- Enable Asynchronous Execution - External scripts are easier to load using defer, async, or lazyload methods—unlike inline scripts.
- Boost Caching Efficiency - Once converted to external files, scripts can be cached by the browser and CDN, avoiding redundant loads across pages.
- Improve Security - Replacing inline scripts helps comply with CSP rules that often block inline execution.
- Optimize Script Management - External scripts can be minified, bundled, or lazyloaded using standard optimization strategies.
Problems Without This Optimization
- Render Blocking - Inline scripts block HTML parsing, especially if DOM manipulation is involved early in the document.
- Code Duplication - The same inline logic is duplicated across multiple pages, increasing total page weight.
- Limited Deferral Options - Inline scripts are executed immediately and cannot be easily deferred or async-loaded.
- No Browser Caching - Browsers treat each inline script as new, even if identical across pages—leading to inefficiencies.
Solutions Provided by W3Speedster
- Automatic Conversion: Detects and converts inline JavaScript blocks to external files at runtime or during output generation.
- Script Injection via <script src>: Replaces inline blocks with <script src="generated-file.js"> to load scripts externally.
- Supports defer, async, and Lazyload: Adds flexibility in loading strategies—ensures scripts don’t delay rendering.
- Improved Load Time: Smaller HTML and deferred scripts lead to faster content rendering and better performance.
- Granular Control: Allows selective conversion of inline scripts using keyword matches or length thresholds.
Best Practices
- Apply this to large inline scripts (e.g., analytics, third-party widgets, or modal logic).
- Avoid externalizing critical short scripts that must run before DOM parsing (like inline variables or settings).
- Regularly clear cache to regenerate new external versions when inline logic changes.
Summary
The Load JavaScript Inline Script as URL feature in W3Speedster offers key performance and security improvements:
- Reduces HTML size by moving large scripts into external files
- Allows caching and asynchronous loading of previously inline logic
- Prevents rendering delays caused by inline script execution.
- Supports advanced features like script deferring and lazyloading.
This optimization significantly enhances both load performance and user experience while maintaining compliance with modern web standards and security policies.
Exclusions
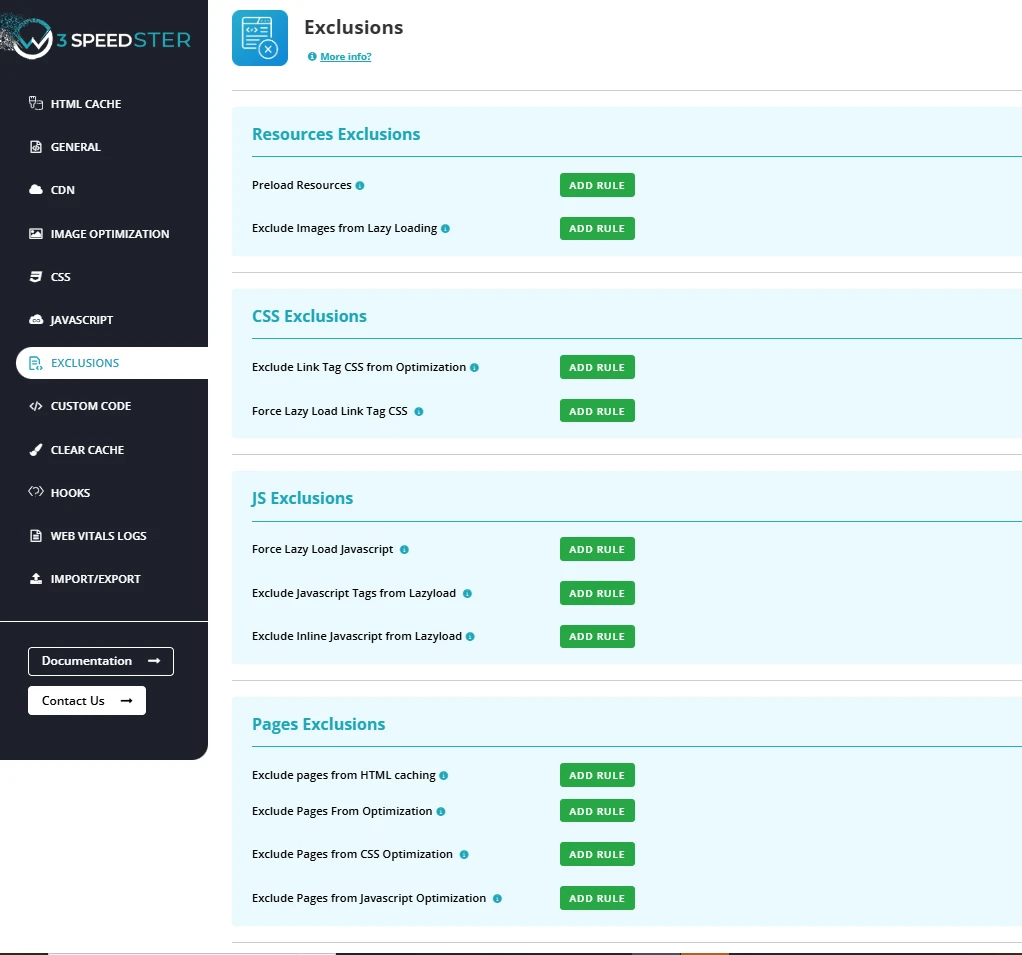
Preload Media
Feature:
The Preload Resources feature in W3Speedster enables developers to instruct browsers to prioritize fetching specific critical resources early, before they are discovered through standard HTML parsing. By injecting <link rel="preload"> directives into the document head, this mechanism accelerates the delivery of high-priority assets such as stylesheets, fonts, scripts, and images, improving page load speed and rendering time.
Why We Need It
- Improve Load Timing of Critical Assets: Preloaded resources are fetched immediately, reducing delays in rendering key visual and functional elements.
- Enhance Core Web Vitals (FCP, LCP): Early delivery of styles, fonts, and above-the-fold images directly improves First Contentful Paint (FCP) and Largest Contentful Paint (LCP).
- Avoid Render-Blocking Delays: Ensures critical files (fonts, CSS, etc.) are available when needed, reducing layout shifts and unstyled content.
- Boost PageSpeed Insights Scores: Resolves warnings such as “Preload key requests”, improving diagnostic performance metrics in tools like Google PSI and Lighthouse.
Problems Without Preloading
- Delayed Resource Discovery: Browsers only detect and fetch assets as they encounter them during HTML parsing—introducing latency for critical resources.
- Layout and Visual Shifts: Fonts and images may load too late, causing Flash of Unstyled Text (FOUT) or visual glitches in above-the-fold sections.
- Increased Time to Interactive (TTI): Late-loading scripts and styles delay interactive readiness, degrading user experience and engagement.
How to Configure
Under the Preload Resources settings, you can specify full URLs (one per line) of important assets like:
- https://example.com/wp-content/themes/theme/style.css
- https://example.com/wp-content/uploads/image.webp
- https://example.com/wp-content/themes/theme/fonts/custom.woff2
Best Practices
- Preload only above-the-fold or immediately used assets to avoid overloading the browser's preload queue.
- Avoid preloading non-critical or large resources that can block bandwidth.
- Use Developer Tools (Chrome DevTools > Performance/Network tab) or Google PageSpeed Insights to identify appropriate assets.
- Preload fonts and styles used in header, navigation, and hero sections to eliminate visual instability.
Summary
The Preload Resources feature in W3Speedster delivers faster and more predictable rendering by ensuring early fetch of high-priority files. It:
- Improves page speed by reducing discovery time for critical assets.
- Enhances Core Web Vitals metrics like FCP and LCP.
- Provides a flexible UI for developers to declare preloadable resources.
- Ensures proper browser behavior through automatic type and origin handling.
Preloading is a simple yet powerful way to accelerate perceived performance and optimize user experience across all devices.
Exclude Media from Lazy Loading
Feature:
The Exclude Resources from Lazy Loading feature in W3Speedster empowers developers to precisely define which assets, such as images, videos, js or iframes—should not be subjected to lazy loading. While lazy loading is essential for deferring non-critical content, certain resources (especially those above the fold or involved in early interactions) must load immediately to preserve layout stability, functional accuracy, and user experience.
Why We Need It
- Prevent Layout Shifts (CLS): Above-the-fold images that are lazy loaded can cause Cumulative Layout Shift (CLS), resulting in content movement and degraded visual experience.
- Ensure Functional Integrity: Media required for early interactions (e.g., banners with call-to-actions or interactive image buttons) must load without delay to ensure immediate usability.
- Maintain SEO and Accessibility: Critical visual content—such as logos, hero sections, or accessibility aids, must be fully rendered and indexed, especially for screen readers and crawlers.
Problems Without Exclusion
- Broken UI/UX: Lazy loading of essential images can lead to incomplete or broken layouts during the initial viewport rendering.
- SEO Compromise: Search engines may ignore lazy-loaded images if not handled properly, leading to reduced image indexing.
- Visual Lag for Branding Elements: Brand assets or strategic visuals (e.g., above-the-fold CTAs) that load late can negatively impact conversion rates and brand perception.
Solutions Provided by W3Speedster
W3Speedster enables selective exclusion of resources from lazy loading using the following targeting strategies:
- Partial or Full URLs
- Example: xyz.png - Matches any image URL that includes xyz.png.
- CSS Class Names
- Example: .nolazy - Excludes all images with this class name.
- Element IDs
- Example: #logo - Targets an image or media element with the ID logo.
- Alt Attributes
- Example: alt="above the fold" - Excludes images containing this exact alt text.
- Intelligent Parsing
- W3Speedster scans the output HTML and matches these conditions dynamically.
- The plugin ensures these matched elements bypass lazy loading, allowing them to load immediately and without delay.
Best Practices
- Exclude Only When Necessary: Apply exclusions to above-the-fold or critical UI elements only to avoid losing lazy load benefits.
- Use Precise Selectors: Leverage unique class names or IDs to avoid over-exclusion and preserve overall performance gains.
- Audit with PSI & DevTools: Utilize Google PageSpeed Insights or browser developer tools to identify which resources are impacting layout shifts or early user interactions.
Summary
The Exclude Resources from Lazy Loading feature in W3Speedster provides developers with targeted control to maintain layout precision and improve user experience. It:
- Prevents layout instability and visual shifts by loading critical assets early
- Enhances SEO and accessibility by ensuring prompt rendering of important media.
- Works seamlessly across all PHP frameworks through dynamic HTML processing.
- Supports custom exclusion via URLs, classes, IDs, and alt text.
- Balances lazy load performance with functional reliability and visual consistency
This feature is crucial for maintaining a professional, user-friendly front-end while benefiting from the performance optimizations of lazy loading elsewhere.
Exclude Background Images from Lazy Loading
Feature:
The Exclude Background Images from Lazy Loading feature in W3Speedster ensures that background images defined via CSS or inline styles are loaded immediately, bypassing the plugin’s lazy loading mechanism. This is essential for preserving the visual continuity, branding, and first-impression impact of websites where background imagery plays a key design or functional role.
Why We Need It
- Maintain Visual Integrity: Background images are often used in hero sections, sliders, or full-width banners. Lazy loading them can result in blank or visually broken areas on initial load.
- Prevent Flash of Empty Background (FOEB): Delayed loading can cause unstyled sections, which negatively affects user trust and engagement.
- Reinforce Brand Identity: Immediate rendering of background imagery supports branding, storytelling, and emotional impact—especially for visually rich designs.
- Support Design-First Layouts: When layout structure and visual mood depend on background images, deferring their load disrupts UX and design coherence.
Problems Without Exclusion
- Layout Disruption: Background-dependent sections may collapse or misalign before the image appears, breaking layout flow.
- Perceived Site Lag or Breakage: Users may see a partially rendered or visually inconsistent page, affecting trust and bounce rates.
- Reduced Initial Engagement: Delays in background visuals—especially in headers or hero areas—can diminish the first-click experience and conversion potential.
W3Speedster’s Solution
W3Speedster intelligently scans for HTML elements that use background images and ensures these bypass the lazy loading engine.
How It Works
- Enter the matching tag name, class. or ID.
- W3Speedster scans the output HTML and matches these conditions dynamically. Identifies elements such as ,
, etc., with inline or CSS-based: style="background-image: url('...')". - Prevents the lazy loading script from deferring these images.
- Ensures that background images are fetched and rendered during the browser's initial page load cycle.
Best Use Cases
- Hero banners and sliders: Visually critical sections often rendered full-width at the top of the page.
- Headers with background-text overlays: Where delayed image load impacts text readability and UX timing.
- Landing pages with immersive design: Where visual storytelling is central to conversion and branding.
Best Practices
- Enable Selectively: Use exclusion primarily for above-the-fold or high-impact sections only, to retain lazy loading benefits elsewhere.
- Optimize Background Assets: Convert background images to modern formats like WebP and use compressed resolutions appropriate to the display context.
- Measure with Core Web Vitals: Validate effectiveness using CLS, LCP, and FCP metrics in tools like Google PageSpeed Insights or Lighthouse.
Summary
The Exclude Background Images from Lazy Loading feature in W3Speedster ensures that design-critical backgrounds are rendered instantly, preserving layout integrity and delivering a consistent first impression. This feature:
- Eliminates visual lags caused by deferred backgrounds
- Protects layout consistency and brand experience
- Works across all PHP environments by parsing and modifying HTML output
- Complements other optimization techniques without compromising critical UX
By intelligently excluding only the necessary background images, this feature balances performance and aesthetic fidelity, helping deliver a fast and visually complete page experience.
Exclude Stylesheet URLs from Optimization
Feature:
The “Exclude Link Tag CSS from Optimization” feature in W3Speedster empowers developers and site administrators to selectively exclude specific CSS files from being affected by optimization techniques such as minification, combination, and lazy loading. This capability is essential for maintaining layout consistency, preventing conflicts, and ensuring third-party compatibility in complex or legacy environments.
Why We Need It
- Preserve Functional Styling: Certain CSS files are essential for the correct rendering of critical UI components, and must remain unaltered to prevent visual or functional issues.
- Avoid Conflicts: Optimization may change load sequence or structure, potentially breaking scripts or layouts that depend on specific styling order.
- Support Legacy and Custom Frameworks: Older themes or custom architectures often rely on strict inclusion patterns, making them vulnerable to global optimization techniques.
- Protect Third-Party Integrations: External plugins or embedded widgets that inject their own stylesheets may fail or render incorrectly if those files are altered or delayed.
Problems Without Exclusion
- Broken Layouts: CSS reordering or merging can disrupt flexbox/grid structures, padding/margin spacing, or z-index stacking, affecting user perception.
- Cumulative Layout Shift (CLS): Deferring essential styles causes unstyled flashes, leading to unstable rendering and poor Core Web Vitals scores.
- JavaScript Dependency Failures: Interactive elements may malfunction if their required styles aren’t available during initial script execution.
- Third-Party Styling Issues: Minifying or combining CSS from third-party tools may violate their internal dependencies, breaking UI/UX.
W3Speedster’s Solution
W3Speedster provides a dedicated interface to manually declare exclusions for stylesheets under the section: “Exclude Link Tag CSS from Optimization”, You can enter:
- Full file URLs - Example: https://example.com/wp-content/plugins/plugin-name/css/widget.css
- Partial paths or filenames - Example: 'widget.css', 'plugin-name/css/'
The Plugin Will Automatically:
- Skip minification for listed stylesheets.
- Avoid combining excluded files into bundled CSS groups.
- Prevent lazy loading, ensuring these styles are loaded with rel="stylesheet" immediately during page render.
Best Use Cases
- CSS files from third-party plugins that rely on precise load timing.
- Stylesheets containing critical layout or above-the-fold styles.
- Theme-specific CSS files that must load early and unaltered.
- Files required by JavaScript animations or event handlers.
Best Practices
- Exclude only necessary files: Avoid overusing this feature to maintain performance benefits for non-critical styles.
- Use browser DevTools or PSI: Identify which CSS files are causing layout shifts or delays.
- Test after exclusion: Measure key metrics like FCP, CLS, and LCP after applying exclusions.
- Exclude by specificity: Use precise paths or filenames to avoid excluding unrelated files that could still be optimized.
Summary
The “Exclude Link Tag CSS from Optimization” feature in W3Speedster offers fine-grained control over how CSS files are handled during optimization. It ensures:
- Stability for custom or sensitive stylesheets
- Compatibility with legacy themes and third-party plugins
- Prevention of visual shifts or broken layouts
- Seamless integration with all PHP-based platforms
This capability allows developers to balance optimization with reliability, tailoring performance without sacrificing design fidelity or functionality.
Force Lazy Load Stylesheet URLs
Feature:
The “Force Lazy Load Link Tag CSS” feature in W3Speedster enables developers to intentionally defer the loading of non-critical CSS files such as icon libraries and font stylesheets (e.g., fontawesome.css, icons.css). These CSS files are typically large and not required immediately during the initial page render, making them prime candidates for lazy loading to optimize performance.
Why We Need It
- Reduce Initial Payload: Large CSS files for icons or fonts are often unnecessary for above-the-fold content. Deferring their loading reduces the size of the initial CSS payload.
- Improve Page Speed Metrics: Delaying non-critical CSS helps improve metrics such as Time to First Byte (TTFB), First Contentful Paint (FCP), and Largest Contentful Paint (LCP) by removing render-blocking resources.
- Enhance User Experience: Users can interact with the page content faster, improving perceived performance and responsiveness.
- Save Bandwidth on Mobile: Deferring large stylesheets saves data and improves load speed for mobile users, especially when certain styles may never be needed.
Problems Without Forced Lazy Load
- Slower Initial Loads: Large CSS files block rendering, extending the time before the page becomes interactive.
- Negative Impact on Core Web Vitals: Render-blocking CSS harms important metrics that affect SEO and user experience.
- Bandwidth Waste: Users download unused stylesheets, which is inefficient, particularly on pages with conditional or rarely used UI components.
W3Speedster’s Solution
- Developers specify CSS filenames or paths (e.g., fontawesome.css, icons.css) in the Force Lazy Load CSS field.
- W3Speedster modifies the corresponding tags to load asynchronously, deferring stylesheet loading until after initial page render.
- This ensures these stylesheets do not block rendering and are fetched only when necessary.
Best Use Cases
- Font Libraries: FontAwesome, Material Icons, Google Fonts (non-critical styles).
- Icon Sets: Custom or third-party icon packs loaded site-wide but not immediately needed.
- Conditional Styles: CSS for modals, popups, tabs, or rarely visible UI elements.
Best Practices
- Ensure the stylesheet is not critical to the initial visible content to avoid flashes of unstyled content (FOUC).
- Monitor the site for any FOUC after enabling lazy load and consider using Critical CSS to inline essential styles.
- Pair this feature with Preload Resources for a balanced loading sequence if partial early loading is required.
Summary
The Force Lazy Load Link Tag CSS feature in W3Speedster provides granular control over CSS loading behavior, enabling significant improvements in page load speed and user experience by deferring unnecessary stylesheets without compromising critical visual elements. This results in faster rendering, better Core Web Vitals, and optimized bandwidth usage across all PHP frameworks.
Force Lazy Load Javascript
Feature:
The "Force Lazy Load JavaScript" feature in W3Speedster allows developers to defer the loading of non-critical JavaScript files or inline scripts that are not essential for the initial render. This includes third-party scripts such as social media widgets, analytics trackers, and marketing tools. Delaying these scripts improves performance without affecting primary functionality.
Why We Need It
- Enhance Page Load Speed: Non-essential scripts like those for Facebook, Instagram, or ad trackers can delay rendering. Lazy loading them ensures faster content visibility.
- Optimize Main Thread Usage: Reduces pressure on the browser’s main thread by loading heavy scripts only after initial rendering is complete.
- Improve Core Web Vitals: Directly improves performance metrics like First Input Delay (FID) and Interaction to Next Paint (INP) by deferring scripts that could otherwise delay interactivity.
- Conserve Bandwidth: Especially beneficial for mobile or low-bandwidth users by avoiding unnecessary script downloads during initial page load.
Problems Without Forced Lazy Load
- Render-Blocking Scripts: JavaScript from social widgets, ads, or analytics tools can delay page rendering, making the site feel slow.
- Poor Interaction Metrics: Heavy scripts executing early increase INP and FID scores, harming the user’s experience.
- Higher Bounce Rates: Users may abandon pages that appear slow or unresponsive due to unnecessary early JavaScript execution.
W3Speedster’s Solution
W3Speedster provides targeted lazy loading of specific JavaScript files or inline scripts through the "Force Lazy Load JavaScript" feature:
- Script Identification: Developers can enter script file names, URLs, inline script IDs, or partial matches (e.g., facebook, ads, instagram) into the configuration.
- Deferred Execution: Identified scripts are automatically delayed until the page after user interaction, reducing their impact on initial render.
- Non-blocking Behavior: Scripts do not interfere with the critical path, ensuring that visual content and interactivity load first.
Best Use Cases
- Social Media Widgets: Facebook, Twitter, LinkedIn embeds.
- Analytics Tools: Google Ads, Hotjar, Matomo (when not mission-critical).
- Marketing Plugins: Live chat scripts, newsletter popups, feedback collectors.
- Third-Party Services: Any JavaScript that is not essential to above-the-fold content.
Best Practices
- Use distinctive keywords or file names for targeting (e.g., ads.js, widget-loader.js, facebook).
- Verify functionality post-implementation to ensure that essential interactivity is not inadvertently delayed.
- Combine with Preload or Delayed Load options if the script must load shortly after render without blocking it.
Summary
By enabling Force Lazy Load JavaScript, W3Speedster provides granular control over script execution, ensuring only necessary code runs during the initial load. This improves page speed, interactivity, and visual stability—while significantly enhancing user experience and boosting performance scores across all PHP-based environments.
Exclude Javascript From LazyLoad
Feature:
The Exclude JavaScript from Optimization feature in W3Speedster offers developers precise control over which JavaScript elements, both tags and inline scripts—should bypass optimization routines such as lazy loading or minification. This ensures that critical functionality, user interface behaviors, and third-party integrations remain unaffected by performance enhancements.
Why We Need It
- Ensure Functional Reliability
- Prevent critical JavaScript files and inline logic from being delayed or reordered.
- Maintain stable and predictable behavior across all devices and user sessions.
- Support Script Dependencies: Many scripts require strict loading sequences or DOM availability. Excluding them prevents initialization errors.
- Protect Time-Sensitive Code: Tracking tools, API handlers, UI initializers, and third-party services often need synchronous execution during the initial page load.
Problems Without Exclusion
- Core Script Failures: Lazy loading may defer essential JavaScript (e.g., navigation, modals, or UI logic), causing broken functionality.
- Delayed Third-Party Integrations: Services like Google Analytics, Facebook Pixel, Stripe, or CAPTCHA systems may fail if their scripts load late or out of order.
- Visual & Interaction Glitches: UI elements relying on animation, layout calculation, or live updates may behave inconsistently.
- Loss of Event-Driven Behavior: Inline scripts tied to user actions or page-load events may not execute when needed, impacting UX and tracking accuracy.
W3Speedster’s Solution
W3Speedster resolves these issues with a dual mechanism for JavaScript exclusion:
- Exclude JavaScript Tags
- Script Identification - You can define:
- Full external URLs (https://example.com/js/main.js)
- File names (jquery.js, custom-interaction.js)
- Script tag identifiers or unique substrings in the script path.
- Bypass Lazy Load & Minification - Marked scripts are excluded from:
- Lazy loading deferral
- Minification and merging
- Async or defer manipulations
- Ideal Use Cases
- Core UI libraries (jquery.js, main.js)
- Payment SDKs (Stripe, Razorpay)
- Real-time modules (WebSockets, chat scripts)
- E-commerce components (cart logic, session validators)
- Script Identification - You can define:
- Exclude Inline JavaScript
- Pattern-Based Filtering - Specify unique:
- Text patterns (e.g., gtag, fbq, initializeSlider)
- script tag IDs (id="initMenu")
- Keywords that match logic-critical functions
- Immediate Execution - Matching inline scripts:
- Execute as part of the original HTML load
- Are not affected by lazy loading or other deferral logic
- Ideal Use Cases
- Tracking scripts: <script>gtag('config', 'UA-XXXXX');</script>
- Marketing pixels: <script>fbq('track', 'PageView');</script>
- UI initializers: <script>initializeSlider();</script>
- Pattern-Based Filtering - Specify unique:
Best Practices
- Use precise and unique identifiers to avoid over-exclusion or unintended matches.
- Keep the exclusion list minimal—only essential scripts should bypass optimization.
- Regularly audit excluded scripts to ensure relevance as your site evolves.
- Verify third-party requirements, especially those that mandate synchronous script loading.
Summary
The Exclude JavaScript from Optimization feature in W3Speedster provides advanced control over the execution of both external and inline JavaScript. By selectively excluding mission-critical scripts from lazy load and other optimizations, developers can ensure seamless functionality without sacrificing overall performance. This balanced approach enhances site stability, supports third-party integrations, and upholds a high standard of user experience across all environments.
Exclude pages from HTML caching
Feature:
The "Exclude Pages from HTML Caching" feature in W3Speedster empowers developers to bypass static HTML caching for specific URLs. This ensures that selected pages are always delivered dynamically from the server, rather than from a cached version. This is critical for pages that involve personalized content, real-time data, or session-dependent logic.
Why We Need It
- Ensure Data Freshness: Dynamic pages such as stock tickers, user dashboards, or order tracking must reflect real-time data and should never be served from outdated cache.
- Support Logged-In User Experiences: Personalized pages like user profiles, shopping carts, or account summaries must remain dynamic to avoid incorrect or stale content.
- Preserve Privacy and Security: Caching pages that contain personal or sensitive information may inadvertently expose data to other users, posing serious security and compliance risks.
- Enable Backend Operations: Pages involving form submissions, checkout processes, or backend workflows typically rely on fresh stateful data and may break if cached.
Problems Without Exclusion
- Stale or Incorrect Content: Users may encounter outdated data, such as expired cart items or past order statuses, if dynamic pages are cached.
- Cross-User Personalization Errors: Cached pages may incorrectly display another user’s session data—compromising the experience and privacy.
- Functional Breakdowns: Session-driven operations like login status, cart management, or form tokens may not work properly if cache overrides current session context.
- Security and Compliance Violations: Exposing cached private data may breach data protection standards and introduce security vulnerabilities.
W3Speedster’s Solution
W3Speedster offers a flexible mechanism to exclude specific pages from HTML caching, supporting a wide range of use cases:
- Exact URL Exclusion - Input specific paths such as: /checkout, /user/profile, /account/settings
- Wildcard Matching - Use wildcard patterns to exclude entire groups: /admin/*, /dashboard/*, /orders/*.
- Conditional Logic (Optional): Advanced users can implement conditional exclusions based on query parameters, user roles, or session states (where supported).
Use Case Examples
- Checkout and Cart Pages: Exclude /checkout to ensure order summaries, shipping options, and cart items reflect real-time updates.
- Admin or Control Panels: Exclude /admin/* to prevent caching sensitive administrative content.
- User Dashboards or Profiles: Exclude /dashboard or /user/profile to maintain session accuracy and real-time data visibility.
Best Practices
- Test Excluded Pages: Confirm that excluded pages behave dynamically and correctly after implementation.
- Limit the Scope: Only exclude pages that require it—excessive exclusions may reduce overall caching efficiency.
- Maintain a Clean URL Structure: Use consistent and identifiable path naming (e.g., /user/*, /admin/*) to streamline exclusion management.
Summary
The "Exclude Pages from HTML Caching" feature in W3Speedster is a crucial tool for ensuring dynamic accuracy, data integrity, and user-specific content delivery on PHP-based sites. By carefully identifying and excluding sensitive or real-time pages from caching, developers can uphold site security, functional reliability, and an optimal user experience—without sacrificing the performance benefits of caching elsewhere.
Exclude Pages From Optimization
Feature:
The "Exclude Pages from Optimization" feature in W3Speedster allows developers to completely bypass all frontend performance enhancements—including CSS/JS minification, lazy loading, image optimization, and resource deferral—for specified pages. This ensures that critical or sensitive pages retain their original behavior and structure, avoiding disruptions that may be caused by aggressive optimizations.
Why We Need It
- Preserve Page Functionality: Some pages rely on specific JavaScript timing, CSS layout rendering, or inline scripts that may fail if modified, minified, or deferred.
- Ensure Third-party Tool Compatibility: Pages embedding external services like payment gateways, live chats, or iframe-based apps may require full script and style integrity.
- Secure Transaction Handling: Pages such as login, checkout, or form submission flows must remain unoptimized to avoid interfering with their execution or layout.
- Simplify Debugging: By excluding pages from optimization, developers can isolate issues more effectively when diagnosing rendering or functionality problems.
Problems Without Exclusion
- Broken Forms or JavaScript Failures: Script deferral or minification can interfere with validation logic, token verification, or session management, leading to critical failures.
- Distorted UI/UX: CSS optimizations may affect responsive behavior, layout structures, or interactive elements, especially on complex pages.
- Library Conflicts: Lazy loading, file reordering, or asynchronous loading may conflict with real-time rendering engines or external SDKs.
- Negative User Experience: Functional errors or broken visuals on key pages can result in user frustration, abandoned carts, or support tickets.
W3Speedster’s Solution
W3Speedster provides a simple configuration interface to exclude entire pages or sections from optimization:
- Exact URL Matching: Example: /checkout, /login, /cart
- Wildcard Pattern Matching: Example: /user/*, /secure/*, /admin/*.
- Query Parameter-Based Matching: Example: /checkout?step=payment, /form?type=feedback.
Once configured, excluded pages will bypass:
- CSS and JavaScript minification
- Lazy loading of scripts, styles, and images
- Deferral or async loading of resources
- Compression or merging of frontend assets
This ensures that the excluded pages load as originally authored, maintaining full compatibility and predictable execution.
Use Case Examples
- Checkout & Cart Pages: Avoid optimizing /cart and /checkout to ensure smooth payment processes and real-time price updates.
- Login Pages: Exclude /login to support accurate authentication workflows and session management.
- Interactive Admin Dashboards: Complex dashboards with charts, AJAX, or real-time data updates should remain unaltered.
- Third-party Embedded Tools: Pages embedding chat, ticketing systems, or customer support widgets (e.g., /support/live-chat) require stable script environments.
Best Practices
- Minimize Exclusions: Only exclude pages where absolutely necessary to maintain maximum site performance.
- Maintain Clear Documentation: Keep a record of all excluded paths to assist with future debugging or audits.
- Test Thoroughly: Validate each excluded page under different devices and conditions to ensure consistent behavior.
Summary
The "Exclude Pages from Optimization" feature in W3Speedster is a powerful safeguard that ensures mission-critical pages retain their full functionality, integrity, and reliability. By selectively excluding pages that require untouched frontend behavior, developers can confidently apply optimizations site-wide—without compromising the security, usability, or interactivity of sensitive or complex pages.
Exclude Pages from CSS Optimization
Feature:
The "Exclude Pages from CSS Optimization" feature in W3Speedster allows developers to opt out specific URLs from receiving CSS performance enhancements such as minification, merging, critical CSS injection, and lazy loading of stylesheets. This ensures that design integrity and functional styling are maintained on complex, third-party, or interactive pages where CSS modifications may lead to issues.
Why We Need It
- Prevent Layout Breakage: On pages with custom layouts or theme overrides, optimized CSS may defer or remove essential styling, causing misaligned elements or visual issues.
- Maintain Compatibility: Certain plugins, themes, or external scripts require CSS to be loaded in a specific order or format to render correctly.
- Support Interactive Features: Pages containing dynamic forms, carousels, tabbed views, or conditional elements may rely on inline or dynamically loaded styles.
- Facilitate Debugging and Testing: Temporarily excluding a page allows developers to troubleshoot styling issues without disabling optimization globally.
Problems Without Exclusion
- Layout Shift (CLS Issues): Delayed or missing CSS causes content to shift after load, negatively affecting both user experience and Core Web Vitals.
- Broken Styling: Pop-ups, custom widgets, or themed sections may appear unstyled or broken if CSS is altered.
- Lost Dependencies: Pages that include inline <style> blocks, or styles injected by JavaScript/PHP, may fail if minified or merged incorrectly.
- Reduced Trust & Usability: Pages such as checkout, login, or signup with broken visuals can erode user confidence and cause abandonment.
W3Speedster’s Solution
W3Speedster provides a targeted mechanism to exclude pages from CSS-related optimizations by:
- Accepting URL Paths or Patterns: Use full or partial paths such as /checkout, /dashboard, or ?page=editor.
- One URL per Line Format: Makes exclusions clear and easy to manage for administrators and developers.
- Full Bypass of CSS Enhancements: For the excluded pages, W3Speedster will not apply:
- Minification
- Merging
- Lazy loading of CSS
- Critical CSS generation or injection
This ensures the original CSS loads unaltered, preserving layout and visual fidelity.
Use Case Examples
- Checkout Page: /checkout - Prevents disruption in layout and styling during critical user transactions.
- Login & Registration: /login, /register - Ensures that form fields, buttons, and UI elements render as designed.
- Interactive Dashboards: /dashboard, /editor - Retains compatibility with dynamic UI components and layout engines.
- Third-party Plugin Pages: /quiz, /booking, /events - Maintains correct styling when plugins inject their own CSS inline or via AJAX.
Best Practices
- Start Conservatively: Exclude only the most sensitive pages and monitor the impact.
- Test Thoroughly: After exclusions, validate rendering across devices and screen sizes.
- Use Consistent Naming: Maintain logical URL structures for easier batch exclusions (e.g., /user/*, /tools/*).
- Combine with Other Exclusions If Needed: For pages requiring broader protection, consider combining this with JavaScript or full optimization exclusions.
Summary
The "Exclude Pages from CSS Optimization" feature in W3Speedster provides granular control over where CSS performance enhancements are applied. By strategically excluding sensitive or complex pages, developers can ensure flawless design, maintain third-party compatibility, and deliver a reliable user experience—all while continuing to benefit from site-wide CSS optimizations.
Exclude Page from JavaScript Optimization
Feature:
The "Exclude Pages from JavaScript Optimization" feature in W3Speedster allows site administrators to bypass JavaScript optimizations such as minification, merging, and lazy loading on selected pages. This is essential when specific scripts must load in their original order or format to maintain full functionality.
Why We Need It
- Preserve Script Functionality: Some JavaScript files must execute immediately or in a specific order. Optimization can disrupt this sequence.
- Avoid Breakage in Complex Pages: Pages that rely on inline JS logic or heavily use dynamic DOM manipulation may break when scripts are modified or delayed.
- Prevent Errors in Third-Party Integrations: Services like payment gateways, booking engines, or form plugins often use sensitive scripts that should remain untouched.
- Enable Debugging: Excluding pages helps developers isolate JavaScript-related performance or execution issues.
Problems Without Exclusion
- Script Errors and Console Warnings: JavaScript files may not initialize properly due to timing issues caused by deferred or minified scripts.
- Broken UI Components: Sliders, modals, carousels, or AJAX content may fail to work correctly if required scripts are delayed or altered.
- Form Validation Failures: Real-time validation or CAPTCHA functionalities might break if JavaScript is optimized aggressively.
- Interference with Inline Events: Elements relying on onclick, onchange, or onhover handlers declared inline might misfire or become non-functional.
W3Speedster’s Solution
The W3Speedster plugin provides a straightforward method to exclude pages from JavaScript optimization:
- You can enter full URLs, URL fragments, or page slugs where JavaScript optimization should not be applied.
- One entry per line ensures clear configuration.
- These exclusions will skip minification, prevent script merging, and bypass lazy loading for the specified pages.
This ensures that JavaScript is executed in its original, unaltered state—preserving all critical functionality.
Use Case Examples
- Checkout or Payment Pages: /checkout, /payment — Prevent disruptions in scripts handling user transactions or integrations with third-party payment gateways.
- Login or Registration Pages: /login, /register — Maintain the integrity of validation and authentication flows.
- Dashboard or Admin Panels: /admin, /user-panel — Avoid JavaScript optimization that might interfere with data visualization tools or real-time updates.
- Custom Apps or Widgets: /quiz, /polls — Ensure custom JavaScript logic runs as expected.
Best Practices
- Start with performance testing before excluding pages; exclude only when required.
- Group similar paths using shared URL patterns (e.g., /user/*) if your environment supports it.
- Recheck performance and console logs after applying exclusions to validate behavior.
Summary
The "Exclude Pages from JavaScript Optimization" feature in W3Speedster ensures that mission-critical pages retain their intended JavaScript behavior by bypassing optimizations that could otherwise cause functional disruptions. This fine-grained control allows developers to balance performance enhancements with robust, error-free execution across all device types and use cases.
Custom Code
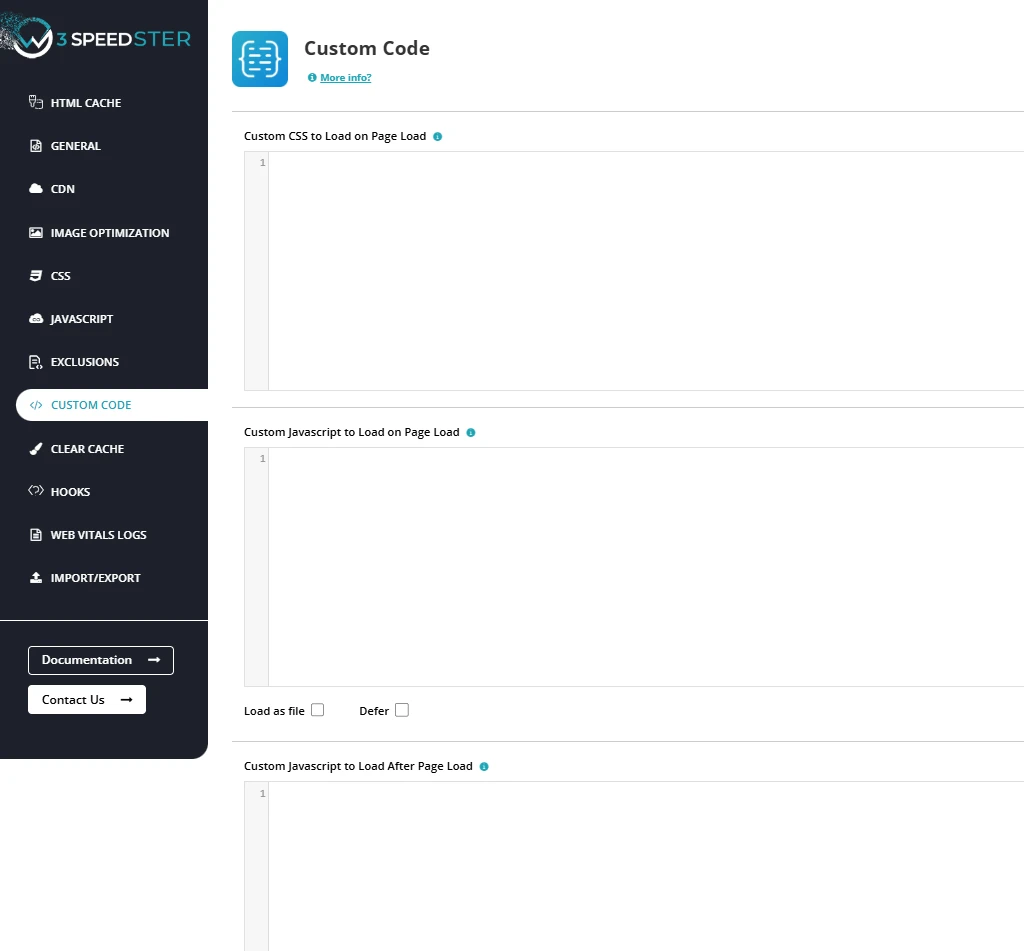
Custom CSS to Load on Page Load
Feature:
The "Custom CSS to Load on Page Load" feature in W3Speedster enables developers to inject critical CSS rules directly into the page’s initial HTML, ensuring that these styles render immediately upon load. This functionality is essential for enhancing the visual stability and user experience by controlling above-the-fold content rendering, especially in sites using deferred or lazy-loaded stylesheets.
Why We Need It
- Prevent Flash of Unstyled Content (FOUC): Ensures vital styles are applied instantly during the first paint, maintaining brand consistency and reducing user distraction.
- Support Custom Design Requirements: Allows implementation of critical UI elements, brand-specific fonts, or layout adjustments that must appear during the initial render.
- Override Delayed CSS: Provides a mechanism to prioritize styles that would otherwise load late due to CSS minification or deferment.
- Enhance Performance Metrics: Improves key Core Web Vitals such as Largest Contentful Paint (LCP) and Cumulative Layout Shift (CLS) by stabilizing the layout early.
Problems Without This Feature
- Styling Delays: Deferred or lazy-loaded CSS can result in visible layout glitches or incomplete designs on first load.
- Unintended Layout Shifts: Content may shift or jump after full CSS loads, which negatively impacts CLS scores and user experience.
- Theme or Plugin Style Conflicts: Without early custom CSS, default or third-party styles may override intended visual behaviors.
W3Speedster’s Solution
W3Speedster offers a dedicated section in the settings panel for injecting custom critical CSS. Here's how it works:
- Syntax: Add only raw CSS rules (e.g., .btn { padding: 10px; }). Do not include <style> tags.
- Load Timing: The CSS is inlined directly into the <head> of the HTML document—ensuring immediate rendering before external stylesheets load.
- Scope: CSS is global by default, but can be scoped using precise class or ID selectors as required.
- Optimized for Performance: Designed to handle small and essential CSS only—ensuring performance is preserved while layout accuracy is improved.
Use Case Examples
- Button Alignment Fix: .btn-primary { margin-top: 10px; }
- Header Height Consistency: header { height: 80px; }
- Styling Hero Section on Load: .hero-text { font-size: 2rem; color: #fff; }
- Temporary Visual Patch While Deferring Full CSS: .main-banner { background: #000; padding: 20px; }
Best Practices
- Keep It Minimal: Limit to only above-the-fold or essential layout styles to prevent HTML bloat.
- Avoid Overly Specific Selectors: Use clean, targeted selectors to minimize future conflicts and maintenance issues.
- Validate Across Breakpoints: Confirm that injected styles work across screen sizes, especially for mobile-first layouts.
- Regularly Audit and Optimize: As your site evolves, update the custom CSS to match current layout and branding needs.
Summary
The "Custom CSS to Load on Page Load" feature in W3Speedster offers granular control over how and when styles are rendered, making it a critical performance and design enhancement tool. By injecting minimal, high-priority CSS into the HTML head, developers can achieve faster visual rendering, more stable layouts, and superior user experience—all without compromising the benefits of deferred CSS loading across the rest of the site.
Custom JavaScript to Load on Page Load
Feature:
The "Custom JavaScript to Load on Page Load" feature in W3Speedster allows developers to inject JavaScript code early in the page lifecycle—ideal for initializing UI components, activating third-party integrations, or defining site-wide logic that must be available immediately.
W3Speedster provides two flexible loading modes for custom scripts:
- As File – Load the script from a generated external file.
- Defer – Embed the script inline using the defer attribute to run after HTML parsing.
Why We Need It
- Enable Early Functionality: Ensures JavaScript required for navigation, modals, or interactive UI elements runs before user interaction.
- Ensure Compatibility with Third-Party Services: Many services (e.g., Google Analytics, tag managers, or A/B testing tools) require scripts to execute early to capture full session data.
- Support for Custom Logic: Allows developers to define reusable site-wide behaviors or conditional logic without relying on theme/plugin hooks.
- Controlled Script Execution Timing: Choose between immediate or deferred execution depending on script weight and dependency.
Problems Without This Feature
- Broken or Delayed Interactions: Elements may fail to respond if the necessary JavaScript is not available when the page loads.
- Script Dependency Failures: Scripts that depend on early DOM availability or other libraries may throw runtime errors if delayed.
- Missed Analytics or Tracking Data: Delayed loading can cause partial or inaccurate tracking, reducing data reliability.
- Reduced Developer Flexibility: Without this feature, custom JavaScript injection relies on themes or hard-coded templates, limiting control.
W3Speedster’s Solution
W3Speedster offers two loading methods for inserting JavaScript:
- As File
- The code is wrapped and saved as an external .js file.
- Best for: Large scripts, reusable logic, caching benefits.
- Keeps inline HTML clean and improves maintainability.
- Defer
- The code is inserted inline in the HTML with the defer attribute.
- Best for: Small, fast-executing scripts.
- Defers execution until HTML parsing completes, enhancing FCP and TTI.
- Input Format
- Do not include <script> tags—enter only the JavaScript content.
- The plugin handles wrapping, placement, and loading order automatically.
Use Case Examples
- Analytics Setup
window.dataLayer = window.dataLayer || []; function gtag(){ dataLayer.push(arguments); } gtag('js', new Date()); gtag('config', 'UA-XXXXXXX-X'); - Dynamic Date Display
document.querySelector("#year").textContent = new Date().getFullYear(); - UI Initialization
window.onload = function() {
				document.querySelector('.menu-toggle').addEventListener('click', function() {
				  document.querySelector('.main-nav').classList.toggle('active');
				});
			  };
Best Practices
- Use Defer only for small, non-blocking scripts.
- Use As File for larger, complex logic to support caching and modularity.
- Avoid referencing DOM elements unless they are guaranteed to be loaded.
- Where applicable, wrap code in event listeners such as DOMContentLoaded for stability.
- Regularly audit scripts for performance and execution timing.
Summary
The "Custom JavaScript to Load on Page Load" feature in W3Speedster empowers developers to define and manage JavaScript execution independently of theme or plugin constraints. With support for both inline and file-based loading, it offers the flexibility to prioritize performance or functionality as needed. Whether used in WordPress, Laravel, CodeIgniter, or any custom PHP framework, this feature ensures robust and early script execution—key to delivering a smooth and interactive user experience.
Custom JavaScript to Load After Page Load
Feature:
The “Custom JavaScript to Load After Page Load” feature in W3Speedster enables developers to execute JavaScript only after the entire web page—including HTML, CSS, JavaScript, images, and other assets—has fully loaded. This is achieved by leveraging the window.onload event to defer non-critical scripts, ensuring a smoother initial render and improved performance.
Why We Need It
- Avoid Blocking Render: Defers custom JavaScript so it doesn’t interfere with the browser’s critical rendering path, enabling faster first paint.
- Improve Core Web Vitals: Helps improve INP (Interaction to Next Paint), FCP (First Contentful Paint), and TTI (Time to Interactive) by minimizing thread blocking during initial load.
- Enhance User Experience: Executes scripts like animations, tracking, or background operations post-load without affecting page responsiveness.
- Fine-Grained Control: Allows developers to decide exactly when certain behaviors or scripts should execute—after full load only.
Problems Without This Feature
- Delayed Content Rendering: Scripts executed too early can block or slow down rendering, harming load speed and increasing bounce rates.
- Layout Shifts & Flickering: JavaScript that manipulates the DOM too early may cause visual instability and lower CLS (Cumulative Layout Shift) scores.
- Unnecessary Processing: Some scripts may load and execute before they’re needed, wasting bandwidth and CPU cycles.
- Runtime JavaScript Errors: Scripts might fail if elements aren’t available yet—especially common when using document.querySelector() too early.
W3Speedster’s Solution
W3Speedster provides a dedicated section to insert JavaScript that should only execute after full page load.
- Deferred Execution
- Scripts are automatically placed inside footer right above the </body> tag
- Ensures execution after all resources (including images and external styles/scripts) are fully loaded.
- No <script> Tags Needed
- Input only the raw JavaScript logic.
- W3Speedster handles wrapping, formatting, and safe injection automatically.
- Ideal for Non-Critical Enhancements - Perfect for:
- Analytics or tracking scripts
- Animation triggers
- Lazy UI effects
- Background resource preloading
Use Case Examples
- Trigger Animation After Load
document.querySelector(".banner").classList.add("animate"); - Load Additional Resources
var link = document.createElement("link"); link.rel = "stylesheet"; link.href = "https://example.com/extra-style.css"; document.head.appendChild(link); - Post-Load Scroll Behavior
window.scrollTo({ top: 0, behavior: 'smooth' }); - Initialize Lightbox or Slider
new LightboxGallery(document.querySelector(".gallery"));
Best Practices
- Keep scripts modular and lightweight to avoid performance hits.
- Use this section only for non-essential enhancements—not critical page logic.
- Avoid DOMContentLoaded this setting automatically waits for page to fully load.
- Always check DOM availability before accessing elements.
- Periodically review your deferred scripts to ensure they are still relevant and efficient.
Summary
The “Custom JavaScript to Load After Page Load” feature in W3Speedster offers developers a powerful way to shift non-critical scripts out of the critical rendering path, helping improve page load speed and user experience. It is fully compatible with any PHP-based framework—including WordPress, Laravel, CodeIgniter, and custom stacks—making it an essential tool for optimizing site performance without sacrificing interactivity or functionality.
Cache
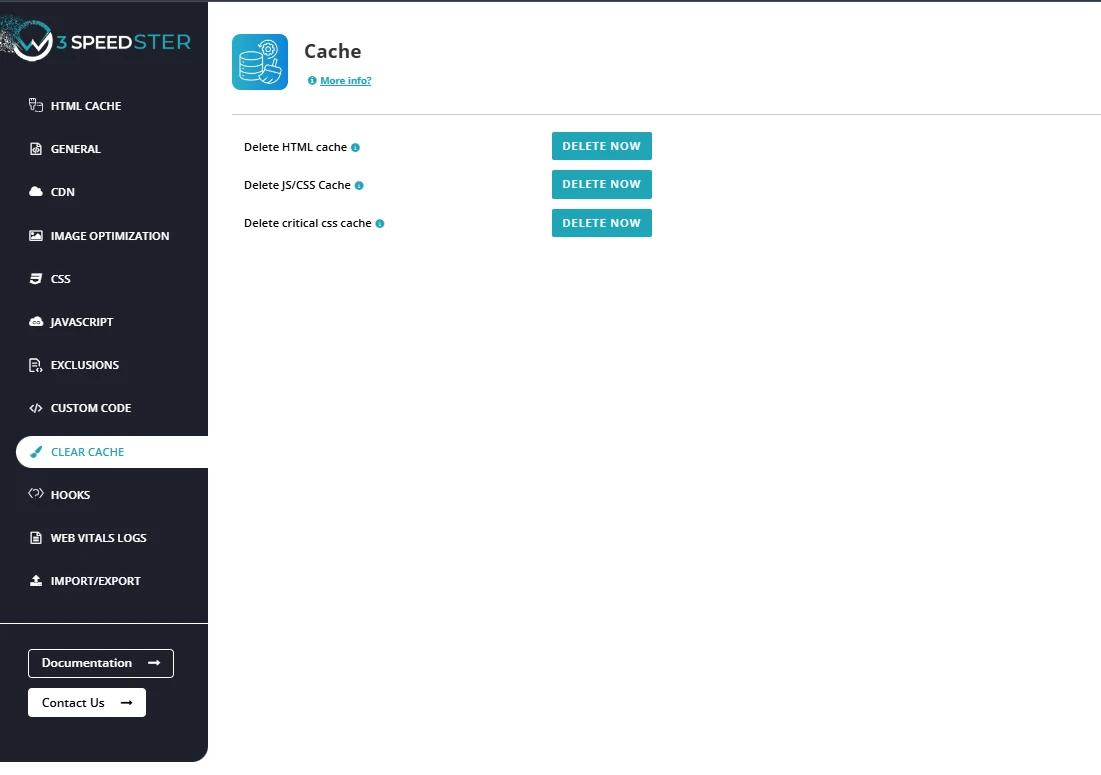
Delete HTML Cache
Feature:
The “Delete HTML Cache” feature in W3Speedster allows administrators and developers to manually clear the static HTML versions of cached pages. HTML caching significantly improves performance by serving pre-rendered pages, but when your site content or layout changes, the cached files can become outdated. This feature ensures that updates are reflected immediately on the front end.
Why We Need It
- Ensure Fresh Content: Clearing outdated HTML cache ensures visitors receive the most recent version of your site’s content.
- Prevent Mismatched Pages: Avoids the risk of showing users an older version of a recently updated page.
- Reflect Design or Layout Changes: Any updates to themes, templates, navigation, or components become visible instantly.
- Maintain SEO Accuracy: Prevents search engines from indexing outdated content, which can affect visibility and credibility.
Problems Without Clearing HTML Cache
- Stale or Incorrect Content: Updates such as new blog posts, product details, or banner changes may not appear unless the cache is manually cleared.
- Broken Functionality: If structure or script changes occur, old cached HTML may cause inconsistencies or JavaScript errors.
- User Confusion: Users may report seeing outdated content, causing mistrust or unnecessary support requests.
- Layout Inconsistencies: New CSS or structural modifications might not reflect, leading to broken layouts or missing styles.
W3Speedster’s Solution
The “Delete HTML Cache” feature offers a quick and safe mechanism to refresh cached HTML files while preserving long-term caching benefits:
- Manual Invalidation of Cached Pages
- All stored HTML cache files are deleted from the cache directory.
- Triggers re-generation of the HTML cache on the next user request.
- Ensures Real-Time Updates - Ideal for applying changes made via:
- Page content updates
- Theme or plugin modifications
- Menu or widget edits
- Dynamic content injections
- Retains Performance Optimization
- HTML caching remains active—only stale content is removed.
- Regenerated pages will still benefit from fast load times after the cache refresh.
Recommended Use Cases
- After publishing or editing any page or post
- Following theme or template structure changes
- When modifying headers, footers, or navigation
- Post plugin updates that alter frontend behavior
- After site migration or cloning
- While debugging frontend issues caused by outdated markup
Summary
The “Delete HTML Cache” feature in W3Speedster is vital for ensuring that your website reflects accurate, up-to-date content and design, especially after updates. It balances the need for performance through caching with the requirement for content freshness, making it a key tool for maintaining site integrity across all PHP environments—including WordPress, Laravel, CodeIgniter, and custom frameworks.
Delete HTML/JS/CSS Cache
Feature:
The “Delete HTML/JS/CSS Cache” feature in W3Speedster enables you to clear all cached HTML, JavaScript and CSS files that have been previously minified and combined for performance optimization. While asset caching accelerates page loads by reducing file size and request counts, it may cause issues when scripts or stylesheets are updated. This function ensures that updated files are reprocessed and served fresh to users.
Why We Need It
- Apply Latest Changes: When themes, plugins, or custom scripts/style/content are updated, the browser might still load old cached assets unless the cache is cleared.
- Avoid Styling, Scriptand Content Conflicts: Prevents loading of outdated CSS, JS or HTML files that can cause layout breaks or functionality errors.
- Maintain Performance and Stability: Clears stale caches to ensure performance optimizations do not come at the cost of incorrect or inconsistent frontend behavior.
Problems Without Clearing HTML/JS/CSS Cache
- Outdated Scripts/Styles/HTML: Visitors may experience broken interfaces due to older versions of CSS or JS being served from cache with its HTML.
- Broken UI/UX: New interactive elements such as menus, modals, or animations might not work correctly if the associated scripts are stale.
- Debugging Complexity: Developers can face difficulty distinguishing between genuine code errors and issues arising from cached, outdated assets.
- Cross-Browser or Device Inconsistencies: Cached assets might not reflect recent changes uniformly across browsers or devices, causing inconsistent experiences.
W3Speedster’s Solution
W3Speedster offers a simple, one-click “Delete HTML/JS/CSS Cache” function with these capabilities:
- Clear Combined and Minified Files: Removes all cached HTML, merged JS and CSS files from the server cache directory.
- Force Regeneration of Assets: Automatically rebuilds and optimizes updated JavaScript and CSS and HTML files on the next request.
- Immediate Reflection of Updates: Ensures that any changes to theme, plugin, or custom scripts/styles and HTML are instantly visible on the live site.
- Prevents Cache Conflicts: Mitigates issues stemming from browser or CDN caching mismatches by refreshing server-side cached assets.
Important Considerations
- After modifying custom JavaScript, CSS files or HTML.
- Following plugin or theme updates affecting frontend behavior or styles.
- Upon resolving UI bugs related to JavaScript or CSS.
- When implementing layout changes or adding new interactive components.
Best Practices
- Keep scripts modular and lightweight to avoid performance hits.
- Use this section only for non-essential enhancements—not critical page logic.
- Avoid DOMContentLoaded this setting automatically waits for page to fully load.
- Always check DOM availability before accessing elements.
- Periodically review your deferred scripts to ensure they are still relevant and efficient.
Summary
The “Delete HTML/JS/CSS Cache” feature in W3Speedster is crucial to maintain a stable, consistent, and accurate frontend experience while leveraging caching for speed. Clearing and regenerating asset caches after every relevant update prevents stale resources from causing display or functionality issues, thereby ensuring seamless performance and user satisfaction across all browsers and devices in PHP-based environments.
Delete Critical CSS
Feature:
The “Delete Critical CSS” option in W3Speedster enables developers and administrators to manually clear all previously generated Critical CSS. Critical CSS contains the essential above-the-fold styles that are rendered immediately during page load to improve perceived performance. Clearing this cache ensures that any recent styling modifications are accurately reflected in the initial page render.
Why We Need It
- Reflect Recent Style Changes: Updates to headers, hero sections, or other above-the-fold elements require fresh Critical CSS to prevent outdated styles from persisting.
- Avoid Styling Mismatches: Stale Critical CSS may cause visual glitches, layout shifts, or broken designs until the full CSS file loads.
- Ensure Optimized Rendering: Regenerating Critical CSS prioritizes the most current and relevant styles, enhancing Core Web Vitals like Largest Contentful Paint (LCP) and Cumulative Layout Shift (CLS).
Problems Without Deleting Critical CSS
- Visual Inconsistencies: Above-the-fold content may appear misaligned or incorrectly styled due to old cached Critical CSS rules.
- Increased CLS (Cumulative Layout Shift): Delays in correct styling cause page elements to jump or shift as full CSS loads, negatively impacting user experience.
- Debugging Difficulties: Outdated Critical CSS complicates troubleshooting of styling and layout issues during development or testing.
W3Speedster’s Solution
- One-Click Deletion: Administrators can instantly clear all stored Critical CSS for pages and post types site-wide.
- Automatic Regeneration: Upon clearing, W3Speedster queues affected pages for fresh Critical CSS generation, commonly using background processes cron.
- Improved Accuracy: Guarantees above-the-fold content reflects the latest design and layout updates immediately.
Important Considerations
- Regeneration Time: On large sites with many pages, regenerating Critical CSS can take several minutes; plan cache clearing accordingly.
- External Caching Layers: If you use CDN or caching plugins (e.g., Cloudflare, Varnish), clear those caches as well to prevent serving stale styles.
- Optimal Use Cases: Use after major redesigns, header or hero section changes, or updates to global CSS variables impacting above-the-fold styles.
Summary
The “Delete Critical CSS Cache” feature in W3Speedster is vital for maintaining visual fidelity and maximizing frontend performance. By ensuring that critical above-the-fold styles are current and optimized, this tool helps deliver fast, stable, and visually consistent page loads across all devices and PHP frameworks.
Plugin Hooks
W3speedster Pre Start Optimization
| Function: | w3SpeedsterPreStartOptimization |
|---|---|
| Description: | Modify page content pre optimization. |
| Parameter: | $html = Content visible in pages view source. |
| Return: | 1 – Reflect the changes done in html of the page. |
function w3SpeedsterPreStartOptimization($html){
$html = str_replace('Existing content','Changed content',$html);
return $html;
}
W3speedster Before Start Optimization
| Function: | w3SpeedsterBeforeStartOptimization |
|---|---|
| Description: | W3Speedster allows you to make changes to the HTML on your site before actually starting the optimization. For instance replace or add in html. |
| Parameter: | $html = $html – full html of the page. |
| Return: | 1 – Reflect the changes done in html of the page. |
function w3SpeedsterBeforeStartOptimization($html){
$html = str_replace(array(""),array(""), $html);
return $html;
}
W3speedster After Optimization
| Function: | w3SpeedsterAfterOptimization |
|---|---|
| Description: | W3Speedster allows you to make changes to the HTML on your site after the page is optimized by the plugin. For instance replace or add in html. |
| Parameter: | $html – full html of the page. |
| Return: | 1 – Reflect the changes done in html of the page. |
function w3SpeedsterAfterOptimization($html){
$html = str_replace(array('image.png'),array('image-100x100.png'), $html);
return $html;
}
W3speedster Inner JS Customize
| Function: | w3SpeedsterInnerJsCustomize |
|---|---|
| Description: | If you want to make changes in your inline JavaScript, W3Speedster allows you to make changes in Inline JavaScript (for instance making changes in inline script you have to enter the unique text from the script to identify the script). |
| Parameter: | $script_text- The content of the script. |
| Return: | $script_text – Content of the script after changes. |
function w3SpeedsterInnerJsCustomize($script_text){
	if(strpos($script_text'//unique word from script//') !== false){
		$script_text = str_replace('jQuery(window)', 'jQuery(document)',$script_text);
	}
	return $script_text;
}
W3speedster Inner JS Exclude
| Function: | w3SpeedsterInnerJsExclude |
|---|---|
| Description: | Exclude the script tag from lazy loading, which is present in the pages view source. |
| Parameter: | $inner_js = The script tag s content is visible in the page s view source $exclude_js_bool = 0(default) || 1 |
| Return: | 1 |
function w3SpeedsterInnerJsExclude($exclude_js_bool,$inner_js){
	if(strpos($inner_js,'Script text') !== false){
		$exclude_js_bool= 1;
	}
return $exclude_js_bool;
}
W3speedster Internal JS Customize
| Function: | w3SpeedsterInternalJsCustomize |
|---|---|
| Description: | If you wish to make changes in JavaScript files, W3Speedster allows you to make changes in JavaScript Files. |
| Parameter: | $path- Path of the JS file. $string – javascript you want to make changes in. |
| Return: | $string– make changes in the internal JS file. |
function w3SpeedsterInternalJsCustomize($string,$path){
	if(strpos($path,'//js path//') !== false){
	$string = str_replace("jQuery(windw)", "jQuery(window)",$string);
	}
	return $string;
}
W3speedster Internal Css Customize
| Function: | w3SpeedsterInternalCssCustomize |
|---|---|
| Description: | If you want to make changes in your CSS file, W3Speedster allows you to make changes in stylesheet files. |
| Parameter: | $css- Css content of the file. $path- path of css file. |
| Return: | $css – make the required changes in CSS files. |
function w3SpeedsterInternalCssCustomize($css,$path){
	if(strpos($path,' //cssPath // ') !== false){
		$css = str_replace(' ',' ',$css);
	}
	return $css;
}
W3speedster Internal Css Minify
| Function: | W3speedup_internal_css_minify |
|---|---|
| Description: | If you don’t want to minify, W3Speedster allows you to exclude stylesheet files from minify. |
| Parameter: | $path- path of css file. $css- Css content of the file. $css_minify- 0 || 1 (default) |
| Return: | 1 – it will exclude the entered css file from minification. 0 – it will not exclude the entered css file from minification. |
function w3SpeedsterInternalCssMinify($path,$css,$css_minify){
if(strpos($path,'//cssPath//') !== false){
	$css_minify = 0;
}
return $css_minify ;
}
W3speedster No Critical Css
| Function: | w3SpeedsterNoCriticalCss |
|---|---|
| Description: | W3Speedster allows you to exclude the pages from the Critical CSS (like search pages). |
| Parameter: | $url- Stores the url of the page. $ignore_critical_css- 0 (default) || 1 |
| Return: | 1 – it will exclude the page you do not wish to create critical CSS. |
function w3SpeedsterNoCriticalCss($url, $ignore_critical_css){
if(strpos($url,'/path/') !==false) {
	$ignore_critical_css = 1;
}
return $ignore_critical_css;
}
W3speedster Customize Critical Css
| Function: | w3SpeedsterCustomizeCriticalCss |
|---|---|
| Description: | If you wish to make any changes in Critical CSS, W3Speedster allows you to make changes in generated Critical CSS. For instance if you want to replace/ remove any string/URL from critical CSS (like @font-face { font-family:”Courgette”; to @font-face { ) |
| Parameter: | $critical_css- Critical Css of the page. |
| Return: | $critical_css – Reflect the changes made in critical css. |
function w3SpeedsterCustomizeCriticalCss($critical_css){
$critical_css = str_replace('@font-face { font-family:"Courgette";', ' ',$critical_css);
	return $critical_css;
}
W3speedster Disable Htaccess Webp
| Function: | w3SpeedsterDisableHtaccessWebp |
|---|---|
| Description: | Our plugin converts .jpg/.png format to WebP format without changing the URL. it disable webp to render from HTACCESS. |
| Parameter: | $disable_htaccess_webp- 0(default) || 1 |
| Return: | It will add w3.webp at the end of the url for instance (xyz.jpgw3.webp). |
function w3SpeedsterDisableHtaccessWebp($disable_htaccess_webp){
	$disable_htaccess_webp = 1
return $disable_htaccess_webp;
}
W3speedster Customize Add Settings
| Function: | w3SpeedsterCustomizeAddSettings |
|---|---|
| Description: | If you wish to change in variables and paths (URL), W3Speedster allows you to make changes in variables and paths with the help of this plugin function. |
| Parameter: | $add_settings- settings of the plugin. |
| Return: | :$add_settings – reflect the changes made in variable and path. |
function w3SpeedsterCustomizeAddSettings($add_settings){
$add_settings = str_replace(array(“mob.css”),array(“mobile.css”), $add_settings);
	return $add_settings;
}
W3speedster Customize Main Settings
| Function: | w3SpeedsterCustomizeMainSettings |
|---|---|
| Description: | Customize plugin main settings. |
| Parameter: | $settings- Plugin main settings array (like: exclude css, cache path etc ) |
| Return: | $settings |
function w3SpeedsterCustomizeMainSettings($settings){
	$settings['setting_name'] = value;
return $settings;
}
W3speedster Seprate Critical Css For Post Type
| Function: | w3SpeedsterCreateSeprateCssOfPostType |
|---|---|
| Description: | By default our plugin creates a single critical css for post but If you wish to generate separate critical CSS for post. W3Speedster allows you to create critical CSS separately post-wise. |
| Parameter: | $separate_post_css- Array of post types. |
| Return: | $separate_post_css – create separate critical css for each post and page. |
function w3SpeedsterCreateSeprateCssOfPostType($separate_post_css){
	$separate_post_css = array('page','post','product');
    return $separate_post_css;
}
W3speedster Seprate Critical Css For Category
| Function: | W3speedsterCriticalCssOfCategory |
|---|---|
| Description: | W3Speedster Create seprate critical css for categories pages. |
| Parameter: | $separate_cat_css- Array of Category. |
| Return: | $separate_cat_css – create separate critical css for each category and tag. |
function W3speedsterCriticalCssOfCategory($separate_cat_css){
	$separate_cat_css = array('category','tag','custom-category');
   return $separate_cat_css;
}
W3speedster Change Video To Videolazy
| Function: | w3SpeedsterVideoToVideoLazy |
|---|---|
| Description: | Change video tag to videolazy tag |
| Parameter: | $videolazy- 0(default) || 1 |
| Return: | 1 - Change video tag to videolazy tag. |
function w3SpeedsterVideoToVideoLazy($videolazy){
	$videolazy= 1;
	return $videolazy;
}
W3speedster Change Iframe To Iframlazy
| Function: | w3SpeedsterIframetoIframelazy |
|---|---|
| Description: | Change iframe tag to iframlazy tag. |
| Parameter: | $iframelazy- 0(default) || 1 |
| Return: | 1 - Change iframe tag to iframlazy tag. |
function w3SpeedsterIframetoIframelazy($iframelazy){
	$iframelazy = 1;
	return $iframelazy;
}
W3speedster Exclude Image To Lazyload
| Function: | w3SpeedsterExcludeImageToLazyload |
|---|---|
| Description: | W3Speedster allows you to exclude the images from optimization dynamically which you don’t want to lazyload. |
| Parameter: | $exclude_image = 0(default) || 1 $img = Image tag with all attributes $imgnn_arr = Image tag |
| Return: | 1 – it will lazy load the image. 0 – it will not lazy load the image. |
function w3SpeedsterExcludeImageToLazyload($exclude_image,$img, $imgnn_arr){
   if(!empty($img) && strpos($img,'logo.png') !== false){
	   $exclude_image = 1
   }
   return $exclude_image;
}
W3speedster Customize Image
| Function: | w3SpeedsterCustomizeImage |
|---|---|
| Description: | Customize image tags. |
| Parameter: | $img = Image tag with all attributes $imgnn = Modified image tag by plugin $imgnn_arr = Image tag attributes array |
| Return: | $imgnn- Customized image tags |
function w3SpeedsterCustomizeImage($imgnn,$img,$imgnn_arr){
	if(strpos($imgnn,'alt') != false){
		$imgnn = str_replace('alt=""','alt="value"',$imgnn);
	}
	return $imgnn;
}
W3speedster Prevent Htaccess Generation
| Function: | w3SpeedsterPreventHtaccessGeneration. |
|---|---|
| Description: | Our plugin converts .jpg/.png format to WebP format without changing the URL. it disable webp to render from HTACCESS. |
| Parameter: | $preventHtaccess = 0(default) || 1 |
| Return: | 1 – It will add w3.webp at the end of the url for instance (xyz.jpgw3.webp). |
function w3SpeedsterPreventHtaccessGeneration($preventHtaccess){
	$preventHtaccess = 1;
   return $preventHtaccess;
}
W3speedster Exclude CSS Filter
| Function: | W3SpeedsterExcludeCssFilter |
|---|---|
| Description: | If you want to dynamically exclude a CSS file from optimization, W3Speedster allows you to exclude it from optimization (like style.css). |
| Parameter: | $exclude_css – 0(default) || 1 $css_obj – link tag in object format. $css – Content of the CSS file you want to make changes in. $html – content of the webpage. |
| Return: | $exclude_css – exclude CSS from optimization. |
function W3SpeedsterExcludeCssFilter($exclude_css,$css_obj,$css,$html){
		if(strpos($css,'style.css') !== false){
			$exclude_css = 1 ;
		}
	return $exclude_css;
}
W3speedster Customize Force Lazyload Css
| Function: | w3SpeedsterCustomizeForceLazyCss. |
|---|---|
| Description: | If you wish to Force Lazyload CSS files dynamically for a specific page or pages, you can do so with the W3Speedster, it allows you to dynamically force lazyload stylesheet files (for instance font file like awesome, dashicons and css files). |
| Parameter: | $force_lazyload_css – Array containing text to force lazyload which you have mentioned in the plugin configuration. |
| Return: | $force_lazyload_css – Array containing text to force lazyload. |
function w3SpeedsterCustomizeForceLazyCss($force_lazyload_css){
   array_push($force_lazyload_css ,'/fire-css');
   return $force_lazyload_css;
}
W3speedster External Javascript Customize
| Function: | W3SpeedsterExternalJavascriptCustomize |
|---|---|
| Description: | If you want to make changes in your external JavaScript tags, W3Speedster allows you to make changes in external JavaScript tags. |
| Parameter: | $script_obj – Script in object format. $script – Content of the JS file you want to make changes in |
| Return: | $script_obj – Make changes in Js files from an external source. |
function W3SpeedsterExternalJavascriptCustomize($script_obj, $script){
if(strpos($script,'//text//') !== false){
	$script = str_replace(' ',' ',$script)
}
return $script_obj;
}
W3speedster External Javascript Filter
| Function: | W3SpeedsterExternalJavascriptFilter |
|---|---|
| Description: | If you want to dynamically exclude a JavaScript file or inline script from optimization, W3Speedster allows you to exclude it from optimization (like revslider). |
| Parameter: | $exclude_js – 0(default) || 1 $script_obj – Script in object format. $script – Content of the JS file you want to make changes in. $html – content of the webpage. |
| Return: | $exclude_js – exclude JS from optimization. |
function W3SpeedsterExternalJavascriptFilter($exclude_js,$script_obj,$script,$html){
	if(wp_is_mobile()){
		if(strpos($script,'jquery-core-js') !== false || strpos($script,'/revslider/') !== false){
			$exclude_js = 1 ;
		}
	}
	return $exclude_js;
}
W3speedster Customize Script Object
| Function: | W3SpeedsterCustomizeScriptObject |
|---|---|
| Description: | W3Speedster allows you to customize script objects while minifying and combining scripts. |
| Parameter: | $script_obj- Script in object format. $script- Content of the JS file you want to make changes in |
| Return: | $script_obj– Make changes in Js files. |
function W3SpeedsterCustomizeScriptObject($script_obj, $script){
// your code
return $script_obj;
}
W3speedster Exclude Internal Js W3 Changes
| Function: | W3SpeedsterExcludeInternalJsW3Changes |
|---|---|
| Description: | Our plugin makes changes in JavaScript files for optimization, if you do not want to make any changes in JavaScript file, W3Speedster allows you to exclude JavaScript files from the plugin to make any changes. |
| Parameter: | $path- path of your script tags url $string – JavaScript files content. $exclude_from_w3_changes = 0(default) || 1 |
| Return: | 1 – Exclude the JS file from making any changes. 0 – It will not exclude the JS file from making any changes. |
function W3SpeedsterExcludeInternalJsW3Changes($exclude_from_w3_changes,$string,$path){
   if(strpos($path,'//js path//') !== false){
	$exclude_from_w3_changes = 1;
   }
   return $exclude_from_w3_changes;
}
W3speedster Exclude Page Optimization
| Function: | W3SpeedsterExcludePageOptimization |
|---|---|
| Description: | W3Speedster allows you to exclude the pages from the Optimization. if you wish to exclude your pages from optimization. (like cart/login pages). |
| Parameter: | $html = Page viewsources content. $exclude_page_optimization = 0(default) || 1 |
| Return: | 1 – it will exclude the page from optimization. 0 – it will not exclude the page from optimization. |
function W3SpeedsterExcludePageOptimization($html,$exclude_page_optimization){
   if(!empty($_REQUEST['//Path//'])){
	$exclude_page_optimization = 1;
   }
   return $exclude_page_optimization;
}
W3speedster Customize Critical Css File Name
| Function: | W3SpeedsterCustomizeCriticalCssFileName |
|---|---|
| Description: | If you wish to make any changes in Critical CSS filename, W3Speedster allows you to change in critical CSS file names. W3Speedster creates file names for critical CSS files but if you wish to change the name according to your preference this function will help. |
| Parameter: | $file_name – File name of the critical css. |
| Return: | $file_name – New name of the critical css file. |
function W3SpeedsterCustomizeCriticalCssFileName($file_name){
$file_name = str_replace(' ',' ',$file_name);
	return $file_name;
}
Enable Core Web Vitals Logs
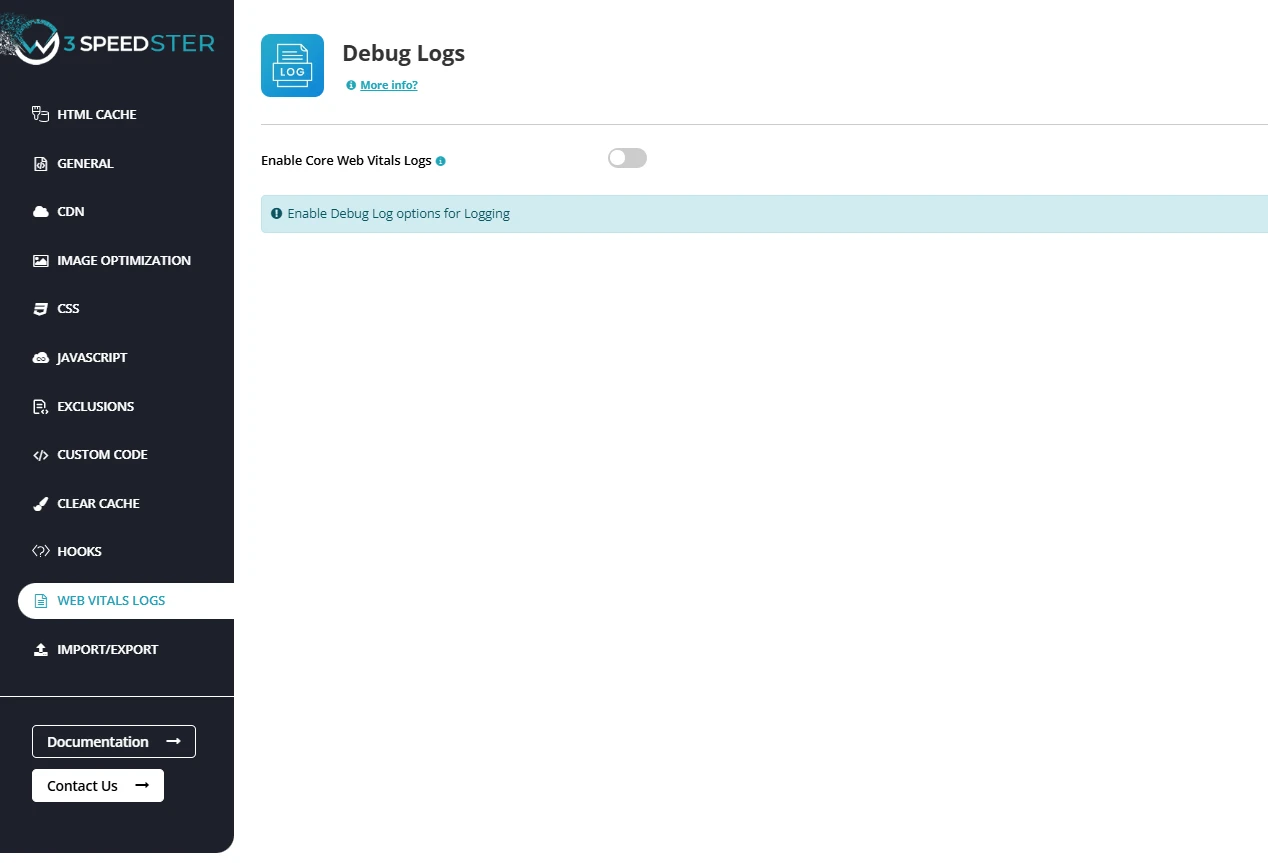
Feature:
The “Enable Core Web Vitals Logs” feature in W3Speedster activates real-time tracking of critical user experience metrics, including:
- Largest Contentful Paint (LCP): Measures page loading performance.
- First Input Delay (FID): Measures interactivity responsiveness.
- Cumulative Layout Shift (CLS): Measures visual stability and layout shifts.
These logs provide developers with valuable insights into how real users experience the site and highlight performance bottlenecks.
Why We Need It
- Performance Auditing: Diagnoses slow loading, input delays, and layout instability issues.
- Data-Driven Decisions: Supplies concrete data for prioritizing frontend optimizations and refactoring.
- SEO and UX Compliance: Supports Google’s Core Web Vitals ranking factors, improving search visibility and user retention.
- Continuous Monitoring: Enables tracking of performance trends over time rather than relying on one-time tests.
Problems Without Logging
- Lack of Insight: No visibility into which aspects fail performance standards.
- Missed Optimization Opportunities: Minor but impactful layout shifts or input delays remain unnoticed.
- Debugging Difficulty: Harder to identify root causes of performance issues without historical logs.
W3Speedster’s Solution
- Real-Time Metric Tracking: Captures LCP, FID, and CLS from real user interactions and synthetic tests.
- Structured Log Format: Stores logs with timestamps, URLs, and detailed context for effective analysis.
- Diagnostic Value: Helps distinguish whether issues stem from frontend resources (JavaScript, CSS, images) or server-side delays (TTFB, resource blocking).
- Iterative Optimization: Validates the impact of changes—e.g., improvements after deferring scripts or fixing layout shifts.
Summary
Activating Core Web Vitals Logs in W3Speedster empowers developers with actionable data critical to maintaining and improving site performance. This feature transforms raw performance metrics into strategic insights essential for delivering fast, responsive, and visually stable user experiences on any PHP-powered website.
Import / Export
Import Settings
Feature:
The Import Settings feature in W3Speedster enables developers to quickly apply predefined performance configurations by importing a JSON-formatted settings file. This functionality is especially beneficial for managing multiple environments or deploying consistent optimization practices.
Why We Need It
- Consistency Across Sites: Ensures uniform performance configurations across development, staging, and production environments.
- Time Efficiency: Eliminates the need for manual reconfiguration on every new or cloned project.
- Error Minimization: Prevents misconfigurations by reducing the chance of overlooking critical options.
- Rapid Deployment: Accelerates site setup during new launches, rebuilds, or environment synchronization.
Problems Without This Feature
- Manual Rework: Repeating configuration steps (caching, deferring, exclusions, etc.) wastes valuable time.
- Inconsistency: Risk of performance discrepancies due to missing or inconsistent settings across different sites.
- Deployment Delays: Longer project onboarding and delivery timelines caused by repetitive optimization setup.
W3Speedster’s Solution
- Simple JSON Import: Users paste or upload a previously exported JSON file into the import interface.
- Instant Configuration Sync: Applies all performance settings—HTML cache, JS/CSS deferral, lazy loading, resource exclusions, and more—in one action.
- Multi-Site & Cross-Project Compatibility: Ideal for agencies, freelancers, or developers managing multiple client websites or recurring projects.
- Safe Overwrite Logic: Imports only configuration data without affecting existing content, theme, or plugin files.
Summary
The Import Settings feature in W3Speedster significantly improves workflow scalability by enabling developers to replicate performance best practices efficiently and reliably. Whether managing multiple WordPress sites or custom PHP applications, this functionality ensures consistency, reduces setup time, and supports error-free optimization deployment across all environments.
Export Settings
Feature:
The Export Settings functionality in W3Speedster allows developers and site administrators to save their complete performance optimization configuration as a structured JSON file. This export acts as a reliable backup or a transferable configuration package—ideal for environment synchronization, migration, or collaborative development workflows.
Why We Need It
- Configuration Backup: Preserves all customized optimization settings for quick recovery in case of system failure or plugin reset.
- Quick Setup Replication: Facilitates seamless application of the same configuration across staging, testing, and production environments.
- Team Collaboration: Enables distributed teams to standardize and share optimization strategies efficiently.
- Disaster Recovery: Safeguards against data loss during reinstallation, migration, or accidental configuration changes.
Problems Without This Feature
- No Backup for Custom Settings: Risk of complete configuration loss if the plugin is removed or the site is compromised.
- Inconsistent Optimization: Difficulty maintaining identical settings across multiple sites, leading to performance variations.
- Time-Consuming Setup: Manual reconfiguration increases setup time and likelihood of misconfigurations.
W3Speedster’s Solution
- Structured JSON Export: Outputs a comprehensive snapshot of all active performance settings, including:
- HTML caching rules
- JavaScript and CSS minification
- Lazy loading configuration
- Preload and exclusion rules
- Compression and deferral strategies
- Portable Configuration: The exported JSON can be:
- Saved locally for archival
- Stored in version control systems
- Shared with team members or clients for consistency
- Seamless Reimport: Easily re-imported into the same or another PHP-based site using W3Speedster’s Import Settings functionality for continuity.
Summary
The Export Settings feature in W3Speedster ensures configuration reliability, project scalability, and workflow efficiency. It provides developers with a practical way to back up, replicate, and share optimization presets across environments or teams. This capability is vital for maintaining performance consistency and operational agility in multi-site PHP development ecosystems.
Change Logs
Feature:
The Change Logs functionality in W3Speedster provides a detailed audit trail of all configuration changes made within the plugin. It tracks which user performed what action, along with timestamps, ensuring complete transparency and accountability over optimization settings.
Why We Need It
- Accountability: Tracks individual user actions, helping teams identify who made specific changes.
- Audit History: Maintains a chronological log of all configuration updates, reversals, or resets.
- Error Tracing: Helps pinpoint the source of performance issues caused by misconfiguration.
- Team Collaboration: Facilitates multi-user workflows by providing visibility into each contributor’s activities.
- Security Monitoring: Detects unauthorized or unexpected changes that could impact performance or stability.
How It Works in W3Speedster
- Automated Logging: Every time a user saves, updates, or resets a configuration within the W3Speedster dashboard, an entry is automatically recorded.
- Detailed Entries:
- User identification (username or user ID)
- Type of action (e.g., enabled minification, disabled cache)
- Date and time stamp
- Affected setting(s)
- Accessible Interface: View logs directly from the W3Speedster dashboard under the “Change Logs” section for quick reference.
Benefits
- Improves transparency for developers and site owners.
- Speeds up troubleshooting by allowing rollback to prior configurations based on tracked changes.
- Enhances team workflows, especially in multi-admin environments.
- Increases trust by providing visibility into all modifications made in the optimization settings.
How to Access
- Navigate to the W3Speedster Dashboard admin.
- Click on the “Change Logs” tab or section.
- Browse the chronological list of actions, filter by date or user, and review detailed activity logs.
Best Practices
- Review logs periodically to ensure no unauthorized or accidental changes have been made.
- Use logs during debugging to correlate changes with performance regressions or improvements.
- Maintain least-privilege access—only allow trusted users to modify plugin settings.
Summary
The Change Logs feature in W3Speedster acts as a real-time audit system, ensuring every action is recorded and reviewable. It empowers teams with visibility, supports debugging workflows, and enforces accountability across optimization efforts—critical for maintaining long-term performance and operational integrity.
![]()