Installation Process of W3speedster Magento Extension
Unzip the Magento archive you have and start the installation process of the Magento extension by uploading the complete extension folder using FileZilla Software. Make sure your uploaded folder must go in the /root/app/code.
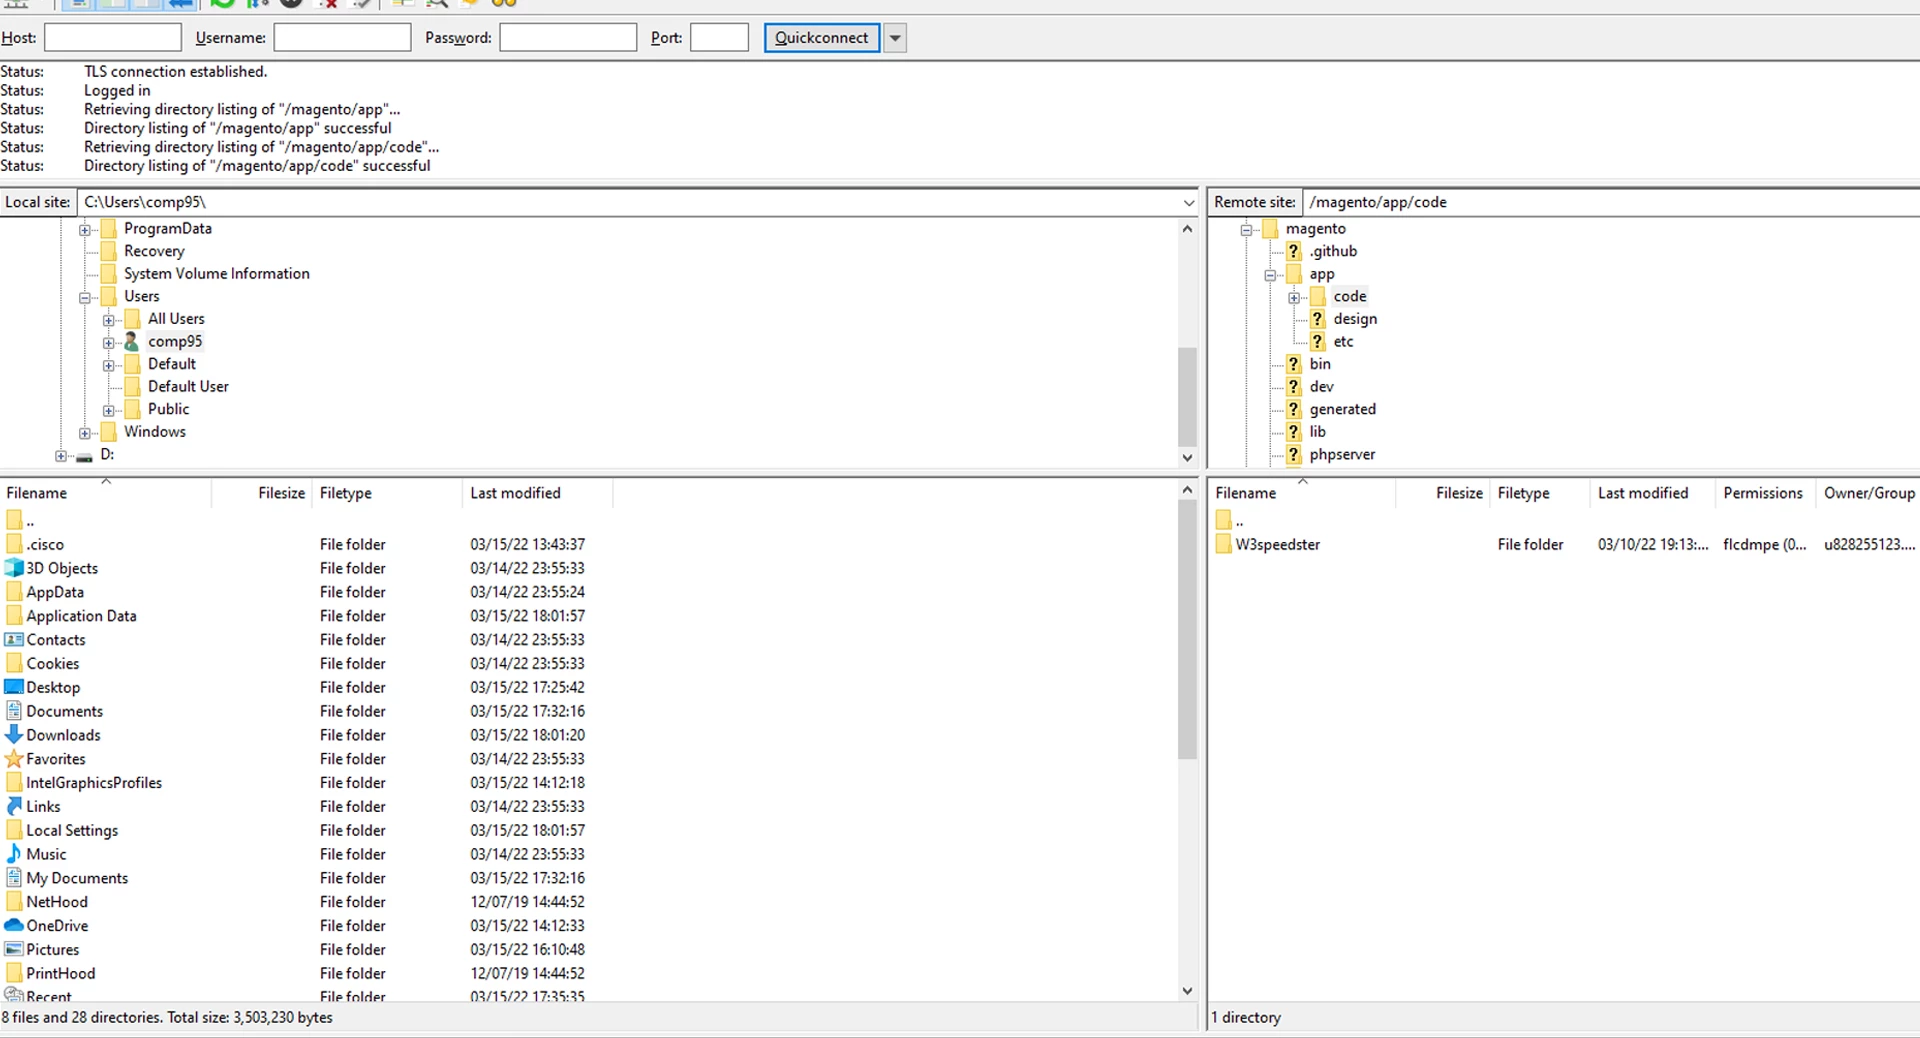
Once you upload your Magento extension, you’ll now have to run the below commands through the terminal in the extension root directory.
php bin/magento setup:upgrade
php bin/magento setup:di:compile
php bin/magento setup:static-content:deploy -f
php bin/magento cache:clean
php bin/magento cache:flush
Now you are ready to enjoy your licensed w3speedster Magento extension.
Follow the extension settings using our guide:
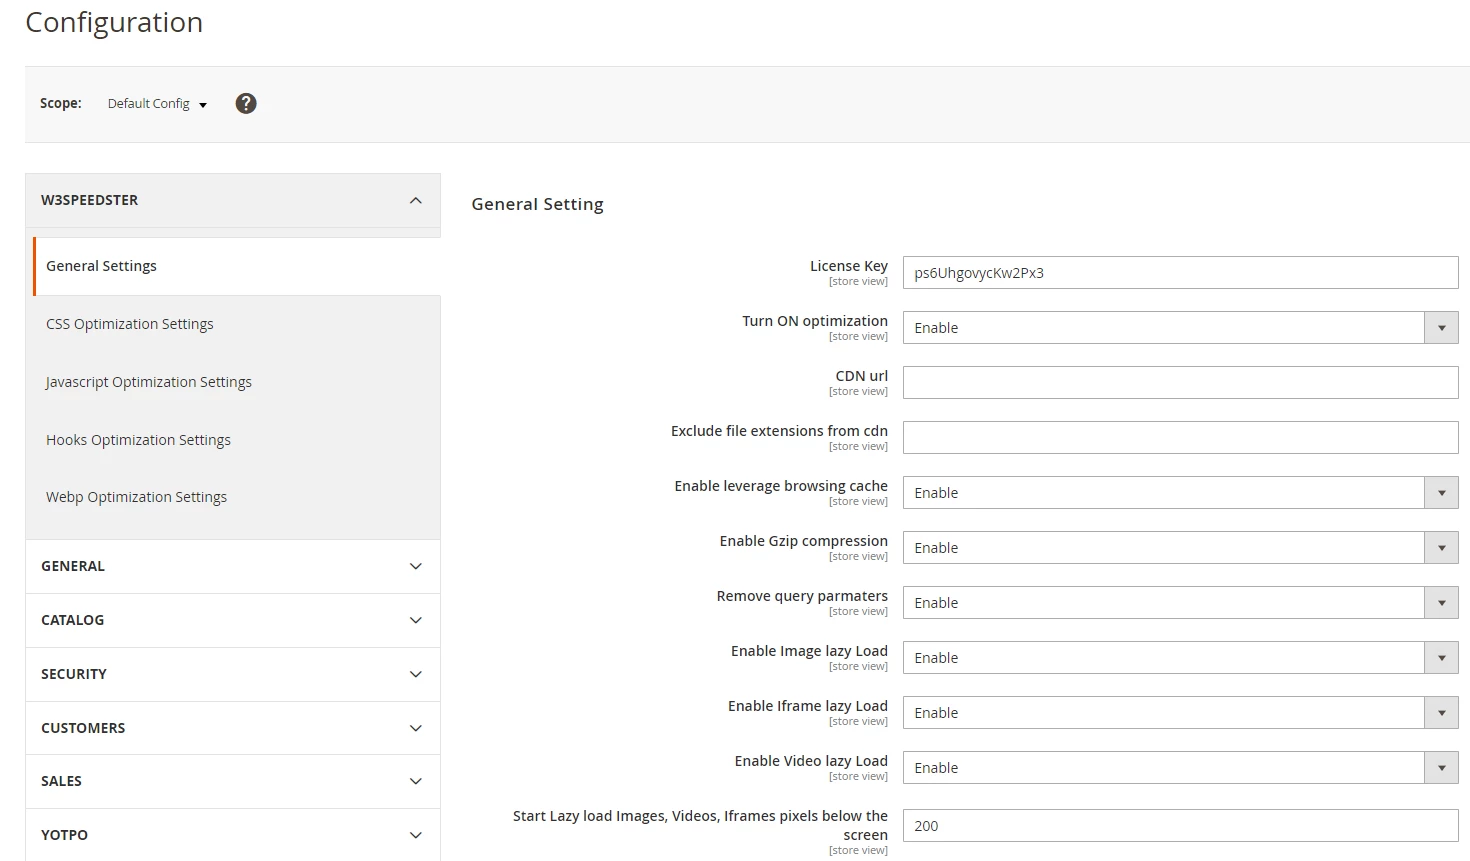
General Settings
1. LICENSE KEY:-
Your unique License Key is auto-generated when your W3speedster Magento extension order is successfully completed. Your unique code of your License key will be added with the “Order completed” email notification sent to you by us, immediately after your order.
Each License Key data is generated per product configuration and the license key is mandatory to insert to validate your licensed plugin access.
2. TURN ON OPTIMIZATION:-
Among several other tasks, the W3speedster Magento extension performs a range of tasks on your site. It enables the JS & CSS Minification, Gzip Compression, Generates Critical CSS, Allows Lazy Loading & more.
In order to enable all given optimization features, all you need to do is enable Turn On Optimization. However, you can also individually adjust each field (i.e. JS, CSS) by changing the respective field setting.
3. CDN URL:-
Enter the CDN URL you’ve bought for your Magento site.
4. EXCLUDE FILE EXTENSIONS FROM CDN:-
Once you’ve implemented CDN, you can also exclude a few extensions from CDN so that your Magento extension doesn’t affect in terms of performance. For instance, excluding ‘Font Extensions’ like (.woff, .ttf, .eot, .woff2).
5. ENABLE LEVERAGE BROWSING CACHE:-
The extension offers you the functionality to leverage browser cache on your site. Browser cache helps in retrieving files from the cache when visitor revisits your site instead of downloading all the files again. This makes the loading faster than last visits.
Thus, our extension has an in-built response to the leverage cache, which it automatically implements in your site.
6. ENABLE GZIP COMPRESSION:-
Our extension also provides smart automatic functionality to enable Gzip Compression on your site, it automatically implements in your site. It will work only on the Apache server.
7. REMOVE QUERY PARAMETERS:-
Our extension has automatic functionality to remove Query Parameters from CSS & JS on your site. You can either enable or disable it.
8. ENABLE LAZY LOAD:-
The W3Speedster Magento extension allows you to lazy load basically different forms of content specifically delaying the site loading time. Our extension will help lazy load the Images, Iframe, and Videos on your site.
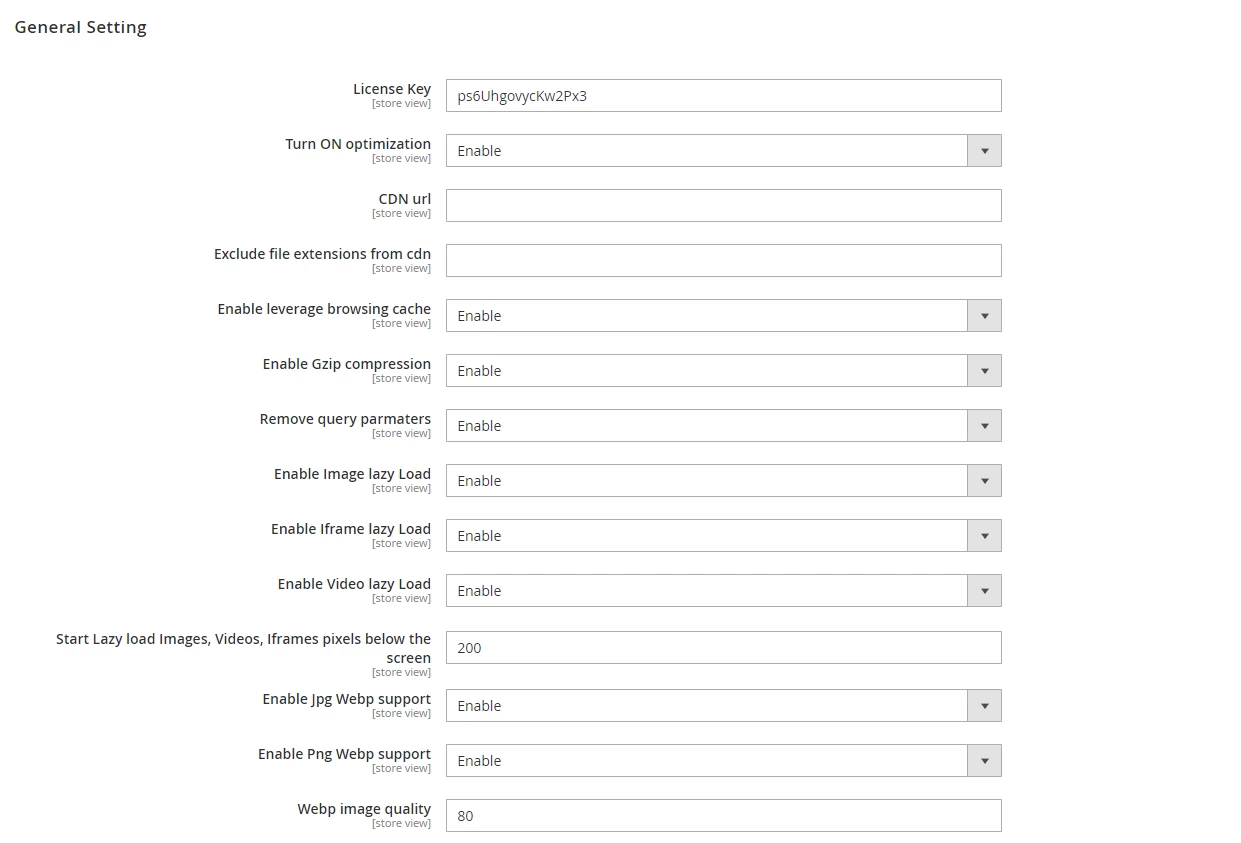
9. START LAZY LOAD IMAGES, VIDEOS, & IFRAMES PIXELS BELOW THE SCREEN:-
The W3speedster extension keeps a standard 200 px quality intact and unscrewed. Making lazy-loaded images will allow images to load only when they will come in viewpoint or interaction, that means as soon as users scroll down the page. Thus, it reduces the off-screen loading.
10. ENABLE JPG WEBP SUPPORT:-
The extension converts the image formats (.jpg & .png) into WebP format.
11. ENABLE PNG WEBP SUPPORT:-
Enable this feature to convert your png images into WebP image format.
12. WEBP IMAGE QUALITY:-
The W3speedster Magento extension keeps a standard 90% quality to keep the quality of your images intact and unscrewed. However, you can change it according to your suitability.
13. OPTIMIZE JPG/PNG IMAGES:-
The W3Speedster extension can optimize different formats of images including .jpg & .png.
14. JPG & .PNG IMAGE QUALITY:-
The W3Speedster extension keeps a standard 90% quality to keep the quality of your images intact and unscrewed. However, you can change it according to your suitability.
15. OPTIMIZE IMAGES ON THE GO:-
The W3speedster extension is highly advanced that whenever you open a page on your site, it captures the unconverted and unoptimized images and then optimizes them in the background. This ensures that images that are used on the site are optimized first. However, it is recommended to disable this feature after a couple of days.
16. AUTOMATICALLY OPTIMIZE IMAGES ON UPLOAD:-
Whenever you upload media the W3speedster extension automatically optimizes and converts the image formats into WebP format. The individual setting to optimize the images and convert them to WebP should also be enabled.
17. PRELOAD RESOURCES:-
If you wish to preload any resources like images, CSS, JS, and fonts all you need to do is simply put your complete resource URL in the ‘Preload Resources Section’ and it will preload. Simple as it sounds. Enter each URL in a separate line.
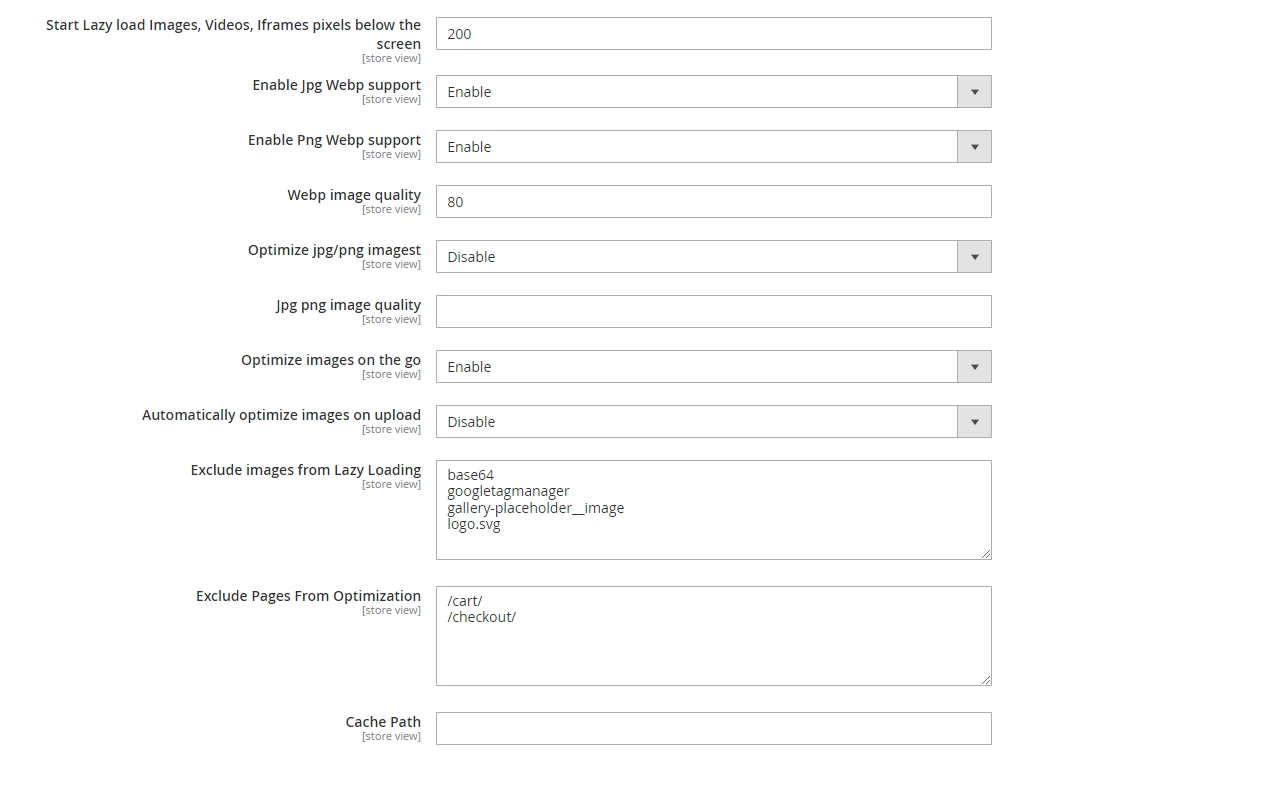
18. EXCLUDE IMAGES FROM LAZY LOADING:-
The images you don’t want to lazy load can be excluded here. All you need to do is simply exclude those particular images by putting the image URL, class name, Id, alt attribute, etc (eg: xyz.png, nolazy).
19. EXCLUDE PAGES FROM OPTIMIZATION:-
For the pages you do not wish to optimize, all you need to do is simply exclude those particular pages by putting the page URL (eg:/cart, /login).
20. CACHE PATH:-
The cache of the W3speedster extension is automatically generated inside the cache folder of the WP Content folder. If you wish to change the path you can change it by putting the full path in this section.
CSS Optimization
1. Enable CSS MINIFICATION:-
Within your extension, you’ll also get a feature to enable CSS Minification. This will help you minify your CSS.
2. LOAD CRITICAL CSS:-
The w3speedster extension generates critical CSS and loads in the .css file.
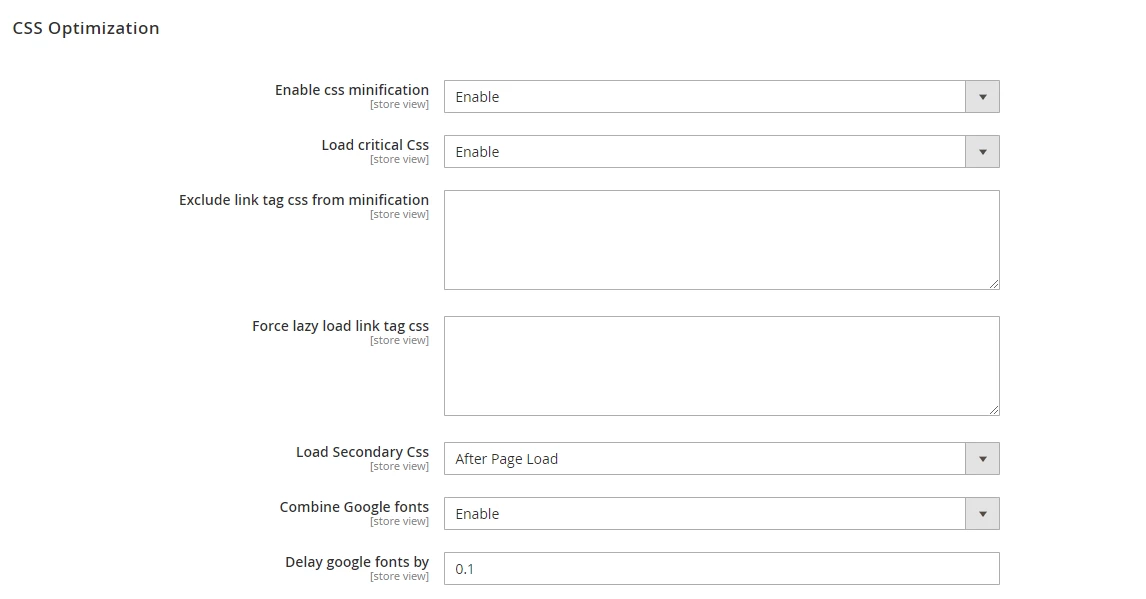
3. EXCLUDE LINK TAG CSS FROM MINIFICATION:-
With the W3Speedster extension you can easily exclude CSS files for all the pages you do not wish to minify by putting CSS URL (eg: xyz.css) in a separate section.
4. FORCE LAZYLOAD LINK TAG CSS:-
For all the files that consume excessive data, you can easily force lazy load them with the help of the W3Speedster extension. For instance, (FontAwesome.CSS or Icon’s CSS).
5. LOAD SECONDARY CSS:-
Apart from critical CSS, the w3speedster extension loads all minified CSS after page load.
6. DELAY SECONDARY CSS BY:-
The W3speedster extension loads all minified CSS after 5 to 10 seconds or on user interaction.

7. COMBINE GOOGLE FONTS BY:-
The W3speedster extension helps you load & combine all google fonts which are loaded on your site.
8. DELAY GOOGLE FONTS BY:-
This section allows you to lazy load Google fonts by entering the seconds you want to delay the google font load.
9. EXCLUDE PAGE FROM LOAD COMBINED CSS:-
With this feature, you can exclude CSS optimization from specific pages you don’t want to optimize by entering the URL or part of the URL. Make sure to enter each URL or part of the URL in a separate line.
10. CUSTOM CSS TO LOAD WITH PRELOAD CSS:-
If you wish to preload any CSS, add in this section without a style tag.
JavaScript Optimization:
1. ENABLE JS MINIFICATION:-
JavaScript minification is the process of removing all the unnecessary characters from JS source code.
With w3speedster, you can minify JS by enabling this box.
2. EXCLUDE JAVASCRIPT TAGS FROM COMBINE:-
With the W3Speedster extension, you can easily exclude JS files for all the pages you do not wish to Lazy Load and JS Minify by putting JS URL (eg: xyz.js) in the pertaining section.
3. JavaScript defer:
JavaScript deferring helps in JavaScript execution until the page loads. Our W3speedster extension can allow you to defer JS.
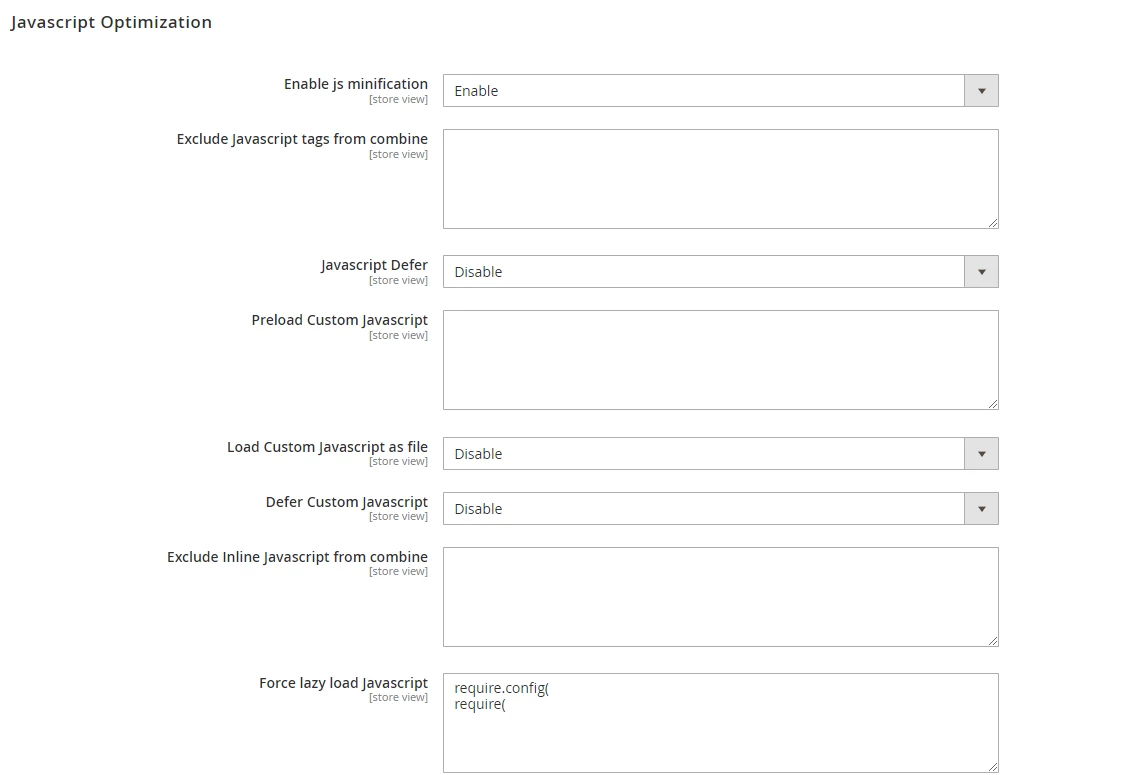
4. PRELOAD CUSTOM JAVASCRIPT:-
If you wish to preload any JavaScript, add in this section without a script tag.
5. Load Custom JavaScript as file:
You can load custom JavaScript as a file with the help of the w3speedster extension.
6. Defer Custom JavaScript:
Here you can also disable or enable deferring of the custom JavaScript.
7. EXCLUDE INLINE JAVASCRIPT FROM COMBINE:-
This section allows you to add the script or part of the script URL for excluding it from optimization. If you wish to add defer attribute then add defer after a space.
For e.g., “jquery.min.js defer”. If you wish to not minify it then add full after a space. For eg. “jquery.min.js full”.
8. FORCE LAZY LOAD JAVASCRIPT:-
Put the specific word from the inline script tag, script URL, or part of the script URL to force lazy load JavaScript which takes a lot of time to load (E.g., Facebook/Instagram) and reduces the score.
9. LOAD COMBINED JAVASCRIPT:-
Load the minified and combined JS on page load or after page load. Use after page load to score better on google page speed insights or other speed tools. However, please use the ‘after page load’ option very carefully.
10. DELAY INTERNAL JAVASCRIPT TAGS BY:-
Enter the seconds in the box if you want to delay the load of combined and minified JavaScript. Make sure you’ve selected ‘after page load’ in ‘Load combined JavaScript’.
11. Delay External JavaScript tags by:
Just like internal JavaScript, you can delay external JavaScript by a few seconds that you want to enter.
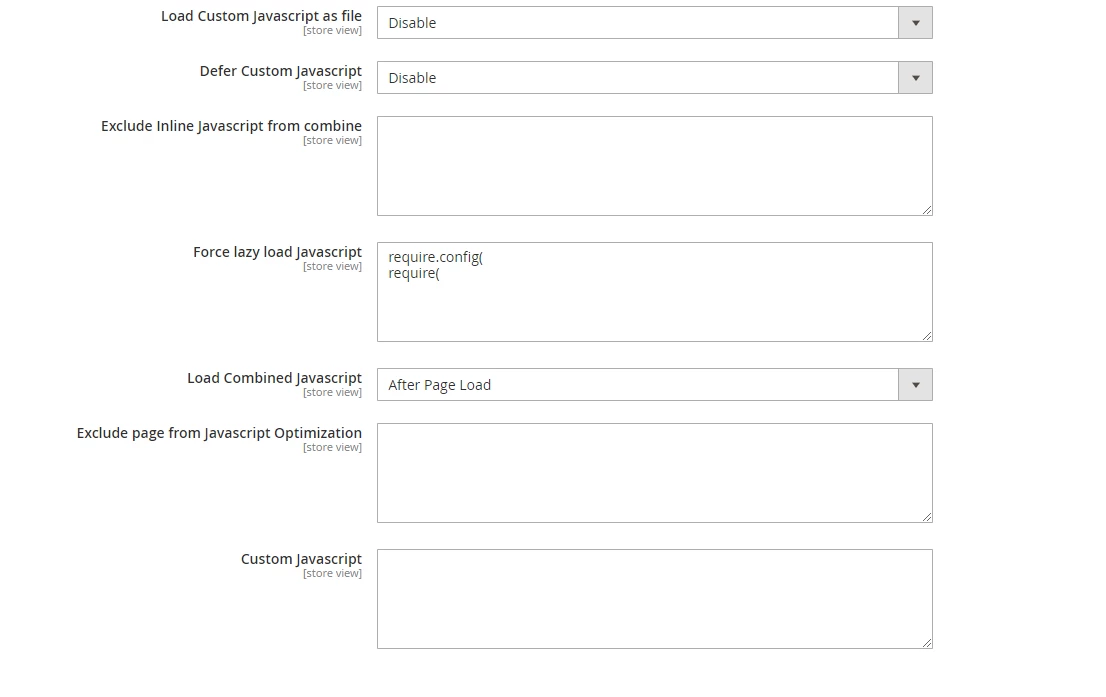
12. EXCLUDE PAGE FROM JAVASCRIPT OPTIMIZATION:-
With the W3Speedster extension, you can easily exclude pages from JavaScript optimization that you do not wish to lazy load or minify. Simply put the page script URL or part of the script URL in a separate line.
13. CUSTOM JAVASCRIPT:-
If you wish to load any script tag JavaScript, add in this section without script tag which loads after page loads or on user interaction.
Hooks Optimization Settings
W3speedster before start optimization:
To make changes in the page view source before optimization, you can use this w3speedster extension hook and write your code here in the box.
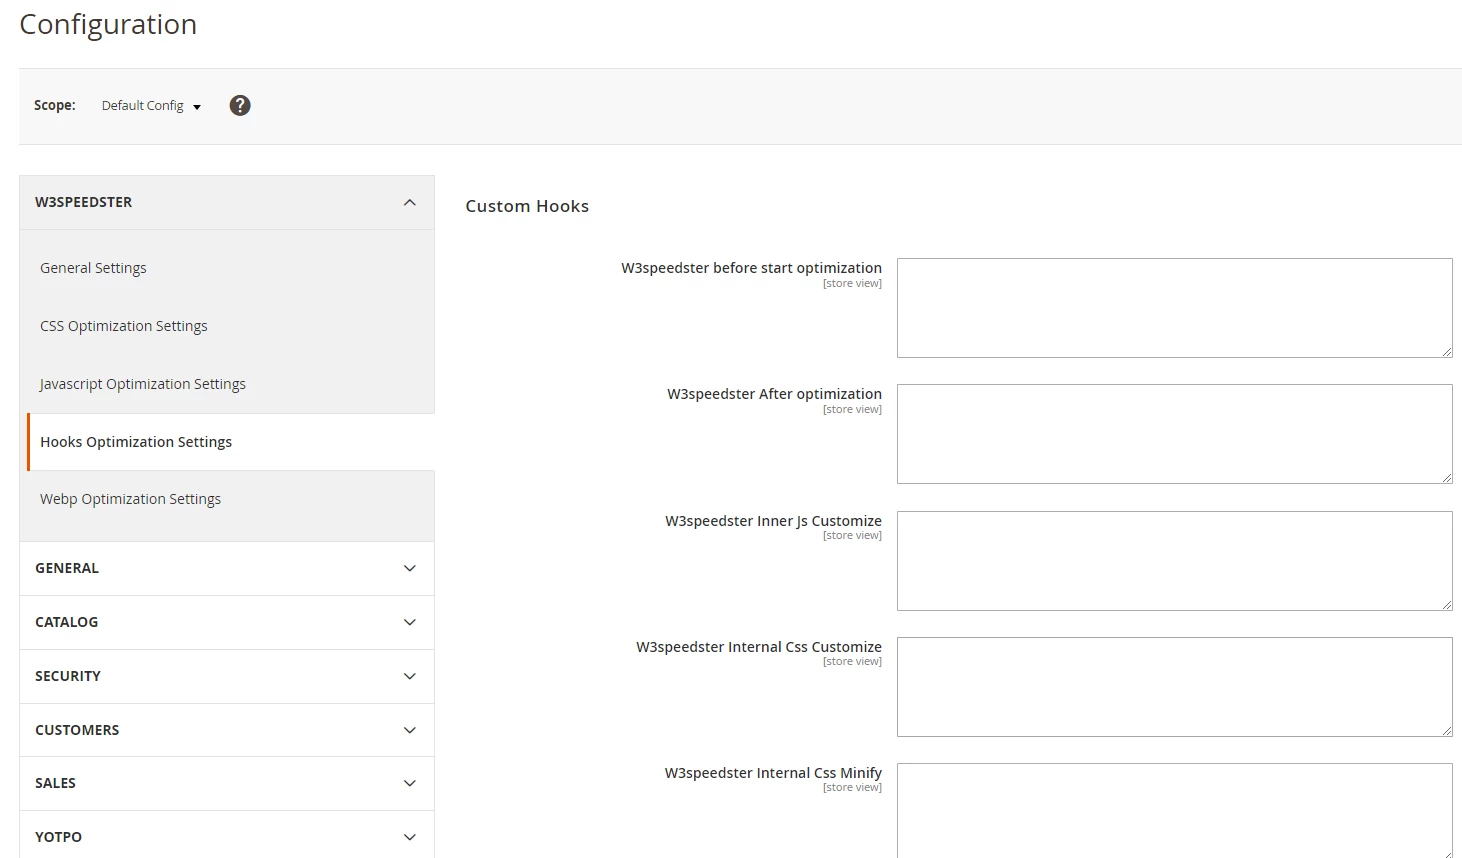
W3speedster after optimization:
W3Speedster allows you to make changes in the page view source of your site after optimization. Simply write your code in the W3speedster After Optimization box.
All the changes you’ve done here will stay permanent.
W3speedster Inner Js Customize:
If you want to make changes in your inline JavaScript, W3Speedster allows you to make changes in Inline JavaScript. Add the code in the given box and make changes in the script tag and get modifications in the sources related to the script.
if(strpos($html,'//unique word from script//') !== false){
$html = str_replace('','',$html);
}
W3speedster Internal CSS Customize:
If you want to make changes in your CSS file, W3Speedster allows you to make changes in stylesheet files.
if(strpos($path,'style.css') !== false){

$html = str_replace('$( window ).load( function()','$(document).ready(function()',$html);
}
W3speedster Internal CSS Minify:
If you don’t want to minify, W3Speedster allows you to exclude stylesheet files from minification. You can add the following code:
if(strpos($path,'//cssPath//') !== false){
return false;
}
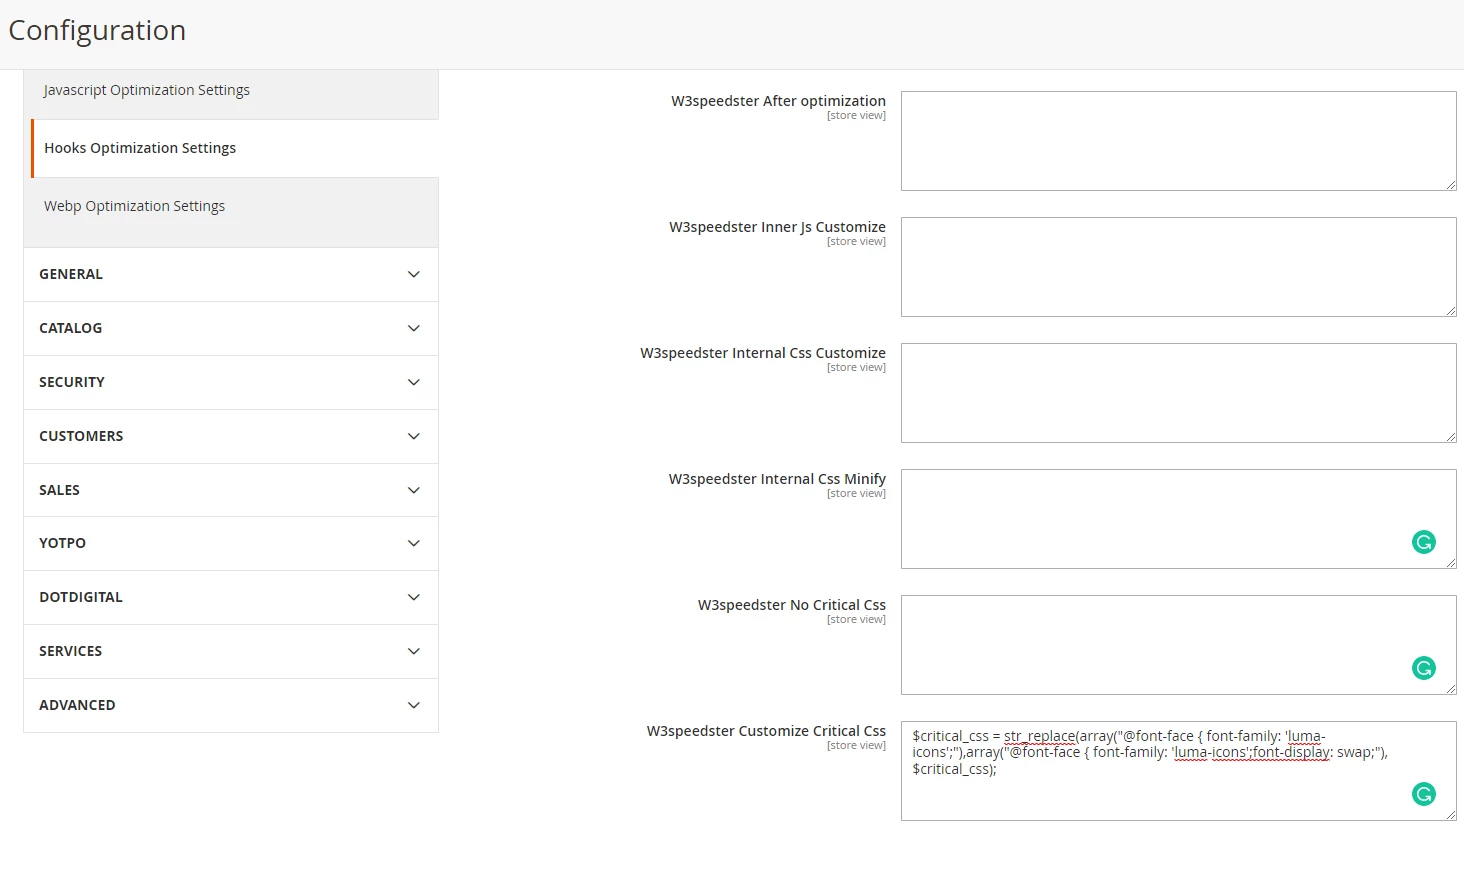
W3speedster No Critical CSS:
If you want to exclude specific pages from creating critical CSS, you can use this extension hook. Use your custom code here.
function w3_no_critical_css($url){
if (strpos($url,'/fierce-look/') !== false) {
return true;
}
}
W3speedster Customize Critical CSS:
If you wish to make any changes in the Critical CSS filename, W3Speedster allows you to change critical CSS file names. You can add the following code:
$critical_css = str_replace(array("@font-face { font-family: 'luma-icons';"),
array("@font-face { font-family: 'luma-icons';font-display: swap;"), $critical_css);
Work with us at No Risk.
We guarantee to speed ster WordPress in the given timeframe. You will get a 100% refund if you are not satisfied with our work So, what are you waiting for?
Need Proof of Our Work?
Just Click on the button and it will take you to the client’s review page.
![]()