 Christmas Mega Sale – Enjoy Up to 50% OFF on Every Plan!
Introduction
When you see your Google PageSpeed Insights score stuck in the red or orange zone, it is frustrating. You tweak things, run the test again, and still, no green. That score isn’t just a number. It decides how people see your site, how Google ranks you, and how many visitors stick around. The good news? You can push that score to 90 or even higher without paying anything to anyone.
You will be surprised how small changes can lead to big wins when you use W3Speedster, even with the free version.
In this step-by-step guide, we will break down every setting that leads to a green score. You will feel the difference, and so will your visitors.
So, let’s start with understanding how much speed affects everything for your site and why a slow page feels broken, whereas a fast one feels right.
Why Your WordPress Site’s Page Speed Matters?
Faster site = more views, more actions, more sales, more love from Google. Everything else you do, content, ads, SEO, works better when your site responds instantly. Here is how it also passes Google Sitespeed test with 90+ scores:
- Fast Feels Trustworthy
People trust what feels smooth, and if your site loads like lightning, users assume your business is solid. Whereas if it lags, they question your entire operation without even knowing why.
- Speed Shapes Memory
Visitors remember how your site made them feel, not what they read. A fast site feels effortless, so your brand sticks in their brain as simple, helpful, and worth coming back to.
- Every Delay Is an Unspoken “No”
When your page stalls, users do not get mad; they drift and their attention walks away silently. Therefore, speed is the only element that keeps them locked in without them even realizing it.
- Speed is Invisible Design
You can spend hours perfecting layout, colors, and fonts, but if your site takes 4 seconds to load, users never see it. You already know speed is the first design choice they experience.
- Fast Sites Are Shared More
People do not share slow things, as no one wants to look bad by linking to something that lags. A fast WordPress site earns more shares, more mentions, and more reach all organically.
The above was just some of the reasons why an ideal page load time matters (under 2 seconds). All this talk about speed is great, but how do you know where your site stands right now? Let’s learn how you can check pagespeed and other performance metrics using Google PSI.
How to Use PageSpeed Insights Tool?
Before fixing anything, you need a clear picture of what is working and what is dragging you down to score 90+ on the PageSpeed Insights tool. That’s where the Google PageSpeed Insights test comes in, as it tells exactly what is slowing your site and what to fix first.
Start by visiting PageSpeed Insights and entering your full website URL. Click “Analyze,” and the tool will evaluate your site for both mobile and desktop devices. These results are separate because performance often varies—mobile scores tend to be lower due to slower networks and devices.
Now, you will get performance scores between 0 and 100, and below that, you will find detailed sections of:
| Feature | What It Does | Why It Matters |
| Performance Score | Shows overall loading performance | Helps you track your site’s speed |
| Core Web Vitals | Key Google ranking metrics | Direct SEO impact |
| Opportunities | Suggestions to improve loading time | Optimize user experience |
| Diagnostics | Deep dive into tech issues | Fix hidden slowdown problems |
| Mobile/Desktop Tabs | Compare performance on different devices | Optimize both versions separately |
You can start by fixing the items in the Opportunities section, as they often bring the biggest performance gains with minimal effort. Each suggestion comes with an estimated time savings and a clickable dropdown for in-depth information and related resources. Here are some typical suggestions:
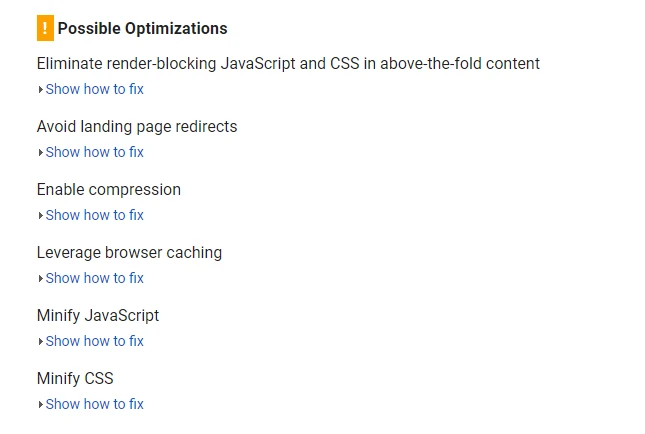
Now, in the next section, I will walk you through the top WordPress pagespeed insights optimization techniques to help you score a 90+ on the PageSpeed Insights tool.
How to Achieve 90+ Scores on Google PageSpeed Insights?
PageSpeed Insights is a free, powerful tool to analyze your website speed. To score 90+, many users rely on the W3Speedster plugin for WordPress.
If you are in a hurry, here is the dedicated video to understand everything.
And for those whose eyes are on text, not on tape, start by installing it through your WordPress admin panel. After checkout, you will receive the download link via email.
Log in to WordPress, go to Plugins > Add New > Upload Plugin, select the file, then click Install Now and Activate. Once activated, you’ll see W3Speedster in the menu. Click it to open the plugin dashboard.
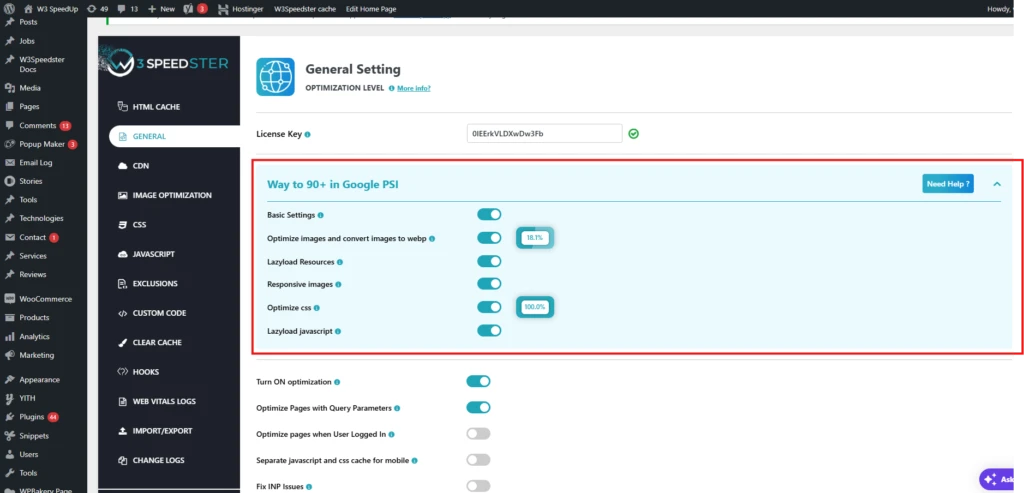
Next, click the second menu option named “General’, where the optimization settings appear on the right. If you’re on the free version, skip the license key. Paid users should enter their key and click Activate Key.
Now that your setup is complete, scroll to the section titled ‘Way to 90+ in Google PSI.’ Click it, and six powerful optimization options will appear to help your site achieve top scores in PageSpeed Insights with ease.
1. Basic Settings:
Turn this on to optimize your WordPress site speed with HTML Cache and query parameters. This option will also activate the ‘Turn ON optimization’ setting and take you one step closer to your faster-loading website.
Do you want to know what impact this option will make on your platform, then we have got you covered.
(For easy navigation, we have listed all the benefits below using the exact same names as they appear in the plugin settings.)
- HTML Cache:
W3Speedster optimizes WordPress speed by caching static HTML, serving pages via .htaccess or PHP, and supporting GET parameters, mobile-specific cache, and logged-in user caching.
It auto-refreshes cache on updates, preloads pages at intervals, enables GZIP compression and browser caching, removes query strings from CSS and JavaScript files to minimize server load, and sets cache expiry and custom cache paths.
All of this will be enabled when you switch on the basic settings. This setting will enhance speed, reduce server load, and boost SEO across all devices.
- Turn ON optimization:
To fully activate our tool, make sure this switch is turned ON. This will help you enable all optimization features, including CSS/JS minification, lazy loading, and advanced performance tweaks, everything it offers to score 90+ on Google Page Speed metrics.
- Optimize Pages with Query Parameters
If someone opens a special link with extra stuff like ?nocache=1, they will normally see the old, slow version of your page. But when you turn basic settings ON, W3Speedster makes sure even those links show the fast, optimized version.
2. Optimize Images and Convert Images to WebP:
It is time to head over to one of the most important WordPress performance optimizations: image optimization. These visual creatures are usually the heaviest part of your site. If you do not optimize them, they slow everything down.
Now, see what WebP will do to make your pages load faster and boost your Core Web Vitals in no time:
- Optimize JPG/PNG Image
With this, your JPG and PNG files will be compressed and cleaned up as a result. It is a well-known fact that big images take longer to load and that is where optimizing them makes them smaller in size and faster without affecting their quality.
- Convert to Webp:
The plugin will save a WebP copy of all your JPG and PNG images and show it to the users. As you know, WebP images are much lighter in size (not in quality), which is why they also load faster.
- Optimize Images via wp-cron:
W3Speedster uses WP-Cron to compress or convert images (e.g., to WebP) at regular intervals (one by one) in the background. Just because of this smart scheduling approach, your site will be able to manage server load and prevent performance bottlenecks.
- Optimize Images on The Go:
When someone visits a page on your site, W3Speedster also gets back to work and detects if there is any unoptimized image. If it finds, then it instantly compresses and converts these images in the background to ensure faster loading times for future visitors.
Attention: Before initiating the essential CSS generation, ensure that the image optimization is 100% finished.
3. Lazyload Resources
Now, turn this option on if you are actually serious about getting a solid 90+ on the Google Sitespeed test. This function will help your site delay the loading of images, iframes, videos, and audio. Lazy loading means these elements will not load until a user comes across them. In other words, if your website loads everything at once, it will lead to an increase in server load, which is not good.
So, when you lazy load, you skip loading things that are not visible until needed.
This WordPress performance optimization setting helps reduce the initial page load time, lightens server load, and delivers a faster, smoother browsing experience.
4. Responsive Images
Now, turn this option on to allow W3Speedster to make all your site images appear in the exact size that visitors need.
As you know display of smartphones is small compared to desktops. So, there will be no point in using the exact same size of image for every device.
For example, if you show giant images on mobile devices, firstly, it will load slowly (big content takes more time, of course); and secondly, it will demand high data.
So, don’t think much and enable this setting to serve different image sizes depending on the user’s device (desktop, tablet, mobile) with super-fast load times and lower data usage.
5. Optimize CSS
Your website’s look and feel come from colors, fonts, and layout, and these all come from CSS files. But when these files get bulky, they slow everything down. Therefore, if you wish to reduce the burden, activate this feature.
Attention: Make sure that the image optimization is 100% completed before turning on this feature.
Now, let’s understand what it does to your site and why:
- Enable CSS Optimization
W3speedster will start compressing CSS files, clean up unused lines, and trim extra code to help your styles load faster. Do not worry, this thing will not break your site’s design.
- Combine Google Fonts
Our plugin will do this, so shave some extra seconds off your load time and help you achieve above 90 in PSI. You might not notice, but if your theme or plugins use multiple Google Fonts, each one makes a separate request. And that’s bad news for speed. But when you optimize css, you allow W3Speedster to combine all font calls into one, and lazy load the extras.
- Localize Google Fonts:
For successful css optimization, W3Speedster downloads Google fonts and saves them on your site server. This method is great for Faster Load Times & Performance as it eliminates the DNS lookup, TLS handshake, and potential network latency caused by external Google servers. This way, loading of your fonts becomes faster, so does loading of your webpages.
- Load Critical CSS
When you click on Optimize CSS, this enables the generation of critical css. If you don’t know what it is, then the top part of your site (the hero section or navigation) is what users see first and is known as critical CSS or “above the fold content.”
If your site only loads the CSS needed for the first part of the webpage, the content will appear faster to the users. This means your site loads faster and you improve your LCP scores. And don’t worry, the rest content will load in the background when the visitor scrolls near it.
- Load Critical CSS in Style Tag
The <style> tag in HTML allows you to use CSS to style your website.
Normally, CSS files load from external sources, which slows things down. However, when you turn on optimize css, W3Speedster puts the critical styles in the <style> tag, so that your browser can apply these styles instantly without having to wait to download anything.
- Create Critical CSS via wp-cron
When you switch on the css setting in our plugin, it creates critical CSS for your WordPress pages using something called WP-Cron.
Now, instead of generating critical CSS for all pages at once (which can slow down your server), WP-Cron spreads the task out gradually.
It works quietly in the background and creates the critical css for each page one by one to avoid overloading your server.
6. Lazy Load JavaScript:
This last setting will prove as a game-changer, and it will directly take you to 90+ Scores on Google PageSpeed Insights.
As you are aware, JavaScript is essential for your website because it allows your pages to be interactive through the use of buttons, pop-ups, forms, and sliders. However, loading too much JS at once can cause your website to slow down significantly.
But if you hit this button and make it on, it will do the following things to make your site super fast:
- Enable JavaScript Optimization
When you enable Lazy Load JS, W3Speedster gets to work by streamlining your JavaScript files. It cleans up the unnecessary clutter, removes extra spaces, and compresses the code. This process reduces file size so your scripts load quicker and boosts overall site speed.
- Lazy Load JavaScript
Lazy loading is the technique used to just load the most crucial content at once and delay the rest until it is absolutely necessary.
When you make the best decision of your life by switching it on, you sign up for improved Core Web Vitals (particularly First Input Delay). In other words, it speeds up the first load of your page and provides a seamless user experience.
So, that was all you needed to make your site achieve high Scores on Google PageSpeed Insights. Switch on the above-mentioned 6 buttons and you are good to go.
Final Words:
By implementing the W3Speedster optimizations, your site will not only achieve a 90+ score on Google PageSpeed Insights but also offer a faster, smoother experience for visitors. The best part? The tool is free to use, so why not give it a try? Instead of seeing your business suffer due to slow load times, optimize your site’s speed today and reap the benefits.
And if you want to score 100% on the Google PageSpeed test, then choose the pro plan, as it comes with full site critical css generation and complete site image optimization perks.
However, the W3Speedster free version also has some extra settings that you can try. For detailed information on those, you can refer to the plugin documentation.