 Christmas Mega Sale – Enjoy Up to 50% OFF on Every Plan!
Do you also blame big images or bad hosting for the fact that your website loads slowly? Think twice.
The actual offenders may be your unoptimized JavaScript and CSS files, since they cause rendering issues and user interaction delays.
But imagine if your site would load with a flip of the switch. That sounds great, huh? That’s what CSS and JavaScript performance optimization will do for your site.
And here in this blog, we are going to show you how to declutter, compact, and intelligently load your stylesheets using a free WordPress speed optimization plugin. After this, your website will not only get faster, but feel buttery smooth from initial click through to final scroll.
Let’s get started with the clever ways you can improve your CSS and JavaScript performance.
Why Optimizing JavaScript and CSS Is Important?
You have already got it figured out that optimization makes pages load faster. But the advantages do not stop at speed. When you perfectly optimize css and JS files, your site feels and performs silkier, and even gets you more conversions. Here are some commonly overlooked reasons why it is a necessity:
1. Relieves Browser Stress
When your code is bloated or cluttered, your visitors’ browser works overtime. It keeps redrawing the same elements over and over, wasting resources, and the battery runs down. But when your JS and CSS are optimized, all runs cooler, glossier, and more efficiently.
2. Helps with Responsiveness
Ever hit something on a page and uncomfortably waited for it to do something? That is heavy JavaScript, slowing things down. Once you have optimized your scripts, your page responds like lightning and keeps users happy with the speedy, smooth experience they demand.
3. Prevents Memory Overload
Unused, unnecessary code takes up too much browser memory and slows your site down or, worse, causes it to crash. If this is also the case with you, tidying up scripts will help to keep your site light and stable.
4. Accelerates Third-Party Tools
Your website most likely has widgets such as live chat, advertising, or analytics running on it. But if your own script is too resource-intensive, it brings those down, too. Optimizing your base scripts means those third-party items run smoother, too.
How to Optimize CSS and JavaScript for Free on WordPress?
Most sites are plagued by bloated JavaScript and overwhelming CSS rules. But the silver lining? You do not have to be a coder to tidy things up. With a few powerful tweaks using W3Speedster, you can strip away the clutter, load only what is necessary, and build a lightning-fast site that users adore.
But first, install the free version of the WordPress Speed Optimization plugin through the link you have received in the email after the checkout process.
Now, log in to the WordPress admin panel, navigate to Plugins > Add New, and click Upload Plugin. Select the downloaded file, click install now, and hit activate.
As of now, you will be able to see W3speedster in the WordPress admin panel, click on that to open the plugin menu, and find all the optimization settings right in front of your eyes.
Finally, let’s dive into the meat of the matter, I mean, your step-by-step guide to optimizing CSS and JavaScript.
1. CSS Optimization:
When you optimize css, it leads to improved Core Web Vitals like FCP and LCP, which further helps SEO and makes your site faster and more efficient.
As you can see, the option for CSS, don’t wait for extra seconds, just hit this to start working with the settings lined up in here.
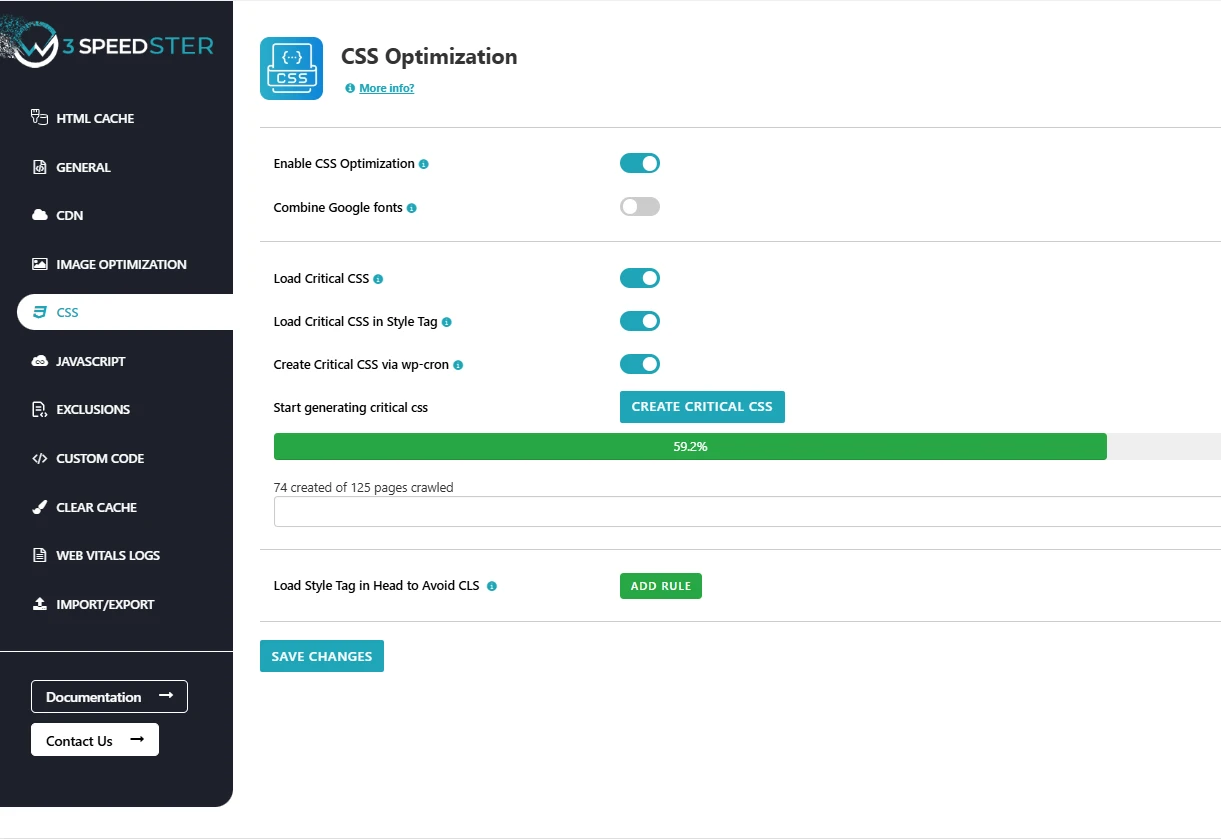
- Enable CSS Optimization
You need to turn this on to unlock the full power of CSS performance optimization. For this, go to your W3Speedster settings, find the CSS Optimization option, and turn it ON.
This step is like flipping the master switch; without it, nothing else will work. You won’t get minification, critical CSS, or any improvement in loading speed. So, if you want to make your site faster, smoother, and better for your users, start right here.
- Combine Google Fonts
Now, look for Combine Google Fonts under the CSS Optimization section. Enable the toggle button to merge and lazy load all the fonts used on your site. When you load Google Fonts, fewer requests are generated. Even better, it lazyloads fonts you do not need right away. The result is that your site gets faster without losing its style.
And if you still want a font to show upfront, you can do that too by adding its CSS manually or preloading it in the preload resources under the exclusion tab.
- Load Critical CSS
For this, scroll down to Load Critical CSS and turn it ON to make your page load smartly. It tells your site to load only what is important first. So, rather than loading all of the styles for the entire page at once, you can load only the CSS required for the above-the-fold content. This makes your site appear faster because users can see and interact with something immediately
That way, you can give users a smooth experience right from the start. Means you won’t waste their time, and you won’t lose their attention (that is a win for your site).
- Load Critical CSS in the Style Tag
You can use this option to place your critical CSS directly inside a style tag. The <style> tag defines CSS directly within an HTML document, usually in the <head> section.
Loading crucial CSS in the <style> tag improves page load times by applying key styles instantly. This reduces render-blocking and prevents the flash of unstyled content (FOUC). This CSS optimization technique will enhance performance and user experience.
- Create Critical CSS via WP-Cron
Here, things get smarter because when you enable the power of WP-Cron. Unaware of what it is? It is a WordPress scheduling tool called WP-Cron that performs tasks like posting content or monitoring for updates at predetermined intervals.
Creating Critical CSS via this optimizes page load times by generating and updating critical CSS in the background without affecting user experience. It does this efficiently by creating CSS in chunks based on your server’s schedule to prevent overload, even with hundreds of pages. In other words, you will get faster performance without putting pressure on your hosting.
- Start Generating Critical CSS
Clicking this button starts the real magic, as now the plugin will crawl your entire site, create CSS that matters most, even if you have a massive site, this feature handles it on its own, and you do not have to do anything else.
In the free version of W3speedster, you will get critical CSS for the home page only. But with the Pro version, there is no limit. You can cover your entire site with optimized CSS and never worry about speed again.
- CSS Exclusions:
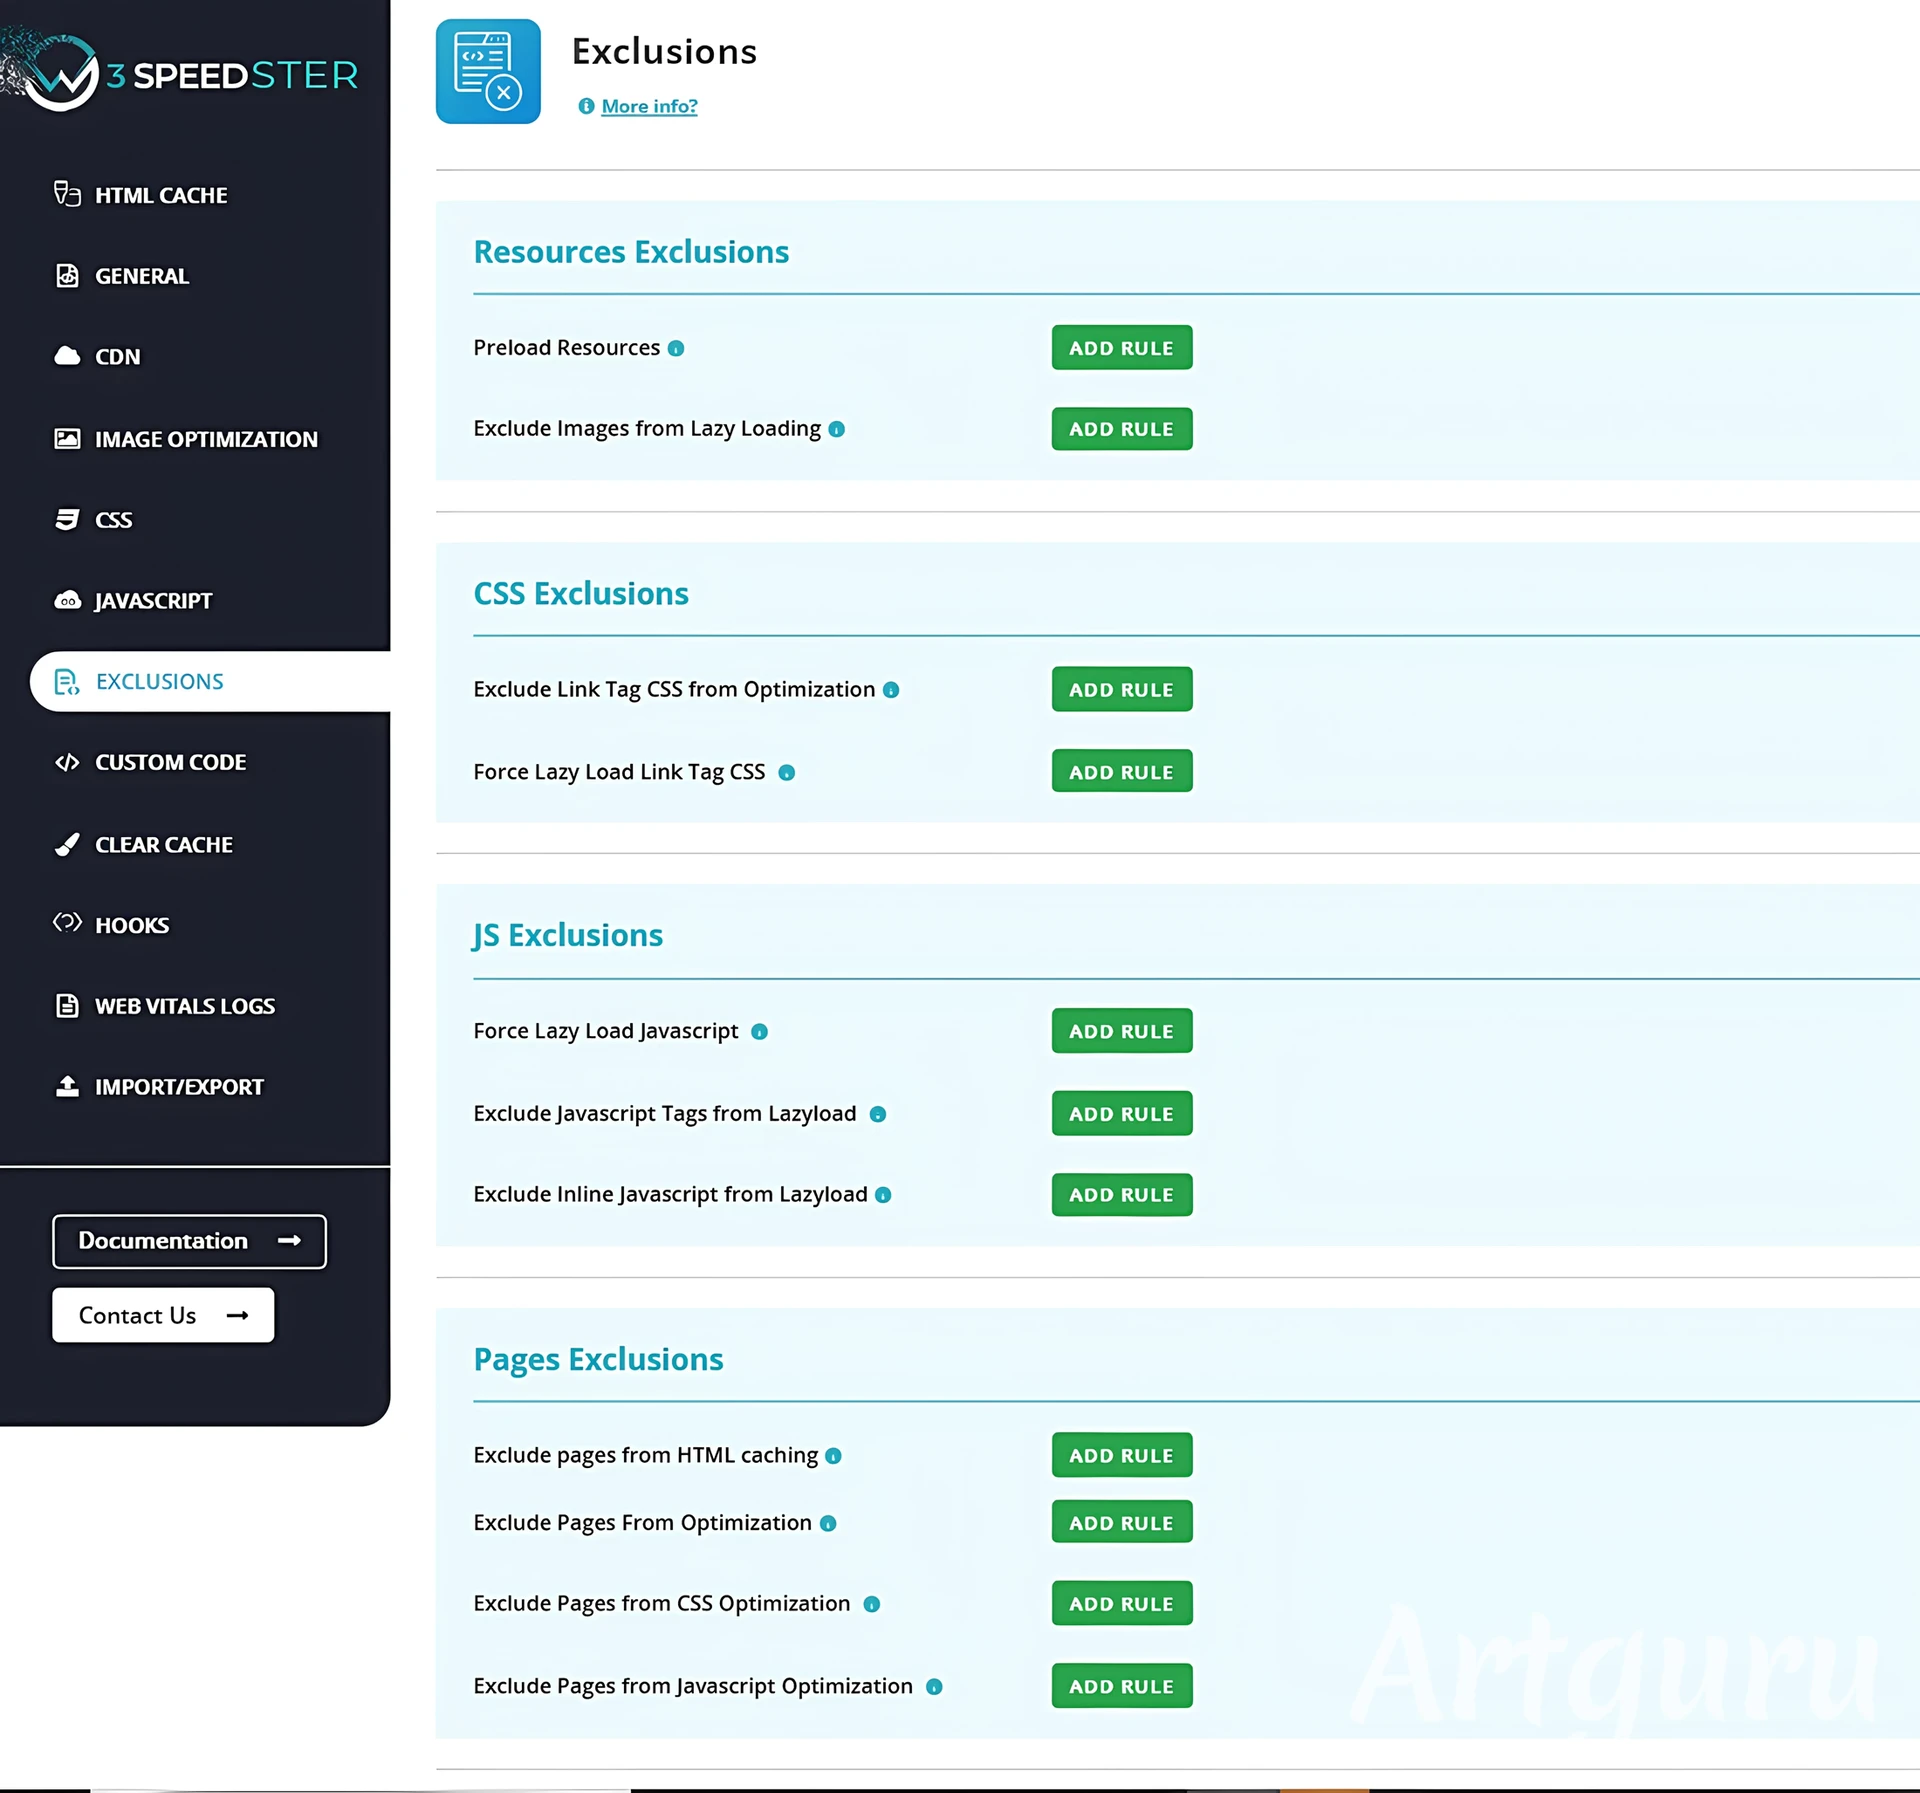
Now, in the exclusions menu, you will find the second option named CSS Exclusions. Click on that one. You can see two options pop up; here is how they can help you in CSS performance optimization:
1. Exclude Link Tag CSS from Optimization
This option is a handy feature that lets you skip certain CSS files from being optimized, like minifying, combining, or deferring them. This is especially useful when a plugin or theme’s CSS gets broken due to over-optimization.
For this, simply copy a part of the CSS file’s URL (for example, plugin-name/style.css), hit Add Rule, and paste it into the input field. This tells the system to leave that CSS file untouched.
2. Force Lazy Load Link Tag CSS
This option now delays the loading of unimportant CSS files unless the user interacts with the website. It is perfect for styles like footers, popups, or chat widgets.
For this, you just need to click Add Rule and enter part of the CSS file’s URL there. This will help speed up your site’s initial load and boost FCP and LCP scores.
Now that the CSS settings are done, we can peacefully move forward to optimize JS.
2. JavaScript Optimization:
Most websites load a lot of JavaScript files, and many of them are not even needed right away. This slows down your site and makes users wait. But with W3Speedster, you can clean up the mess and make your site faster without touching any code.
Here’s how you can do it step by step and why each option is important.
- First, log in to your WordPress dashboard.
- Now, click on W3Speedster from the left menu.
- You will see a list of features. Find the JavaScript Optimization section.
Here you will find all the options that help you fix and speed up your site’s scripts. Now, let’s walk through each setting and see how it helps your site.
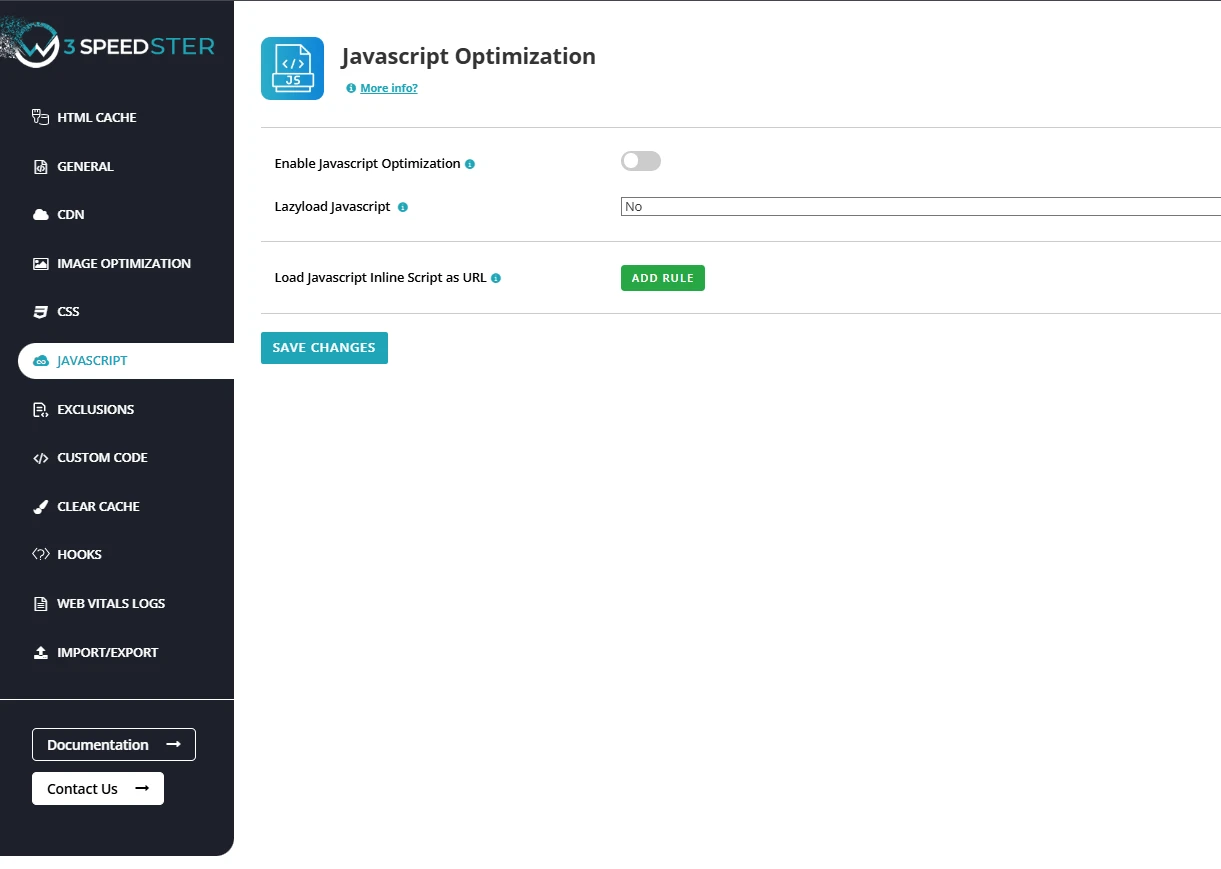
- Enable JavaScript Optimization
Now, it’s time to turn this ON to optimize JavaScript files. Through this main switch, you are allowing the W3sppedster plugin to start compressing and cleaning up JavaScript files.
This removes extra spaces, cuts down file size, and loads things faster.
So, your users will get a quicker and smoother experience the second they visit your site.
- Lazy Load JavaScript:
This feature is quite useful in enabling JS lazy loading. With it, you can load the important parts first, like the content and layout, and load the rest only when needed.
In other words, you can make your site use its power to load what the user needs first and handle the rest quietly in the background.
In this manner, users can view your page instantly, and your site will be lighter and faster. Plus, it will help you raise your Core Web Vitals scores, which is crucial for higher SEO rankings.
So, for this setting, just select Yes and turn it ON to load everything, but only when it is truly needed.
- Load JavaScript Inline Script as URL
Sometimes, inline JavaScript code gets too large and slows down your website. The best way to fix this is by moving that script into a separate .js file. This setting does exactly that by creating and loading that ‘new file’ along with other resources.
So, you just need to click ‘add rule’ and paste a unique bit of inline JS code. However, make sure to enter each in a new line.
With this JS optimization technique, you can save your page from loading heavy inline scripts and, as a result, from slowing down. This keeps your HTML cleaner, improves page speed, and makes the script easier to manage, update, and cache.
- JavaScript Exclusions:
Now, head over to the Exclusions menu and spot the third option called JS Exclusions, yes, hit that button. Once you do, three cool options will pop up. Here is how you can use these to support your JavaScript performance optimization efforts:
1. Force Lazy Load JavaScript
This patch delays executing certain JavaScript until the user interacts with the page, such as scrolling or clicking. It is perfect for non-essential scripts such as animations and social widgets.
To apply it, just click Add Rule and paste a unique bit of inline JS code (such as initSlider() or fbq(‘init’)). This improves page load efficiency and boosts your Time to Interactive (TTI) score.
2. Exclude JavaScript Tags from Lazyload
This setup ensures that some external JavaScript files are preloaded instead of being lazy-loaded. Use it on non-critical scripts that need to be present during the first page load, i.e., navigation, sliders, or security scripts.
Just click Add Rule and paste a segment of the URL of the JavaScript file (e.g., main.js or jquery.min.js) in there. It prevents lag and gets key features running in no time.
3. Exclude Inline JavaScript from Lazyload
With this configuration, you can stop inline JavaScript from being deferred, so it runs the moment the page loads. It is best for scripts that manage things like menu toggles or form validation, which need to be present immediately.
For this, click Add Rule and type in a unique part of the inline code (like a function name). This way, you will be able to keep major interactions smooth and functional from the beginning.
Final Words:
So, that was it from our part, now it’s your turn to download and set W3Speedster to active mode to speed up your WordPress website. The best thing you get with this plugin is that it works without writing a single line of code. And if you ever want to unlock even more features, consider upgrading to the Pro version for full-site Critical CSS and beyond.
Remember, a fast website is now a necessity, and with W3Speedster, you have already got the toolkit to make it happen.